Facebook 1

Showing posts with label Valentine's Day. Show all posts

Saturday, February 20, 2016

Red velvet cookies and cream muddy buddies

I was late to the muddy buddy party.  By decades.  Then the other day, while assembling goodies for my sister as part of a post-surgery recuperation package, I stumbled across cookies and cream muddy buddies. And I bought them. And proceeded to eat nearly a third of the bag on my subway ride home (and then toss the remainder of the bag in the nearest garbage can. Self control is clearly not my strong point.). Needless to say, I was hooked.


Lately the shelves have been stocked with fun and interesting flavored Oreos (case in point: cinnamon bun, red velvet, "filled cupcake"), and in my post-Valentine's day brain, I started thinking up muddy buddy flavors of my own.  Like red velvet cookies and cream!  Conveniently, I had purchased packages of all three new (techniically red velvet was available last year, seasonally) flavors, but had only cracked open the cinnamon bun ones to try (they're delicious, and I'm already working on a recipe for those!).  I had originally planned to dip the red velvet ones in white chocolate for Valentine's Day, but lost track of time, and so they were just sitting around.


These buddy buddies are delicious!  I loved the red velvet flavor mixed with the cream cheese flavor (from the filling) and the hint of vanilla from the coating.  Absolute perfection!  At least I won't have to worry too much about self control, since I will be shipping (most) of these off to work with B tomorrow!

Red Velvet Cookies & Cream Muddy Buddies
Adapted from this recipe

Ingredients:

6 cups chex cereal (I used corn)
12 oz white almond bark (I used white vanilla CandiQuik)
20 Red Velvet Oreos
1/2 cup powdered sugar (I ended up needing a little more)

Directions:

Put cereal in a large bowl.

Process the Oreos in a food processor until fine (my preferred method) or place in a sealed ziplock bag and crush with a rolling pin.

Melt CandiQuik (or almond bark) in it's tray (or a microwave safe bowl) and microwave in 30 second increments.
Stir.
Continue microwaving and stirring every 30 seconds until completely melted.

Pour melted CandiQuik/almond bark over cereal.
Stir carefully to coat it.

Immediately add the ground Oreos.
Toss/Stir to coat.
Next, toss on the powdered sugar and mix until coated.

I placed mine on a wax paper lined baking sheet so that the CandiQuik could dry.
I felt mine needed a little more powdered sugar, to I added 1 Tbsp at a time until all of the muddy buddies were coated in powdered sugar.

Sunday, February 14, 2016

Valentine's Rice Krispie Treat Sticks

The toasted marshmallow Rice Krispie treats I made a few months ago almost instantly became my most favorite Rice Krispie treat ever.  I've made them a bunch of times since (although I've spared you, except for this one time, since it would be so repetitive to tell you "I made these super awesome Rice Krispie treats.....again!"), but this time I decided to dress them up for Valentine's Day.  And since my mom's birthday is the day before and B's mom will be in town for the weekend, I decided I'd bring them along to my mom's birthday dinner, along with her favorite brownies.


Instead of cutting them into the regular square or stubby rectangle shape, I cut them into long skinny Rice Krispie treat sticks, and then dipped them into some white chocolate and some festive Valentine's sprinkles for a cute and tasty treat!


Toasted Marshmallow Rice Krispie Treat Sticks

Ingredients:

1/4 cup unsalted butter
1 10.5 oz bag of mini marshmallows (for some reason all the bags I've been finding lately have been 10 oz)
5-6 cups Rice Krispies cereal

White chocolate chips (or milk or semisweet or dark -- your choice) -- about 1 cup
Sprinkles, of your choosing

Directions:

Grease a 9x9 inch pan lightly with cookie spray.

Melt the butter in a large pot over medium-low heat.
Continue cooking butter, swirling pan until it becomes a nice brown color (it should take about 5 minutes)
Remove from the heat and set aside.

Turn the oven on to broil.

Line a baking sheet with parchment paper.
Evenly spread the marshmallows onto the lined sheet.
Place the marshmallows under the broiler for 45 seconds to 1 minute, until the marshmallow are puffed and deeply golden.
WATCH THEM CLOSELY, as they can burn very quickly!

Lightly grease a rubber spatula with cooking spray.
Immediately scrape the marshmallows into the bowl/pot with butter.
Stir to combine quickly.
Pour the Rice Krispies into the toasted marshmallow mixture.
Stir to combine.

Press evenly into the prepared pan.

Allow to cool before cutting into sticks.

Line a baking sheet with wax paper.

Place chocolate in a microwave safe bowl.
Microwave in 30 second intervals, stirring in between, to make sure that chocolate doesn't burn.

Dip sticks halfway into the chocolate.
Lift sticks and let excess chocolate drip off back into the bowl.
Place onto the prepared sheet and quickly place the sprinkles on the wet chocolate.
Allow to cool.

Friday, February 13, 2015

Mini meringues

Confession: these are totally a copycat.  I stole the idea from a bakery I was in a few weeks ago, where, when buying a marzipan challah, which I will never -- despite how badly I'd love to -- be able to bake, I saw a bag of mini tri-colored meringues for sale.  They were Valentine's-y colors and so cute....and had a pretty hefty price tag on them for what they were...so I decided I'd bake some up myself for B and I for Valentine's Day.


I actually decided to make these easy on myself (crazy, I know, right?), and despite deciding to make something in three different colors, I figured I could slowly add the food coloring to the meringues in two steps, to get gradations of color.  Pretty sneaky -- and efficient -- right?


I've made meringues hundreds of times.  They're a go-to Passover recipe in our family.  But I always forget the proportions of sugar to egg white to cream of tartar to salt to vanilla, so I googled it and found this recipe.  If you have a go-to meringue recipe that you use, go ahead and use that one, and just jump on in at the point when I talk about food coloring and piping.

Check out just how mini they are!
These are next to a regular Valentine's conversation heart!!

Tri Colored Valentine's Day Mini Meringues
Adapted from this recipe

Ingredients:

3 egg whites
1 1/2 tsp clear or regular vanilla extract (or any other flavor you'd like -- I debated strawberry for my pink ones)
1/4 tsp cream of tartar
"dash" of salt
2/3 cups sugar

red food coloring

Directions:

Place egg whites in a small bowl.
Let stand at room temperature for 30 minutes.

Line a baking sheet with parchment paper.

Preheat the oven to 250F.
Add vanilla, cream of tartar, egg whites, and salt to the bowl of a stand mixer.
Beat on medium speed until foamy.
Gradually add sugar, 1 Tablespoon at a time.
Beat on high after each addition until sugar is dissolved.
Continue beating until stiff glossy peaks form, about 7 minutes.

Place a small star or decorative piping tip on a piping bag (I used a Wilton 22).
Add about 1/3 of the mixture to the piping bag.
Pipe mini meringues onto the prepared baking sheet, about 1-1.5" apart.

Once done piping the white meringues, add a few drops of red food coloring to the remaining mixture.
Beat until color is incorporated and the desired pink color has been reached.
Remove 1/2 of the mixture and repeat the piping process.

Once done piping the pink meringues, add a few drops of red food coloring to the remaining mixture.
Beat until color is incorporated and keep adding drops until the desired red color has been reached.
Add the remaining red mixture to a piping bag and repeat the piping process.

Bake for 40-45 minutes or until firm to the touch (my mini ones took 25 minutes).
Turn off oven (do not open oven door).
Leave meringues in the oven for 1 hour.
Remove from the oven and allow to cool completely on baking sheets.

Once cool, remove meringues from the baking sheet.
Store in an airtight container at room temperature.

FYI I got 450 -- yup, four hundred and fifty -- mini meringues!!

Red velvet Rice Krispie treat sandwiches

As soon as I saw these, I knew I had to make them for Valentine's Day.  They combine some of my favorite flavors -- all in one!


But, I'm always honest with you guys, so I feel like I need to come clean right away.  These use cake mix.  You know that boxed stuff, where you add eggs, oil, and water, and bake a cake?  Yeah, well thats in these.  But they're so good I decided to turn a blind eye to my boxed cake mix aversion (except for cake balls....I use it for those), and let you in on this tasty little secret!


See, you simply use a little extra butter when melting the marshmallows, and then you add some red velvet cake mix to the mixture before adding the rice krispies.  It's as simple as that!  And then once they're cooled, you cut the slab in half, cover half of it with some sweetened cream cheese, and then cover them with the other half of the Rice Krispie treats.  And then you cut them into squares.  They're really a deliciously sweet treat!

Red Velvet Cake Rice Krispie Treat Sandwiches
From Cookies & Cups
I adapted it ever so slightly (my changes are in italics)

Ingredients:

1/4 cup butter (4 Tbsp)
1 10 oz bag of marshmallows (10.5 oz bag of mini marshmallows)
1/3 cup dry red velvet cake mix
6 cups Rice Krispies cereal (I used 4.5 cups before I couldn't mix them anymore, and I wanted them all to be coated in the gooey red velvet marshmallow mixture...if you can add more, go for it)

1/2 cup butter or cream cheese, room temperature (I used cream cheese)
2 cups powdered sugar

White chocolate chips, for decoration (optional)

Directions:

Line a 10 x 15" jelly roll pan with foil.
Grease lightly with cooking spray.
Set aside.
I used a 9 x 13 inch baking pan, sprayed with cooking spray.

In a large sauce pan, melt butter over low heat.
Add marshmallows and stir until melted.
Remove from heat.
I melted the butter in a microwave safe bowl in the microwave in 30 second increments until all melted.
Then, add the marshmallows to the bowl and toss to coat.
Microwave until melted.  I usually do mine in 60-90 second increments.

Add in cake mix.
Stir until completely mixed with the marshmallow-butter mixture.
Pour into the prepared pan and press evenly (I use a piece of wax paper with cooking spray).
Let cool.

Make the filling by beating the butter or cream cheese with the powdered sugar (start low and add sugar according to taste -- I liked mine minimally sweet and ended up using about half the sugar).
Whip them really well.  I didn't whip mine as much as I would've liked (I was in a rush), and it makes it hard to see that delicious sweetened cream cheese layer in the center.

Cut the Rice Krispie treat sheet in half, so that you have two equal portions.
Spread filling on one of the halves.
Cover with the other piece of the Rice Krispie treat.
Cut into squares.

I debated drizzling some with melted white chocolate, but last minute decided against it.

Wednesday, January 28, 2015

Dried cherry and white chocolate Rice Krispie treat hearts

I started my Valentine's Day treats a little early this year.  I guess less than 3 weeks before Valentine's Day isn't technically early, but it's early for me.  Especially because I still owe you guys that Salted Caramel Apple Pie from Thanksgiving....like, gulp, 2 months ago...


But on Monday night there was an impending blizzard in NYC and there was the potential (thought let's face it, with my luck it wasn't going to happen) for a snow day on Tuesday.  And I had some goodies around the apartment (and a last minute trip to the grocery store to prepare for the impending blizzard yielded a bag of marshmallows and a 5 lb bag of flour)...so I set out to make a yummy Valentine's Day treat for my Valentine.


The answer came in the form of heart shaped dried cherry and white chocolate chip Rice Krispie Treats.  And the added bonus was that I snacked on all...of....the...scraps!  Well, not the added bonus for my waistline, but for me in general, because these are delicious!

Dried Cherry and White Chocolate Chip Rice Krispie Treats (Heart-Shaped for Valentine's Day)

Ingredients:

3 Tbsp butter (unsalted)
1 bag large marshmallows (about 40)
5 cups Rice Krispies Cereal
2/3 cup dried cherries (I used dried tart cherries, since that's what I had on hand)
2/3 cups white chocolate chips

Directions:

Spray a rimmed baking sheet with cooking spray.
Set aside.

Melt the butter in a large microwave safe bowl.
Add the marshmallows and toss to coat in the butter.
Microwave again, on medium-high heat, for 30 seconds.
Mix and return to microwave.
Microwave again for 30-60 seconds until the marshmallows are melted and mix easily.

Add the rice krispies, dried cherries, and white chocolate chips.  (I added mine in 3 batches, to ensure that they all mixed up well.)
Turn the Rice Krispie-marshmallow mixture onto the greased baking tray.
Working quickly, press down the Rice Krispie treats into a 1-1.5 inch layer.  (I used a piece of wax paper sprayed with cooking spray.0
Do not worry if the mixture doesn't cover the whole tray.  Don't make them too thin.

Again, working quickly, while the mixture is still warm, use a heart shaped cookie cutter to cut out the hearts (it's easier to do when they're a little warm, because when the chocolate chips harden again, it's harder to cut through the treats.)

Remove the hearts and place them on a piece of wax paper to finish chilling.

Eat the scraps, all of them.  Because they're so good.  And this way you can keep some for your Valentine :)

Happy Valentine's Day!

Saturday, February 15, 2014

Chocolate "lovebugs"

I made so many Valentine's treats this year that I actually didn't get around to posting these in time for Valentine's Day!


Honestly, I had thought I was done.  I made chocolate covered pretzels, brownies, chocolate-covered heart-shaped raspberry marshmallows, and chocolate heart-shaped cookies.  I thought I went so overboard, in fact, that I didn't even bring them all to B.  So I definitely didn't think I needed anything else.  But then while scrolling through some websites or blogs (I honestly don't remember which), I came across some "lovebugs."  I thought they were cute.  But I didn't do much with the idea.  Until I remembered that I had a lady bug chocolate mold!


So I thought it was fate, or at least something like fate, that I had the lady bug mold AND pink chocolate at home (I was going to make some pink love bugs for Valentine's Day)....but then I saw that I had red chocolate in the fridge, and I just knew I had to make them!  It really was fate!


So after all the roses and chocolate for Valentine's Day have faded, I had these sweet little chocolate lovebugs to give to my Valentine!

* I used dark chocolate for the spots, eyes, and lines.  If I had powdered food coloring, I would've dyed the dark chocolate black, but I didn't, and I still think they turned out fine! *


Thursday, February 13, 2014

Happy Valentine's Day!

In case you're looking for some last minute ideas for Valentine's Day, I've come up with a few sweet ideas for your sweetie this Valentine's Day.


Red Velvet

Red Velvet and White Chocolate Chip Cookies
Red Velvet Cake Pops and Cake Balls
Red Velvet Thumbprint Cookies
Red Velvet Cupcakes (or Mini Cupcakes)


Anything Involving Hearts

The cookie below has a heart-shaped sprinkle placed on top of it.  You could easily bake a sprinkle into the top of each cookie if you so desired.

Lovin' Spoonfuls
Oreo pops with heart-shaped decorations
Heart-shaped cake pops (or regular cake pops with heart-shaped sprinkles), or these
Heart-shaped homemade marshmallows, either plain or chocolate-covered
Heart-shaped deep chocolate cookies, drizzled with white chocolate and topped with a few heart sprinkles
Chocolate covered pretzels with heart sprinkles


Chocolate (!!)

Frankly, in my opinion, anything chocolate will do, although I am particularly a fan of dark chocolate.  Here are just a few chocolate ideas for your sweetie on Valentine's Day.

Chewy Chocolate Cookies with White Chocolate Chips
Loaded Peanut Butter Chocolate Covered Potato Chip Dulce De Leche Fudge
"The Best" Fudge Brownies
Double Chocolate Chunk Cookies
Flourless Chocolate Earth Cake
"Death by Oreo" Mini Cupcakes
Chocolate Chip Cookie, Oreo, and Brownie Bars


...just to name a few!


Whatever you make, whatever you do to celebrate, I hope your Valentine's Day is sweet!!


Valentine's Day treat

Looking for a quick and easy Valentine's Day treat?  Try some chocolate-covered pretzels with heart sprinkles!


I was looking for a quick and easy treat for Valentine's Day to counteract the somewhat time-intensive but AWESOME chocolate-covered heart-shaped raspberry marshmallows and to complement the decadent chocolate roll out cookies and fudgy brownies.

I originally was going to make them in white, dark, and milk chocolate, but then time got away from me....and milk chocolate seemed like a better option than dark, since the cookies and brownies were so rich.

Valentine's Day Chocolate-Covered Pretzels
By yours truly

Ingredients;

Pretzel rods
Chocolate (in milk, dark, white....or any combination)
Chocolate for drizzling
Sprinkles of your choice (I chose mini hearts, regular sized hearts, and pink and white nonpareils)

Directions:

Line a baking sheet with wax paper.

Melt chocolate in the microwave in 30 second intervals, making sure not to burn it.
Dip the top 2/3 of a pretzel rod into the chocolate and allow the excess to drip off into the bowl.

Place the pretzel on the lined baking sheet.
Apply sprinkles to wet chocolate.

Additionally, if you plan to drizzle them with a contrasting colored chocolate, allow the chocolate to harden.
Once hardened, melt a contrasting chocolate and drizzle onto the pretzels.
Apply sprinkles, if you'd like.  The sprinkles will only stick to the wet chocolate drizzle.

Allow to dry and then wrap in lollipop bags or place chocolate-side up in a small vase or cup.

Fudge brownies

I was thinking the other day, as I was getting ready to bake all my homemade, pre-made cookie dough, that I've baked a lot of cookies lately.  I mean, A LOT of cookies.  There were the 30+ GIANT cookies for the baby shower, and the 200+ regular-sized (mini, compared to the giant ones) ones for baby J's bris.  And somewhere in the middle of it all I thought to myself "I haven't made brownies in a really long time.  I could really go for a brownie."  Not that I should be eating brownies on my diet, but a nice fudgy brownie just sounded perfect.


So in the midst of the cookie baking party I had with myself the day before the bris, I was talking to a friend of mine, and she told me that she had just made a brownie recipe that I had pinned (someone other than me looks at that?!) and that they came out awesome.  So it was apparent to me that when I made brownies, I should probably start with these.  And from the sounds of it, I might not need another brownie recipe ever again!

Fast-forward a few more days, and I decided to bake those brownies.  B and I still aren't sure what we're doing for Valentine's Day (we have a reservation, we may stay in), so I figured if we stayed in I should have a sweet treat.  So (being the huge dork that I am) I made one heart-shaped brownie, just in case.


Now one thing about these brownies.  They're called "The Best Fudge Brownies."  I do not use the word "best" lightly.  I've never posted a recipe that I myself called "the best."  Just because I may think they're the best, doesn't mean you will think they are.  I'll call things "my favorite" - and I even called my peppermint bark "awesome" - but never "the best."  There's one thing, though.  These brownies are pretty freakin' awesome!  And easy.  Oh, are they easy.  I made them in one bowl, with a whisk, and I didn't even have to leave the butter out for a few hours to come to room temperature.  AWESOME.  These are definitely going to become a go-to brownie (along with my mom's favorite, these cappuccino brownies).

"The Best Fudge Brownies" 
From Yammie's Noshery

Ingredients:

2 sticks of butter
2 1/4 cups of sugar
4 large eggs
1 Tbsp vanilla
1 1/4 cups of cocoa powder (I used Dutch press)
1/2 teaspoon salt
1 teaspoon baking powder
1 1/2 cups of flour
2 cups chocolate chips

Directions:

Grease a 9 x 13 inch pan.  I lined mine with parchment paper and then sprayed it with Pam.
Preheat the oven to 350 degrees.

Mix together the butter and sugar in a microwave safe bowl.
Heat in the microwave, stirring about every 30 seconds, until the mixture is bubbly and smooth (mine was smooth, but not so bubbly).  You can also do this on the stove.

Add in the eggs and vanilla and beat until smooth.
Mix together the cocoa powder, salt, baking powder, and flour.  I just sifted it into the butter mixture, in about 3 additions.
Add to the butter mixture, mixing until smooth.
Stir in the chocolate chips.

Pour the batter into the prepared pan.
Bake for about 28 minutes.  I baked mine for 25 minutes.  They were delicious, but very gooey when they came out of the oven.  They did set up nicely when the cooled.

Tuesday, February 11, 2014

Heart and flower chocolate cookies

Remember those homemade cookie dough Oreos I made a week or two ago?  I became (mildly) obsessed with the cookie portion of those Oreos.  They were SO good.  And easy.  Literally, insanely easy to make.  No mixer needed, they came together seamlessly.  And unlike so many other cut-out cookies, you don't need to chill the dough before rolling them out.  Just place the just-made cookie dough between two sheets of wax paper, roll it out to your desired thickness, and then -- get this -- just place those rolled-out sheets of cookie dough in the fridge (in order to keep mine flat, I put them on a cookie sheet before placing them in the fridge).  Seriously.  Then they're ready to let the cookie cutters do their work whenever you want them to.


Since the butter is melted instead of having to be brought to room temperature, you can make them as soon as you decide to on a whim, as I did.  Valentine's Day is rapidly approaching and I wanted to make some cookies.  I have no plans yet, but I assume that B and I will do something low key.  But of course there will have to be desserts.  And since I think I'm subconsciously trying to make up for not remembering if I made anything last year (and if I did, what it was....for more on that, see here), I've made a few.


I thought about icing these with royal icing, but they were so delicious on their own, and I was afraid that the royal icing wouldn't mesh well with their insanely rich chocolate flavor.  Instead, I drizzled them with a teeny bit of white chocolate for some sweetness and color contrast, and then left some plain and put sprinkles on some of them.

Rich Chocolate Roll-Out Cookies
Originally from Love & Olive oil, from these homemade cookie dough Oreos

Ingredients:

1 cup (2 sticks) unsalted butter, melted and slightly cooled
3/4 cup sugar
1 tsp vanilla extract
8 ounces (1 cup) semisweet chocolate or chocolate chips, melted and slightly cooled
1 large egg
1 1/2 cups all-purpose flour
3/4 cup dark or Dutch-processed cocoa powder -- Since they were so good the first time I made them, I stuck with the dark cocoa powder (I used Hershey's special dark)
1 teaspoon kosher salt
1/2 teaspoon baking soda

Decorations:

Melted white chocolate
Any sprinkles or colored sugar that you want to use

Directions:

In a medium bowl, mix together the melted butter and sugar until combined.
Whisk in the vanilla and melted chocolate.
Add the egg and whisk until incorporated.

In another bowl, whisk together flour, cocoa, salt, and baking soda.
Stir flour mixture into the chocolate mixture, using your hands if needed to form a smooth dough, using your hands if needed to form a smooth dough.  I used a large whisk and it worked beautifully.
Divide the dough into two, and roll each piece to 1/4 inch thick between two pieces of waxed paper.
Refrigerate at least 2 hours or until firm.

Heat oven to 325F.
Line baking sheet with parchment paper or a silicone baking mat.

Cut out your desired shape using cookie cutters from the dough sheets.  I used a small heart and small fluted circle which looked like a flower.
Arrange on prepared baking sheet, leaving at least 1 inch between cookies.
Bake for 15 minutes or until cookies are set and just starting to darken around the edges.  Since my cookies were on the smaller side, I had to eyeball them a little.  I ended up baking them for around 9 minutes.  The dough is SO dark, I honestly don't think you'll see them "darken around the edges."

I waited for mine to cool, and then drizzled them with some melted white chocolate.
While chocolate is still wet, apply sprinkles or colored sugar.

Chocolate-covered marshmallow hearts

I had to admit it; I never really loved Valentine's Day.  I'm sure you could say that for many years I was jaded as I didn't have a valentine of my own to spend the day with.  But even now, I am still not a huge fan of the holiday.  There is so much hype around the holiday that I'm pretty sure that the real importance of it is lost behind tons of red and pink hearts, overpriced prix fixe dinners, Valentine's Day cards, and red roses.  Not that's there's anything wrong with those things.  But still, the hype is pretty intense.  There was already an entire aisle of Valentine's Day candies at my local drugstore as early as mid January (it could've been there earlier, it's just that I haven't been in the store in a while).


One thing I do like about Valentine's Day?  All the cute heart shaped treats you can make!  Want something festive?  Make it heart shaped, pink or red, cover it in hearts, or put some flowers it, and voila! it's a Valentine's Day treat!


Last year Valentine's Day fell just a few days after I got back from Thailand, and the day after my mom's 60th birthday (and birthday party).  It was a whirlwind and I was pretty jet-lagged.  B invited me over for dinner and I honestly don't even remember if I made dessert or not.   Tsk, tsk Julie, how bad of me to not remember?!


This year I decided that I needed to make a few Valentine's Day treats.  I think my subconscious realized that I had to make up for last year!  I had a few ideas up my sleeve (stay tuned for those, soon), and kinda dove in head first.  I thought about starting with something a little smaller-scale, but you know me, and that's just not really the way I roll.  I wanted one that would be memorable enough to counteract the fact that I didn't make anything (memorable?) last year.

So what did I make as my first Valentine's Day treat?  Well, remember those raspberry marshmallows I made a few weeks back?  Well, part of the reason I made them was because I wanted to make sure they were good before Valentine's Day.  So that I could make these, clearly.  I mean, duh!

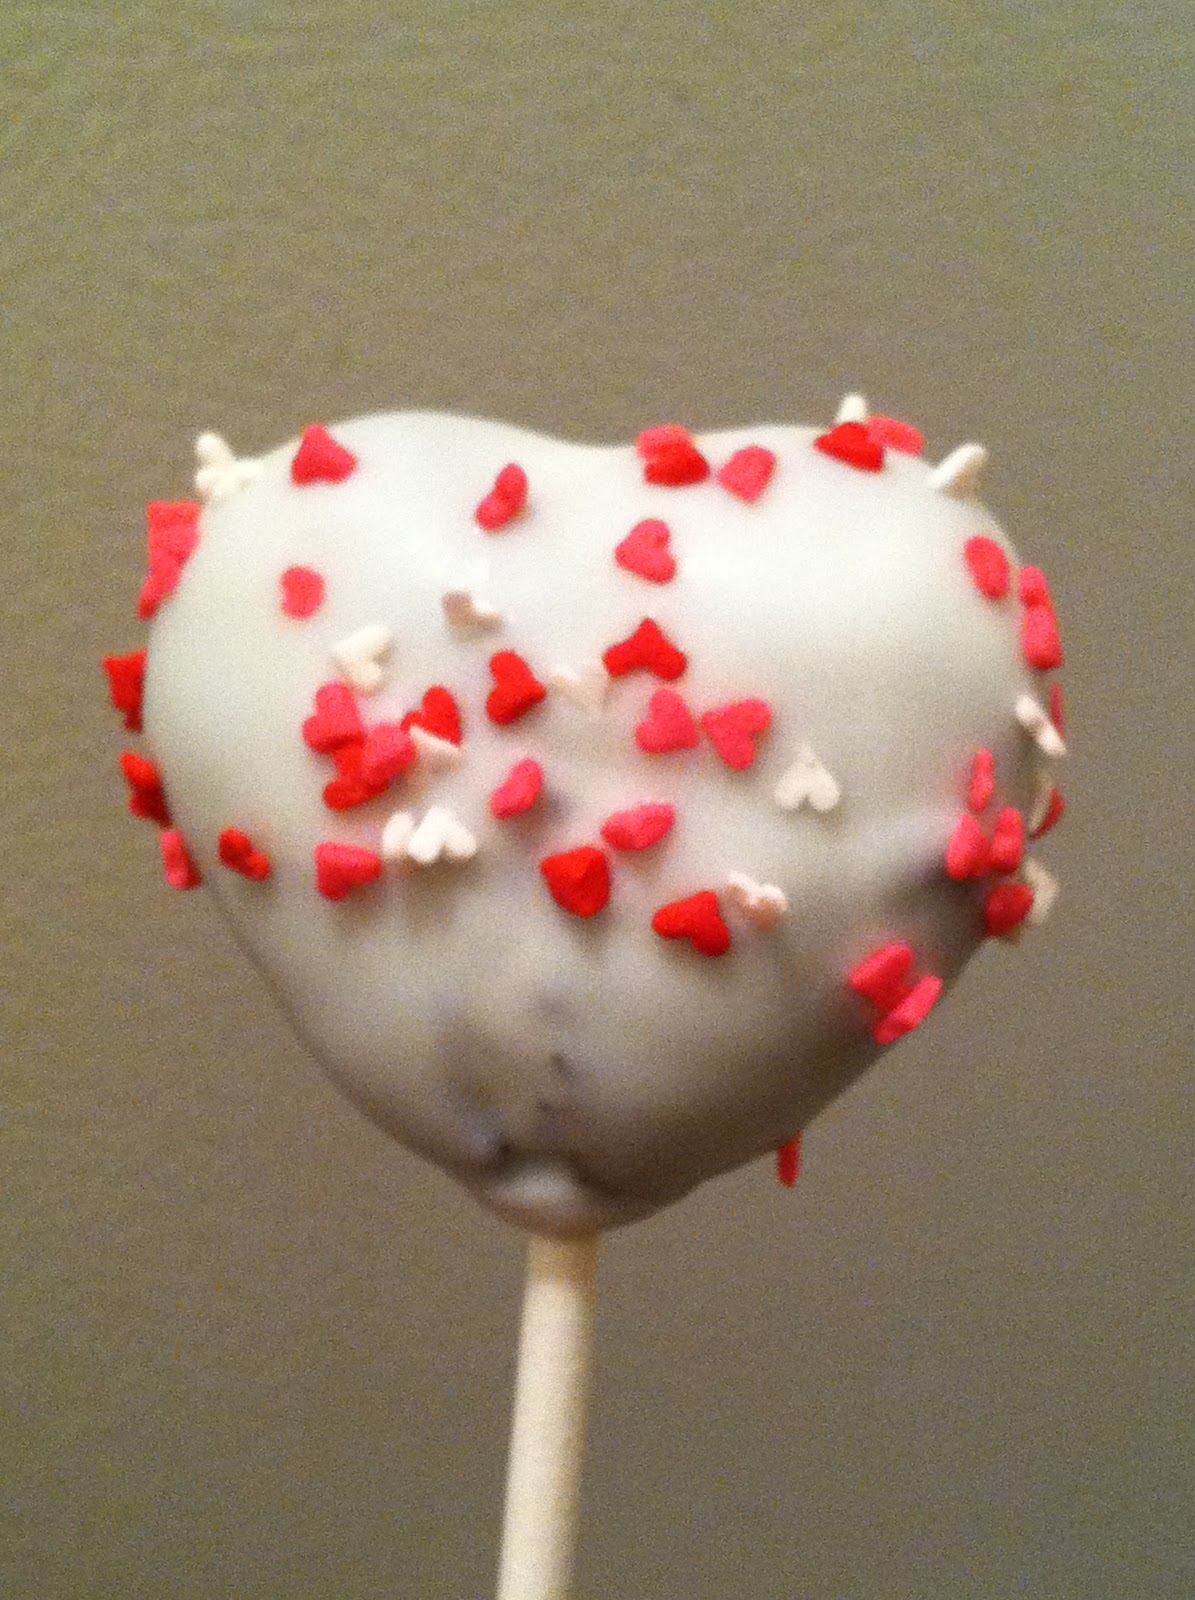
Since I wanted a tasty treat for Valentine's Day, and I wanted it to be heart-shaped, naturally, I decided on pink raspberry marshmallows cut into hearts.  But no, I didn't stop there, I then went and dipped them into chocolate, because it seemed like a good - and clever, if I do say so myself - idea.  Because what's better than a homemade marshmallow in the shape of a heart?  Dipping one in chocolate, and covering it with cute decorations!  Which is exactly what I did!


I dipped half in dark chocolate and the other half in milk chocolate.  Then, I drizzled half of each with some white chocolate, for decoration, and then topped those with some mini heart sprinkles in red, pink, and white!


I was so excited about these that I had to actually post this before Valentine's Day!

Happy Valentine's Day!!  

Chocolate-Covered Raspberry Marshmallow Hearts
Raspberry marshmallows originally posted on the blog here

Ingredients:

1 cup of water, divided
3 envelopes gelatin, unflavored
2 cups sugar (granulated)
1/2 cup light corn syrup
1/2 tsp salt
2 tablespoons pure vanilla (which I left out this time, since the last time I made them I forgot it, and I thought they turned out deliciously!)
1/4 cup raspberry jam
1 drop red food coloring (I ended up using about 3 drops...could've used a few more)

Generous amount of icing sugar to coat the marshmallows, about 2 cups (icing sugar = powdered sugar)

Butter for pan (I used Pam)

Chocolate for coating the marshmallows - milk, dark, white, or any combination of them
Sprinkles in different shapes and colors (I used mini heart sprinkles and white non pareils)

Directions:

Grease a 9 x 9 inch pan with butter (or Pam).  You may want to use a slightly larger pan, since the last time I made them they were insanely fluffy and reached the top of my 9 x 9 inch pan.  I wasn't sure which sized pan to use, so I stuck with the 9 x 9 inch pan and then ended up having to slice the marshmallow into 1" thick pieces, coating them in the powdered sugar, and then using my small heart cookie cutter and cutting the hearts out of the sliced marshmallow.

In a small saucepan over medium heat (I was lazy, I microwaved it in 30 second increments), warm 1/4 cup raspberry jam (or any other flavor) until it becomes runny, about 3 minutes.
Remove from the heat.
Place a fine sieve over a small bowl and pour the warm jam through the sieve to catch any seeds and create a puree.  Set aside for now.

In a stand mixer fitted with the whisk attachment, pour in 1/2 cup of the water and sprinkle with the gelatin.
Set aside to allow the gelatin to soak in.

In a medium sauce pan over high heat, add the sugar, corn syrup, remaining 1/2 cup of water, and salt.
Bring to a rolling boil and continue to boil for 1 minute.
Remove from the heat.
I pour my sugar syrup into a 2-cup measuring cup, which makes it easier and safer to pour into the mixer bowl.

Turn the mixer to low and mix the gelatin once or twice to combine it with the water.
Slowly add the hot sugar mixture by pouring it gently down the side of the bowl, and continue to mix on low.

Add the raspberry puree and one drop of red food coloring.
Turn the mixer to high and continue to whip for 10 to 12 minutes until the marshmallow batter almost triples in size and becomes very thick.
Scrape down the sides of the bowl frequently to avoid overflowing batter.
Add additional drops of red food coloring, if needed, until desired color.
Stop the mixer, add the vanilla, and then whip briefly to combine.  Oops, I forgot that.  It's all good, they're super tasty.

Transfer the mixture to the prepared baking pan and use a spatula or bench scraper to spread it evenly in the pan.
Work quickly, as the marshmallow becomes more difficult to manipulate as it sets.

Grease a piece of plastic wrap with butter (again, I used Pam) and lay it across the top of the marshmallow.
Press firmly on the plastic wrap to seal it smoothly and tightly against the marshmallows.

Leave the marshmallows to set at room temperature for at least 3 hours, or -- even better -- overnight.
The marshmallow will be too sticky and soft to cut before then.

Sprinkle work surface or cutting board with icing sugar.
Run a knife along the top edge of the pan to loosen the marshmallow slab.
Invert the pan and flip the marshmallow out onto the work surface.
Scoop handfuls of the icing sugar and rub all over the marshmallow slab.

Spray a small heart cookie cutter (or any other shape that you'd like to make) with Pam.
Cut out marshmallows with the cookie cutter.
Roll each of the freshly cut marshmallows in the remaining icing sugar to coat them completely.

Let the marshmallows dry for about 30 minutes.

Line a baking sheet with wax paper.

Microwave the chocolate in 30 second increments, until it is melted and thin.
Dip each marshmallow into the chocolate, making sure to remove excess chocolate.  I do this by removing them from the chocolate with one fork, and then transferring it to another fork, and back and forth until most of the excess chocolate has been removed.
Place them on the wax paper-lined baking sheet.
If using sprinkles or decorations, apply them to the wet chocolate.

Let cool and allow the chocolate to harden (I used the fridge for this part) before removing from the wax paper and packaging them up.

Monday, February 13, 2012

Valentine's day cake pops

Valentine's day and chocolate seem to go hand-in-hand, so when deciding what type of Valentine's Day cake pops to make, chocolate seemed like the obvious choice.  So I went with double dark chocolate cake pops dipped in vanilla coating and decorated with Valentine's Day colors and all things heart-shaped.


Happy Valentine's Day!

Check out the cake pops I made last time for the recipe

Saturday, February 11, 2012

Lovin' spoonfuls

Today I came across this cute idea.  It was in a magazine that a patient had left open on the desk in the room when she left.  As I was picking it up to bring it back to the waiting room, I glanced at the opened pages.  There they were, these cute little spoons with chocolate (not to be confused with the chocolate spoons I made before), decorated for Valentine's Day, but I think they could be made for any holiday.  But I'm getting ahead of myself.

I had plenty of Valentine's Day themed decorations at home already, but I bought a few on my way home from work.  Most important of those were conversation hearts.  I loved them when I was a kid.  Back when "fax me" was an up and coming message (ha!  Fax me?  Who OK'd that?).  An added bonus?  I already had red plastic spoons at home, leftover from the Super Bowl, and a few pink ones, too.

These are really easy to make and look great!  Can't wait to try them for other holidays.

Waiting to cool, be put in bags, and tied up.


Lovin' Spoonfuls

Ingredients:

White chocolate
Small Valentine's themed candies
Plastic Spoons
Lollipop bags
Twist ties or ribbon

Directions:

1.  Arrange spoons along the edge of a cookie sheet with a rim, so that the bowls of the spoons are level.
2.  Melt 6 oz of white chocolate for every 8 spoons that you are using.  Melt chocolate in a microwave safe bowl, then transfer to a ziplock bag.
3.  Trim the corner off of the bag and pipe the chocolate into each spoon and gently tap the spoons to level the chocolate.
4.  Sprinkle the candies, sprinkles, and nonpareils. 
5.  Let the chocolate cool completely, then transfer to lollipop bags.  Tie with ribbon or twist ties.

You can include a note stating that the chocolate can be eaten off the spoon or used as a hot cocoa stirrer.