
Fast-forward to about a week and a half ago. My friend's daughter is turning two in March. Last year I made chocolate Elmo lollipops for her birthday party; this year I told my friend to let me know what she might want for the birthday party. She was thinking that Elmo lollipops would be a good idea, but then she thought maybe cake pops, since her daughter is obsessed with the "birthday cake" ones from Starbucks. So, I set out on a mission to perfect the whole cake pop-making process, so that when the second birthday party rolls around in early March, I'll know all the tricks I'll need to know.
 |
| Chocolate Elmo Lollipops from my friend's daughter's 1st Birthday party, March 2011 |
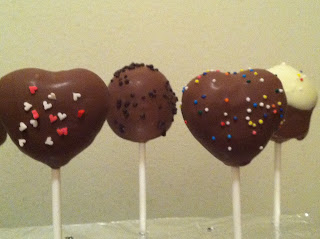
Years ago when I had thought about making cake pops, I had bought a styrofoam block at the art store so that I had something to stand the cake pops up in when the chocolate dried (I didn't want them to have flat tops from resting upside down when they dried). Miraculously, I remembered where I had put it at least a year ago, and took that out. I had chocolate to coat the cake pops in as well as lollipop sticks at home, since I always have them on hand. I always have a box of red velvet or dark chocolate cake and a container of icing on hand for cake balls as well. The only thing hanging over my head was how I was going to make the actual cake ball to put on the stick for the cake pop. While looking on Amazon at the Bakerella Cake Pop Kit and clicking on several links, I came across these adorable molds to shape cake pops. I had to buy them in all 4 shapes.


 |
| Oops....I took too big of a bite and you can see the stick :( |
Cake Pops (from Bakerella)
1 box cake mix -- any flavor you'd like - I went with red velvet
1 can frosting (16 oz.) -- pick a flavor that goes well with the cake flavor - I chose cream cheese
Candy melts/chocolate for dipping -- I find that dark and milk chocolate are easier to use than white chocolate
Lollipop sticks
Wax paper
Optional for decoration:
Sprinkles
Other chocolate for drizzling
Candies for decoration
Edible ink pens
Directions:
1. Bake cake as directed on box in a 9x13" pan.
2. Let cake cool completely, then crumble into a large bowl.
3. Mix the crumbled cake with the can of frosting. Start by adding about 3/4 of the can of frosting, and add up to the whole container if you need (not all cakes will need the entire can)
4. Roll mixture into balls and place on wax paper covered cookie sheet. (Bakerella says it sould make 45-50; when I used my scooper, I get roughly 80) -- I like to keep mine in the fridge overnight, as I find they are easier to dip that way.
5. Melt the chocolate in a bowl, a small amount at a time
6. Dip the tip of the lollipop stick into a little of the melted candy coating and insert into the cake balls (a little less than halfway).
7. Place them in the freezer for a little while to firm up -- Don't let them stay in the freezer too long, otherwise the chocolate may crack as the cake balls thaw (I put mine in the fridge for a few minutes and it did the trick)
8. Once firm, carefully insert the cake ball into the candy coating by holding the lollipop stick and rotating until covered. Once covered remove and softly tap and rotate until the excess chocolate falls off. Don’t tap too hard or the cake ball will fall off, too.
9. If you are using sprinkles or other decorations, apply them while the chocolate coating is still wet.
10. Place in a styrofoam block to dry.
11. If using edible ink pen to write on the cake pops, use them now, then allow ink to dry.
No comments:
Post a Comment