Facebook 1

Sunday, August 18, 2013

Lobster party

I love when things come together. 

What do I mean?  I guess I should backtrack:

About a week and a half ago, I wandered into my favorite baking store.  I didn't have a shopping list, I didn't have anything particular that I needed.  Their hours just make it difficult for me to get there during the week, but I got out of work on time, and decided to go.  Without needing anything in particular, I left with one item: a cookie cutter in the shape of a lobster.


A few days later, I was clicking on links from a blog that I like, and came across lobster shaped lollipops.  They were expensive, and I didn't have a need for them (although - trust me - I did decide for a brief minute that I was going to host a clambake and serve lobsters and have lobster shaped desserts...until I realized that my mom was renovating her kitchen and my Manhattan apartment has a very small kitchen and my little bubble burst).

But somewhere in the mix of all that, I decided I would look for - and ultimately order - a lobster lollipop mold.  And then I went a little crazy.....in the form of starfish, shell, and crab lollipop molds, and a variety of shell and mini crab and lobster chocolate molds.


And then I saw that a store that my family loves is having a lobster sale -- $3.99 per pound!! -- and jokingly sent my mom a message asking if she wanted to pick some up and drive them into the city, and we'd have a family lobster dinner at my apartment.  That didn't happen, but then plan is to now have grilled lobsters (my mom's kitchen was demolished earlier in the week and it's starting it's renovation now....but the grill is still working) at my parent's house this weekend.

 
So, now it's come together!  I made lobster shaped and nautical/beach themed desserts for that dinner.  I know it makes me weird.  And a bit OCD.  And, well, it doesn't matter, because it came together :)


P.S. The beach themed cupcakes I made a while ago would've been a great addition to the desserts, and I even have tons of leftover sugar shells (or could've used chocolate shells), but we didn't need cupcakes in addition to everything else I made.

Lobster sugar cookies

I wandered into the baking store and left with....a lobster cookie cutter.  It was cute, and I didn't want to leave empty handed, and so I picked it up.  I didn't have anything that warranted a lobster-shaped sugar cookie with royal icing.  I mean other than a clambake, what would?


But then, through a series of funny events, I'm going home to my parent's tomorrow night for grilled lobsters.  Enter lobster-shaped cookies.

Only difference is that, although I had planned to make sugar cookies with royal icing, time was not in my favor, and I instead opted for a red sugar cookie dough.  I followed Martha Stewart's sugar cookie cut out recipe, and just added red food coloring.  Don't ask me how much....enough to make the dough look red (not pink, which sometimes happens with red food coloring).

I think the final product is pretty cute:

 
And stay tuned for how these lobster-shaped cookies found lobster friends :)


Lobster Sugar Cookies
Martha Stewart's Sugar Cookie Cutouts

Ingredients:

4 cups sifted all-purpose flour
1 teaspoon baking powder
1/2 teaspoon salt
1 cup (2 sticks) unsalted butter, room temperature
2 cups granulated sugar
2 large eggs
2 teaspoons pure vanilla extract
Food coloring, if coloring cookies
 
Directions:
 
Sift flour, baking powder, and salt into a bowl.
 
Put butter and sugar in the bowl of an electric mixer fitted with the paddle attachment.
Mix on medium speed until pale and fluffy.
Mix in eggs and vanilla.
Reduce speed to low.
This is where you should add in the food coloring, if using.
Gradually mix in flour mixture.
This is where I actually added the food coloring.
Divide dough in half; flatten each half into a disk.
Wrap each in plastic.
Refrigerate until firm, at least 1 hour or overnight.
 
Preheat oven to 325 degrees with racks in upper and lower thirds.
Let one disk of dough stand at room temperature just until soft enough to roll, about 10 minutes.
Roll out dough between two pieces of plastic wrap to 1/4 inch thick.
Remove top layer of plastic wrap.
Cut out cookies with a 4-inch one-piece-shaped cookie cutter.
Transfer cookie dough on plastic wrap to a baking sheet.
Transfer baking sheet to freezer, freeze until very firm, about 15 minutes.
Remove baking sheet from freezer and transfer shapes to baking sheets lined with nonstick baking mats.
Roll out scraps, and repeat.
Repeat with remaining disk of dough.
 
Bake, switching positions of sheets and rotating halfway through, until edges turn golden, 15 to 18 minutes.
Let cool on sheets on wire racks.

Saturday, August 17, 2013

S'mores cookies

For my birthday a few weeks ago, I attempted to make a treat every day of the week of my birthday (I fell a little short, but 4 out of 5 days isn't that bad).  On day 3, I had set out to make s'mores cookies.  I had seen the recipe on Pinterest and pinned it, but then it was nowhere to be found when I sat down to bake them.  (By the way, the giant peanut butter monster cookies I made in their place were AWESOME.)


Recently, I majorly revamped my "Things I Want to Bake" board on Pinterest and divided it into several boards based on the type of baked good (Cookies, Cupcakes, Muffins, Icings, etc), and through this major overhaul, I found the cookie recipe!  That was it, I had to make them.


I even had all the ingredients in the apartment (except for graham crackers), so when I was running errands this morning, I popped into the grocery store and bought them and some buttermilk (for another recipe I'll be making later today or this weekend).

Gooey S'mores Cookies

Ingredients:

1/2 cup (1 stick) butter, softened
1/2 cup sugar
1/4 cup brown sugar
1 egg
1 teaspoon vanilla
1 1/3 cups flour
3/4 cup graham cracker crumbs (7 full graham cracker sheets) -- 7 sheets gave me WAY more than 3/4 cup of crumbs
1 teaspoon baking powder
1/2 teaspoon salt
1 cup Mini Hershey’s Kisses (or chocolate chips/chunks) -- I used Ghirardelli Milk Chocolate Baking Chips
1 cup Jet Puffed Mallow Bits

Directions:

Preheat oven to 350 degrees F.
Line a cookie sheet with parchment paper and spray with cooking spray.
Using a mixer, cream the butter and sugars until light and fluffy, about 3 minutes.
Add the egg and vanilla and beat for an additional 2 minutes.

Meanwhile, use a food processor or blender to crush 7 graham cracker sheets into 3/4 cup fine crumbs.
In a separate bowl, whisk together the graham cracker crumbs, flour, baking powder, and salt.
Slowly add the dry ingredients to the wet ingredients, and mix on low speed until the dough just comes together.
Add the chocolate and marshmallows and stir to combine.

Place 1.5 tablespoon sized scoops of dough (I used my handy dandy cookie scooper) onto the prepared cookie sheet.
Bake at 350 for 10-12 minutes.  Since mine were smaller, I baked them for 9 minutes

Makes 2 dozen cookies (If you make them the size the original recipe recommends -- I got at least 4 dozen).

Tuesday, August 13, 2013

Nutella stuffed bread

Remember when I made that braided, stuffed lemon bread?  Remember how I told you that I saved 1/3 of the dough for an experiment?  Well, this here is that little absolutely awesome experiment....Nutella stuffed bread!


Instead of filling this bread with the lemon cream cheese filling and homemade lemon curd, I filled it with Nutella.  Nothing else.  No special treatment to the Nutella.  Just spread it onto the dough directly from the container!

Now I know you're going to ask...how much Nutella did I use?  Well, honestly, I didn't really measure it.  I kinda just spread it on about 1/4" thick, and then braided it like I did the lemon bread.

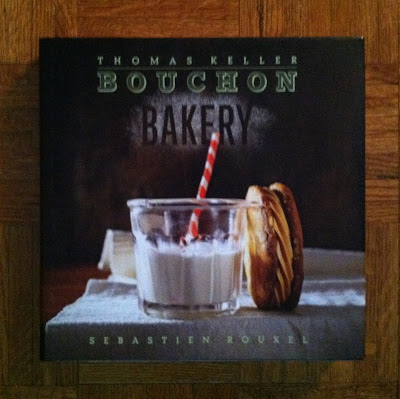
Bouchon Bakery cookbook

I have been eyeing this giant monstrosity of a coffee table cookbook for a while.  For just about a year, according to my blog post on August 16th of last year, when I first mentioned it.  I was finally in Williams Sonoma with a gift card at the same time, and bought it a few days ago.  And then I had to schlep it home...all (roughly) 6.5 pounds of it!  400 pages.  And what I can only assume is hundreds of recipes! 


I have to admit that I want to make croissants.  B loves croissants.  And once I can learn to make croissants, I can attempt to make a cronut for him.  (Although when I was looking for a link for the cronut, I came across a few cronut recipes, which I have bookmarked for later.)  But I digress...

Homemade Nutter Butter cookies....bacon cheddar scones...carrot muffins...homemade Oreos....coffee cake...devil's food cake...homemade Ho Hos...eclairs....the list of things I want to make goes on and on and on!

Sunday, August 11, 2013

Braided stuffed lemon bread

Very infrequently do I eat what I bake.  Extremely rare is when I eat a lot of something that I bake.  One of those things are cinnamon buns.  The other is this braided, stuffed lemon bread!  I've been known to go through half a loaf the day I bake it.  I've made it with the original recipe, and I've added raspberry jam, too.  Once I even made a mini one with scraps and added some peach preserves.  They're all good.  I've chosen to stick with the original recipe today, because I think the lemony-ness (a totally real word, by the way) is fresh and tasty, and just what I would want on this summery day.


* These loaves are a little smaller than you would assume, given the amount of dough that this recipe yields.  That's because I divided it into thirds and saved one third of the dough for an experiment (that you may or may not see up on the blog soon. *


Braided, stuffed lemon bread
Originally from King Arthur Flour, found by me on Smitten Kitchen

Ingredients:

For the sponge:

3/4 cup warm water
2 tsp sugar
2 Tbsp instant yeast (I use Rapid Rise)
1/2 cup flour

For the dough:

All the sponge (see above)
3/4 cup plain of vanilla yogurt (I found this recipe via Smitten Kitchen, and she recommended using sour cream, which is what I did)
1/2 cup (1 stick) unsalted butter, softened
2 large eggs, beaten
1/2 cup sugar
2 tsp salt
2 tsp Buttery Sweet Dough flavor (or vanilla)
5 cups flour
Egg wash (for brushing)
Pearl sugar or sparkling white sugar (for sprinkling on top.  For the longest time, I couldn't find pearl sugar, so I used large crystal sugar, which worked perfectly fine.)

For the Cream Cheese Filling:

2/3 cup cream cheese, softened
1/4 cup sugar
1/4 cup sour cream
2 tsp fresh lemon juice (I used a little extra for an extra lemon-y flavor)
1/4 cup flour
1/2 cup lemon curd*

* For the lemon curd - you can use store bought or make your own....if you make your own, I highly recommend following Smitten Kitchen's recipe, which you can find here, but I recommend doubling if you are making the full dough recipe.

Directions:

In a small bowl, combine the sponge ingredients.
Stir well to combine, loosely cover with plastic wrap, and set aside to proof for 10-15 minutes.

In the bowl of a stand mixer, combine the sponge, yogurt (sour cream), butter, eggs, sugar, salt, and flavoring.
Add 4 and a 1/2 cups of flour and mix with the paddle attachment until the dough is a rough, shaggy mass.
Switch to dough hook and knead on speed 2 until a soft, smooth dough forms, about 5-6 minutes, adding more flour if needed.

Place the kneaded dough in a lightly greased bowl, cover with plastic wrap, and allow to rise for 60-90 minutes, until quite puffy and nearly doubled.

* If making your own lemon curd, now is a good time to make it *

While the dough is rising, prepare the cream cheese filling.
Combine all of the filling ingredients (except the lemon curd) in a small bowl, mixing until smooth and lump-free.
Set aside.

Gently deflate the dough and divide it in half.
Cover half with plastic wrap and set it aside as you roll out the first piece into a 10" x 15" rectangle.
Placed the rolled dough onto a piece of parchment paper.
Lightly press 2 lines down the dough lengthwise, to divide it into 3 equal sections.
Remove the corners of dough.
Spread half of the cream cheese filling down the middle section, and top with half of the lemon curd, leaving 1" free on all sides of the filling.

To form the mock braid, cut 1" crosswise strips down the length of the outside sections, making sure you have the same number of strips on both sides.
Flip the top piece over onto the filling.
Beginning with the left, lift the top dough strip and gently bring it across the filling diagonally.
Repeat on the other side with the top dough strip, so that the two strips crisscross each other.
Continue down the entire braid, alternating sides.

Repeat the process with the second loaf.

Set both loaves aside, lightly covered, to rise for 45-50 minutes, or until quite puffy.

Preheat the oven to 375F.
Brush the loaves with egg wash (1 slightly beaten egg, 2 tsp water, and a pinch of salt).
Sprinkle with sugar, if desired.

Bake for 25-30 minutes, or until the loaves are golden brown.
Remove from the oven and let cool for 15-20 minutes before serving.


And, just to give you an idea of what it looks like with the raspberry jam, I'm adding a picture from a while ago, just to show you:

Friday, August 2, 2013

Red velvet thumbprint cookies

A continuation of L's red velvet birthday treats are red velvet thumbprint cookies.  The first installment, red velvet white chocolate chip cookies, can be found here.


The red velvet white chocolate chip cookie taste tester, my sister who was staying at my apartment for a few days, is not a huge fan of sweets.  In retrospect, probably not the best option for a cookie taste tester, but regardless, she made a good point -- the white chocolate was very, very sweet. 

So when it came to baking these red velvet thumbprint cookies, I was hesitant to fill them with white chocolate, as the original recipe called for.  My first thought was to fill them with cream cheese icing, but the NYC heat, transport issues, and lack of refrigeration at work made me a little cautious.  Ultimately, I decided on a white chocolate cream cheese filling (similar to - and adapted slightly from - the icing on these cranberry white chocolate bars).  I think the cream cheese broke some of the sweetness of the white chocolate, while the white chocolate stopped it from becoming a soupy mess.  Plus, this way I got to impart some of the cream cheese flavor that I think needs to go with the red velvet.  And what a good decision it was!!  It was actually the best part of the cookie.


** I ended up not bringing these to the movie on the pier as they wouldn't survive the stacking.  But they ended up being pretty tasty.  Let them cool before eating them -- that's when the taste the best. **

Red Velvet Thumbprint Cookies

Ingredients:

1 cup butter, softened
1 cup sugar
1 egg
4 tsp red food coloring (I used my gel food coloring, so I cut it down to 3 tsp and they're very RED)
1 teaspoon vanilla
2 1/2 cups all-purpose flour
3 Tbsp unsweetened baking cocoa
1/4 tsp salt

Directions:

Heat oven to 350°F. Line cookie sheet with cooking parchment paper.

In large bowl, beat butter and sugar with electric mixer on medium speed about 2 minutes or until creamy.
Stir in egg, food coloring and vanilla until well blended. 
On low speed, beat in flour, cocoa and salt until blended.

Shape dough into 1-inch balls (I used my trusty cookie scoop).
On cookie sheets, place balls 2 inches apart.
Press thumb into center of each cookie to make indentation, but do not press all the way to the cookie sheet (I used the bottom of a 1/4 tsp measuring spoon to make the crater in the center; I sprayed it with Pam at the beginning).
 
Bake 12 minutes or until set.
Cool 2 minutes; quickly remake indentations with end of wooden spoon, if necessary.
Remove from cookie sheet to cooling rack.
Cool completely, about 10 minutes.
 
Fill the craters in the cookie with the cream cheese-white chocolate filling (see below).  You can use a ziplock bag with the corner cut off, or a piping bag with a decorative tip.
 
Cream Cheese-White Chocolate Filling

 Ingredients:

1 package (8 ounces) cream cheese, softened
1 cup powdered sugar, sifted
3 ounces white baking chocolate, melted

Directions:

In the microwave, melt white chocolate in a microwave safe bowl, in 30 second increments. 
Be sure not to burn the chocolate.

In a large bowl, beat the cream cheese and powdered sugar with an electric mixer until well-blended.
Gradually add melted white chocolate.
Beat until blended.