Facebook 1

Wednesday, July 31, 2013

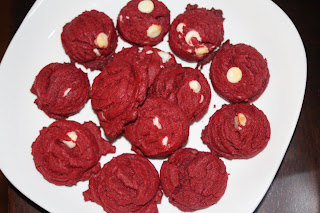
Red velvet white chocolate chip cookies

My friend L's birthday is coming up and she has chosen a movie on the pier to celebrate.  We're going to picnic with some treats and wine, and I figured that since we're celebrating L's birthday and that L loves red velvet, her birthday movie treats would be red velvet.

 
But again - as is pretty much customary in my life - I will be running to the movie straight from work, and that means whatever treats I make will have to first travel from my apartment to work (in Brooklyn) and the back to Manhattan for the movie.  Therefore, ease of transport was a must.  A cake was out.  Cupcakes, too (partially because I didn't want to have to squeeze my way onto the subway with a giant tray of cupcakes, and partially because I made them in a mini for L's 30th birthday party last year).  But cookies?  Those seemed doable.  And transportable.  And, knowing me, why stop at one kind?!  So I set out to make two different types of red velvet cookies.

First up are the red velvet white chocolate chip cookies.   Not too far off from a hybrid of the chewy dark chocolate chip cookies I made last summer (and brought to a movie in the park...for L's birthday) and the dried cranberry white chocolate chip cookies I made earlier in the month (they both use corn starch).


Red velvet became hugely popular a few years ago.  I'm unsure if its the novelty (at least at that time it was a novelty) or simply the fact that they're red (a conversation I had last week, in which B questioned whether an adult would ever admit that they like something simply because it's red).  They're flavor is interesting, with a little -- but not too much -- cocoa, and typically some apple cider vinegar in the batter, too.  But regardless of my opinion and questions regarding red velvet, some people absolutely adore it.  L is one of those people. 

So I started with the red velvet white chocolate chip cookies.  A ruby-hued, mildly chocolately cookie speckled with white chocolate chips.  Why white chocolate?  Well anyone who knows knows that red velvet cake/cupcakes should be topped with cream cheese frosting, and I think aesthetically the white chips mimic the white icing.   (That may be a little deep for a cookie blog post?  Maybe?)

Red Velvet White Chocolate Chip Cookies
With some slight adaptations from the original by yours truly

Ingredients:
 
1 1/2 cups all-purpose flour
2 1/2 Tbsp cocoa powder
1 tsp cornstarch
3/4 tsp baking powder
1/4 tsp salt
1/2 cup butter, softened
1 cup granulated sugar
1 tsp distilled white vinegar - I used cider vinegar.  Why?  Because that's what I always use when I make red velvet cupcakes....and it's what I had on hand
1 large egg
1 1/2 tsp vanilla extract
1 1/2 tsp red food coloring (I had a little snafu - my twist off top on my gel food color wasn't on tightly, and it started oozing out of the bottle....I was aiming for 1 tsp of the gel color because it's so rich, but I think I ended up with closer to the 1 and a half teaspoons)
3/4 cup white chocolate chips, divided (for the first batch of cookies, I divided the chips as the original recipe called for, and then pushed a few into the tops of the cookies before baking.  They turned brown and, in my opinion, not that pretty.  So I mixed them all in and then baked them.  Much easier.  So I don't recommend dividing the chips)
 
Directions:
 
Preheat oven to 375 degrees.
In a mixing bowl whisk together flour, cocoa powder, cornstarch, baking powder and salt, set aside.
 
In the bowl of an electric stand mixer fitted with paddle attachment (mine was in the dishwasher, so I used a good old hand mixer), whip together butter, sugar and vinegar until pale and fluffy, about 3 - 4 minutes.
Mix in egg.
Add in vanilla and red food coloring and mix until blended.
With mixer set on low speed, slowly add in dry ingredients and mix just until combine.
Mix in white chocolate chips (the original author said: I mixed in half of the white chocolate chips then set aside the other half to press into the tops of the rolled dough balls so more of them show through when baking...but she noticed that another baker just pressed some extra white chocolate chips into the tops of cookies AFTER baking, genius!).
Scoop dough out by the heaping tablespoonfuls (or use your handy dandy small cookie scooper, which I did) and shape into balls. If using a scooper, flatten the tops a little before baking, otherwise some cookies may look a little domed.
Transfer to Silpat or parchment paper lined baking sheets and bake in preheated oven 9 - 11 minutes (mine were smaller and baked for 7-8 minutes).
Allow to cool on cookie sheet before transferring to a wire rack to cool.
Store cookies in an airtight container.

Thursday, July 25, 2013

Birthday week treat #4: Chocolate malt cupcakes

On my actual birthday, I thought it was only fitting to post a cupcake on the blog.  A cake would've been acceptable, too, but I figured I could share cupcakes, and a cake would be difficult to lug around and give out to people.  I had been debating between two cupcakes, but this one ultimately won out.

The cute "Happy Birthday" plaque is from my birthday cake
at work yesterday.
I had actually wanted to make these a while ago, but couldn't find malted milk powder in the stores.  So I went online, found it at King Arthur Flour, and ordered it.  Then, it sat in my cabinet until I got around to using it.  In all honesty, whenever I wanted to make these cupcakes, I had the malted milk powder but didn't have any sour cream.  I went back to Target for ingredients for the peanut butter monster cookies and remembered to pick up some sour cream, so I was finally able to make them!


I decided to make 1/3 of this recipe because I have been baking a ton this week and don't really have anywhere to bring it/anyone to give it to, and I can't be eating ALL of the Rice Krispie treats and giant peanut butter monster cookies AND the cupcakes that I've been baking.  I would have halved the recipe, except I didn't feel like having to half an egg....easy solution was to use one egg and just make 1/3 of the recipe.  The original recipe said that it made 30 cupcakes, but I got 13 from the third of the recipe.  For the icing, I just halved it (there was plenty extra!).


** I have to admit -- I didn't love the cupcake part.  But the icing, DELISH!  Next time I think I'd just make a dark chocolate cupcake and top in with the malted buttercream. **

Chocolate Malt Cupcakes

Ingredients (those listed below are the original measurements, which make 30 cupcakes):

For the cupcakes:

2 1/4 cups all-purpose flour
3/4 cup unsweetened dutch-process cocoa powder
1/2 cup granulated sugar
3/4 cup packed brown sugar
1 1/2 teaspoons baking soda
1/2 teaspoon salt
1 cup whole milk
1 1/2 cups malted milk powder
1 cup vegetable oil
3 large eggs, at room temperature
1 cup sour cream, at room temperature
1 teaspoon vanilla extract

For the buttercream:

1 cup unsalted butter, at room temperature
1 cup vegetable shortening, at room temperature
1/2 cup malted milk powder
4 tablespoons unsweetened dutch-process cocoa powder
5 cups confectioner sugar, sifted

Chocolate Covered Malt Balls to garnish (the original blog showed them with mini straws, which are adorable, and I planned to skip them (I even had them at home from L's 30th birthday party last year and the Minnie Oreo pops), but then I couldn't resist them....they're too cute!)

Directions:

Preheat oven to 350 degrees.
Line standard muffin tins with paper liners.
Whisk together flour, cocoa, both sugars, baking soda and salt.
In another bowl, whisk together milk and malted milk powder until powder is dissolved.

With an electric mixer on medium-high speed, beat flour mixture, milk mixture and oil until combined (or just use a whisk and some upper arm strength - which I did).
Add eggs, one at a time, beating until each is incorporated, scraping down sides of bowl as needed.
Add sour cream and vanilla, and beat just until combined.

Divide batter evenly among lined cups, filling each halfway.
Bake, rotating tins halfway through, until a cake tester inserted in centers comes out clean, 18-20 minutes.

While cupcakes are cooling, prepare frosting.
In a large mixer bowl, whip the butter and shorting for several minutes until very light and fluffy.
Sprinkle in malted milk powder and cocoa powder.
Whip for 1 minute.
Slowly add the powdered sugar a few spoonful at a time, letting it incorporate until the frosting becomes thick and stiff.

Fill bag with the frosting and pipe large swirls on top of cupcakes. I liked the way mine looked piled high.
Top with candies and straws, if using.
Enjoy!

Wednesday, July 24, 2013

Birthday week treat #3: Peanut butter monster cookies

I have a confession: these weren't the cookies I set out to make for my birthday. 


I had originally wanted to make these S'mores cookies that I had found on Pinterest ages ago.  They even had these adorable mini marshmallows in them.  But when I sat down and started scrolling though my "Things I Want to Bake" board, I couldn't find the recipe anywhere.  It vanished off the page!  See, the reason for wanting to make the s'mores cookies was that I made s'mores cupcakes for my birthday last year (as well as Kit Kat cupcakes, but this isn't about those).  While not in love with s'mores any more than the next person, I decided that for some birthday week continuity, I would make some s'mores cookies this year.  But lack of a recipe meant I had to scrap that idea. 


So I started looking through my Pinterest board trying to find another cookie that I would want to make for my birthday week of treats.  I came across these Peanut Butter Monster cookies.  HUGE peanut butter cookies with peanut butter and chocolate chips, covered in Reese's Pieces.  Cookies + candy + chocolate chips are definitely birthday treats!  Happy Birthday to me!  (These cookies would also be good for Halloween because, well, Reese's closely resemble Halloween colors.)


 These are not for the faint of heart.....or peanut allergic!

Peanut Butter Monster Cookies
(I got 21 cookies.....BIG cookies)

Ingredients:

2 cups all-purpose flour
2 and 1/4 teaspoons baking soda
1/2 teaspoon salt
1 cup unsalted butter, softened
1 cup peanut butter
1 cup sugar
2/3 cup packed brown sugar
2 large eggs at room temperature
1 teaspoon vanilla extract
1/2 cup rolled oats
1/2 cup peanut butter chips
1/2 cup chocolate chips
Reese’s Pieces mini candies, 1 bag (They suggested two bags, since there weren't enough to coat all of the cookies with one bag - and I needed about 1/5 of an additional bag)

Directions:

Whisk together flour, baking soda and salt in a small bowl.
Set aside.

In a large bowl (or the bowl of a stand mixer) cream together butter, peanut butter, sugar and brown sugar (I used light brown sugar).
Beat until light and fluffy.
Add eggs one at a time, beating well after each addition.
Add vanilla, and beat to combine.
Slowly add dry ingredients, and beat just until combined.
Don’t over beat at this stage.
Stir in oats, peanut butter chips and chocolate chips.
Refrigerate dough for 15 minutes, meanwhile preheating oven to 350 degrees (F).

Prepare a cookie sheet with parchment paper.
Pour Reese’s Pieces candies onto a plate or into a flat bowl.

Using a large cookie scoop (about 3 Tablespoons - I actually used an ice cream scooper, which I purchased specifically for these cookies!) drop cookie dough into the bowl of candies.
Gently use your hand to press the dough down into the candies and flatten the dough into a disc, then transfer to cookie sheet.
Bake, six at a time, for 12-15 minutes or until the edges are just beginning to darken.

Allow to cool on cookie sheet for 5-10 minutes.
*If you skip this step, the cookies might break when you transfer them to a cooling rack.*

Allow to cool on a wire rack for 30 minutes before serving.  Enjoy!

Tuesday, July 23, 2013

Birthday week treat #2: Neapolitan Rice Krispie treats

Birthday week treat #2 was supposed to be a cookie.  But I worked late, ran an errand, and then went back to the office to finish a few charts and call two patients back, and then by the time I got home at 10 p.m. I had to make some meatballs before the ingredients went bad, and I was missing some of the cookie ingredients, and well, I made these instead.  My apologies that its yet another Rice Krispie Treat.....for the second day in a row!  At least these are "fancy" Rice Krispie treats (as one friend called them)...but I digress...

I have been wanting to make this recipe for a while, ever since I saw it on Pinterest.   The only thing holding me back was the inability to find strawberry marshmallow fluff to make the strawberry layer.   But when I was at Target yesterday buying the ingredients for the funfetti Rice Krispie treats, I found strawberry marshmallows!  And figuring I could just exchange the strawberry marshmallows for the fluff, I bought two bags.


The other interesting thing is that the recipe called for Cocoa Krispies and regular marshmallows for the cocoa layer.  Suffice it to say I was intrigued by this recipe.  I've seen chocolate marshmallows, too, so I thought that that may have been how to make the chocolate layer, but I love the Cocoa Krispie idea.  I'm already trying to think of other flavor combinations, but I don't think Cocoa Krispies with strawberry marshmallows would be tasty.  But maybe I'm wrong?


Again, my apologies for making two Rice Krispie treats in the span of one week, but I felt that even though they don't involve baking, they were fun twists on Rice Krispie treats (kinda like the Oreo ones I made before).


Neapolitan Rice Krispie Treats
(adapted from erincooks.com)

FYI:

1.  The original recipe calls for using a 9 x 13 inch pan.  I halved the recipe and used a 9 X 9 inch baking pan.  With the 3 layers in that pan, it came to the tippy top of the pan.  So I recommend that you use a pan with high sides - regardless of if you half it or not.

2. The original recipe calls for using strawberry fluff for the strawberry layer.  I looked long and hard for strawberry fluff but couldn't find it anywhere!  I came across strawberry marshmallows (the large ones, same size as the regular ones) at Target and substituted those for the fluff, and followed the directions for regular rice krispie treats instead of the fluff directions (who knew there were different fluff directions?!).

3.  The original recipe calls for making rice krispie treats the way I remember making them when I was a kid (the few times that we actually made them) - on the stove top in a pot.  But the marshmallow bag that I have at home said to use the microwave, so I did.

4.  The ingredients listed below are for the full 9 x 13 inch pan!


Ingredients:

For the Vanilla Layer

3 tablespoons butter or margarine
40 regular marshmallows (that's just under a full bag)
6 cups Rice Krispies cereal

For the Chocolate Layer

3 tablespoons butter or margarine
40 regular marshmallows
6 cups Cocoa Krispies cereal

For the Strawberry Layer 

3 tablespoons butter or margarine
40 regular-sized strawberry marshmallows
6 cups Rice Krispies cereal

Directions:

Begin by lining a metal square edged 9” by 13” pan with aluminum foil (I skipped that part)
Use a pan that has high sides.
The original recipe notes that: Casserole dishes with rounded edges will not be able to hold all of the treat layers.
Generously spray your prepared pan with cooking spray (I sprayed the pan directly)

For the "Vanilla Layer" melt the butter in a microwave safe bowl.
Add the marshmallows and toss the marshmallows to coat them.
Put the bowl into the microwave for about 1 and a half minutes, stirring about halfway through, until all of the marshmallows are melted and mixed well.
Quickly stir in the rice krispies until they are completely coated.
Pour the mixture into the prepared pan.
Spray a rubber spatula with cooking spray and then firmly press the marshmallow covered cereal into the pan (I use a piece of wax paper sprayed with Pam).
Place the pan in the refrigerator.
Rinse the bowl and dry well. 
Proceed to the Chocolate Layer.

For the "Chocolate Layer" melt the butter in a microwave safe bowl.
Add the marshmallows and toss the marshmallows to coat them.
Put the bowl into the microwave for about 1 and a half minutes, stirring about halfway through, until all of the marshmallows are melted and mixed well.
Quickly stir in the cocoa krispies until they are completely coated.
Pour the mixture into the prepared pan on top of the vanilla layer.
Spray a rubber spatula with cooking spray and then firmly press the marshmallow covered cereal into the pan (I use a piece of wax paper sprayed with Pam).
Place the pan in the refrigerator.
Rinse the bowl and dry well. 
Proceed to the Strawberry Layer.

For the "Strawberry Layer" melt the butter in a microwave safe bowl.
Add the strawberry marshmallows and toss the marshmallows to coat them.
Put the bowl into the microwave for about 1 and a half minutes, stirring about halfway through, until all of the marshmallows are melted and mixed well.
Quickly stir in the rice krispies until it is completely coated.
Pour the mixture into the prepared pan on top of the chocolate layer.
Spray a rubber spatula with cooking spray and then firmly press the marshmallow covered cereal into the pan (I use a piece of wax paper sprayed with Pam).
Place the pan in the refrigerator.

When the treats have cooled completely, remove them from the pan.
Place them on a cutting board.
Discard the aluminum foil (If you used it) and cut the large rectangle into slices.
Then cut each large slice into smaller squares.
Enjoy!

Monday, July 22, 2013

Birthday week treat #1: Funfetti Rice Krispie treats

I never need an excuse to bake, but sometimes it's nice to have one.  It started with a simple question on the juliebakes Facebook page, "My birthday is less than a week away and I'm trying to decide if I should bake something for my birthday, and if so, what I should bake. All suggestions welcome :)"


One person suggested funfetti.   Funfetti is definitely celebratory and birthday-esque, but I had just made a funfetti cake for my sister when she went to Thailand.  I tried to think of a new funfetti recipe and then it came to me.  Funfetti Rice Krispie Treats!


So I made regular old Rice Krispie treats (which are totally awesome on their own), but added loads and loads of colored sprinkles.  Because, honestly lets face it, the only thing that really makes anything funfetti is rainbow sprinkles!


And at work today, I decided that since I'm being overworked at work, the only thing I could do was to attempt to make a birthday treat every weekday of my birthday week.  Because I still find baking relaxing.  So this is the first installment of my "birthday week treats."  Hopefully I'll be able to keep it up all week!  Stay tuned for more fun treats!

Funfetti Rice Krispie Treats
(adapted from the Jet Puffed bag)

Ingredients:

3 Tbsp butter or margarine
40 Large marshmallows (I used Jet Puffed, since that's what they had at the store)
6 cups of Rice Krispies
"Loads and loads" of rainbow sprinkles (actually, 2/3 cup to be exact)

Directions:

Grease a 9 x 13 inch baking pan.  My preference is Pam, but you could also brush it with some melted butter.

Measure out the cereal. 
Add the sprinkles and toss to mix.

Microwave the butter in a microwavable bowl on high until melted (about 45 seconds).
Add marshmallows and toss to coat.
Microwave for 1 minute 30 seconds or until marshmallows are completely melted and mixture is well blended, stirring after 45 seconds.  I recommend using a nonstick spatula or a spatula sprayed with Pam.

Add the cereal and sprinkle mixture immediately, and mix well.
Press into the greased pan.
Allow to cool completely.

Cut into 12 squares.  Honestly, 12 squares will be HUGE Rice Krispie treats.  I recommend cutting them into about 24 squares (4 by 6).  But that's just me.

Sunday, July 21, 2013

Key lime pie cupcakes

I've made key lime pie before.  And I've made cupcakes before (for example: these, these, and even these, to name a few).  But this was my first pie-cupcake.  What, I know you're dying to know, is a pie-cupcake?


Well, it is a cupcake baked on top of a graham cracker crust.  And then these were filled with homemade key lime curd and topped with little dallops of whipped cream and a little key lime wedge.  But I think technically its the cupcake-atop-a-crust that makes it what I have dubbed a pie-cupcake.


Regardless of what they are -- or what makes them what they are -- the only thing you need to know is that they are good.  I mean really good.  Light fluffy lime cupcake.  Crunchy delicious graham cracker crust.  Perfectly tart key lime curd.  Delicious!
 
 
 Now, just a warning, this recipe said it makes about 2 dozen cupcakes.  So I made crust for 2 dozen cupcakes.  And I had leftover crust mixture (I'd guess enough to make about 4 more cupcakes).  And then I made the cupcake batter.  I made 24 cupcakes with crusts, another 12 without crusts, and threw away enough batter to easily make another 18-24 cupcakes.  I'm not sure if it was because I let my butter get really soft or if there was another reason, but I had a ton of extra cupcake batter.  And then I made the curd.  The heavenly perfectly tart curd, and I put it in a bowl to cool, and licked the spatula, pot, and strainer clean.  Then I filled about 18 cupcakes and had a bit of curd left over.  If you get a bunch of cupcakes (more than 24), I strongly recommend making a 1 and a half batch.  Unless you like citrus curd (I do, despite it's name.  Curd.  What a yucky sounding word), and then I'd just double it.

Key Lime Pie Cupcakes
(adapted ever so slightly from the original recipe)

Ingredients:

For the crust:

1.5 cups graham cracker crust
1/4 cup sugar
5 1/3 Tbsp unsalted butter, melted.

For the cupcakes:

3 cups cake flour
1 Tbsp baking powder
1/2 tsp salt
16 Tbsp (1 cup) unsalted butter, at room temperature
2 cups sugar
Zest of 1 lime (or 2-3 key limes) -- I actually found key limes at the grocery store recently and so I used those.
4 large eggs, at room temperature
1 3/4 cups buttermilk, at room temperature
2 tsp vanilla extract
2 tsp coconut extract
I also had some lime extract in my apartment, and since they were key lime pie cupcakes, I added 1 tsp of lime extract as well.

For the filling (Key Lime Curd):

3 large eggs
3/4 cup sugar
1/4 cup freshly squeezed key lime juice
4 Tbsp (2 oz) unsalted butter, at room temperature, cut into pieces

For topping:

1 1/4 cups heavy cream
6 Tbsp confectioners' sugar
Dash on vanilla extract

*Due to the insane heat spell in NYC, and the journey that these cupcakes needed to take, I actually didn't make the topping and instead  used <<gulp>> store bought whipped cream.  I thought it would stay more stable than homemade whipped cream in the heat.  It definitely worked!  I used cool whip in a piping bag with a tip* 

Directions:

Make the curd.

In a non-reactive sauce pain, combine the eggs and sugar.
Whisk together until well blended.
Whish in the key lime juice.
Place the pan over medium-low heat.
Cook, stirring or whisking constantly, until the mixture is warmed through.  *Be careful not to hear the mixture too quickly to avoid curdling of the eggs.
Whisk in the butter a little bit at a time, stirring in each addition until completely incorporated before adding more.
Continue to cook, scraping the bottom of the pan, until the mixture thickens and a spoon or spatula leaves a path when drawn through it (not higher than 175F on an instant read thermometer -- although I honestly didn't use one).
Immediately remove the pan from the heat and pass the mixture through a fine mesh strainer.
Transfer to an airtight container and refrigerate.  It keeps up to 2 weeks in the fridge.

Make the cupcake crusts:

Preheat the oven to 350F.
Line two 12-cupcake pains with paper liners.
In a small bowl, combine the graham cracker crumbs, sugar, and melted butter; mix well with a fork.
Drop about 1 Tbsp of the mixture into the bottom of each cupcake liner and press down to line the bottom (the bottom of a shot glass works marvelously).
Bake for 5 minutes.
Remove from the oven, but keep the oven on at 350F.

Make the cupcakes:

Combine cake flour, baking powder, and salt in a medium bowl.
Whisk together and then set aside.

Add the butter to the bowl of an electric mixer fitted with the paddle attachement.
Beat on medium-high speed for 3 minutes, until light and creamy in color.
Scrape down the sides of the bowl and beat for one more minute.
Beat in the lime zest. 
Add the sugar 1/4 cup at a time, beating 1 minute after each addition.
Mix in the eggs 1 at a time until incorporated.
Scrape down the sides of the bowl after each addition.
Combine the buttermilk and vanilla and coconut (and lime) extracts in a liquid measuring cup.
With the mixer on low speed, add the dry ingredients alternately with the wet ingredients, beginning and ending with dry ingredients, mixing just until incorporated.
Scrape down the sides of the bowl and mix for 15 seconds longer.

Divide the cupcake batter between the prepared paper lines, filling each about 2/3 of the way full.
Bake 18-22 minutes, or until a toothpick inserted into the center comes out clean.
Allow to cool in the pans 5-10 minutes, then transfer to a cooling rack to cool completely.

Make the whipped cream topping:

Combine the heavy cream and confectioners sugar in the bowl of an electric mixer fitted with the whist attachment. 
Whip on medium-high speech until stuff peaks form.
Beat in the vanilla.
Transfer to a pastry bag fitted with a decorative tip.

*As I stated earlier, I was afraid that this whipped cream wouldn't hold up in the heat wave that we're having in NYC, and instead I used cool whip.  I have to say that despite the heat, and the two trips on the subway, the cool whip did not melt or wilt at all.  Just something to keep in mind if your cupcakes will be taking 2 45-minute trips on the 3 train - or a long car ride in the heat*

Assemble the cupcakes:

Using a paring knife, cut a small cone out of the center of the cupcake, and remove (and eat -- you wouldn't want to waste perfectly light and fluffy lime cupcake, would you?!) the cone.
Fill the hole with about 1.5 Tbsp of the lime curd.
Pipe a rim of whipped cream around the top of each cupcake, leaving the lime filling exposed.
Garnish with key lime slices, if desired.

Tuesday, July 16, 2013

Samoa cupcakes (again)

B's birthday was a few days ago.  I had been thinking about what to bake for his birthday for a while, because I wanted it to be great, but I kept coming back to one thing.  Whenever the fact that I bake comes up, B always mentions my Samoa cupcakes (the ones I made for my friend J's birthday in March).  Considering it's the first thing he mentions -- and the fact that he's told me that he really likes them -- it seemed that I should save my new recipes for another occasion.  (Check back in the next day or two for one of those.)

Now, I have to admit, the Samoa cupcakes are pretty awesome.  And they really were perfect just the way they were, but this time I made two small changes -- one intentional, and one unintentional.  The first was that I made salted caramel buttercream.  That was unintentional, as I quickly grabbed salted butter off the shelf of the grocery store, and didn't realize it until it was warmed up to room temperature and it was late (translation: I didn't have the time to wait for unsalted butter to warm up to room temp).  So I used the salted butter and left out the additional salt that the recipe called for.  It turned out pretty tasty.  The other change was that, due to a lack of time and some forethought, I used store bought dark chocolate syrup, instead of the homemade one I made the first time.  The store bought syrup was super tasty, but it kinda made the icing look a little weird.  It may have been because it was a very warm room temperature.  Next time, I'd go with the homemade one in the future or try chilling the store bought syrup just for the aesthetics of the cupcakes.  But that's just me.

 
The recipe for the Samoa Cupcakes can be found here.


Saturday, July 6, 2013

Triple Oreo-yellow cake cupcakes

My sister gets back from her nearly 8-month trip TODAY.  I can't wait!!  I am so excited to see her (the last time I saw her was in Thailand in January/February).


My sister's one request was that we go out for Asian food tonight in Chinatown.  So as soon as she lands, goes through customs, and gets picked up by my parents, they will head over to my sister's favorite restaurant for soup dumplings, where my other sister, B, and I will meet them for a welcome home dinner.  And, being the baker that I am, I couldn't show up to a welcome home celebration without a baked good.


 Just over a year ago, I made mini "Death by Oreo" cupcakes.  There are Oreos 3 ways, with some chocolate cupcake to hold them together.  My sister - who loves Oreos - doesn't love chocolate and at the time had requested that I make her the same cupcake with yellow cake instead of chocolate.  Well today, her request has been answered.


"Welcome Home" Triple Oreo-Yellow Cake Cupcakes

Cupcake recipe here
Icing and assembly here (substituting the above cupcake recipe for the "chocolate cake recipe" listed in the link)

Notes:

1. I halved the cupcake batter recipe.  I got 24 cupcakes.
2. I iced 19 of the cupcakes and had extra icing.  I'm pretty sure I would be able to ice 24 cupcakes with one single batch of icing.

Wednesday, July 3, 2013

Dried cranberry and white chocolate chip cookies

July 4th is not a holiday that I get off from work.  Unless I take a vacation day, which I just never think to do.  So on any typical July 4th, I usually come home from work exhausted and watch the fireworks on television.  Except for the one year that they opened up the roof of my building and that year I came home from work and watched them from up there.  Admittedly, the view was pretty awesome.


This year, July 4th falls on a Thursday.  Which is, of course, my late night at work.  So I'll rush over to B's after work to watch the fireworks from his building's roof deck (he lives closer to my office than I do, plus they didn't let us go on my roof last year, so I presume it's not going to be open again this year).


So, suffice it to say, I haven't really had a reason to bake for July 4th in quite some time.  Because I'm rushing from work to B's, I'm pretty sure I am not going to be schlepping cupcakes or a cake from home to work to B's. 

But, I wanted to bake today, and ended up deciding that I really wanted to have those white chocolate chip and dried cranberry cookies that I had set out to bake last month.  And then you know what I realized?  They're red and white!  I thought about adding some blueberries so that they were red, white, and blue for July 4th, but didn't think that would be too tasty.  So I went with red and white cookies for July 4th.  And the best part?  They're cookies, so they're totally transportable (may not be an actual word, but you know what I mean.).  In hindsight, I could have added dried blueberries, which would've added the blue and would have probably tasted good.  Maybe I'll try those out soon. 


Now those of you that actually know me know that I'm a little Type A/OCD (although my dad would claim that I'm not just a little type A - I believe that his actual quote was "you're not laid back, you're type A, cubed"), so I like my cookies uniform in size.  So I used my little cookie scooper.  But I find it hard to use on refridgerated dough, so this time I didn't let the dough chill and just baked them as soon as the dough was done, but baked them for 7 minutes instead of 8-9.  But the first batch still came out a little domed, and I thought about flattening the following batches, but these fell a little after the cooled, so I didn't need to.  And, as you already know, I love all things mini (OK, almost all things mini), so the cookies are small.  Which may explain why I got 75 cookies out of this batch of dough (although the original said it makes 2.5 dozen, or 30 cookies).

*And, of course, after I wrote this whole blog post, my schedule at work got changed, and guess what....I'm not working on July 4th!  Go figure.*

Soft Baked White Chocolate Chip and Dried Cranberry Cookies
From Sally's Baking Addiction

Ingredients:
 
3/4 cup (1.5 sticks) unsalted butter, softened to room temperature
3/4 cup dark brown sugar
1/4 cup granulated sugar
1 large egg, at room temperature
2 teaspoons vanilla extract
2 cups all-purpose flour
2 teaspoons cornstarch
1 teaspoon baking soda
1/2 teaspoon salt
3/4 cup white chocolate chips
3/4 cup dried cranberries
 
Directions:
 
Line an ungreased cookie sheet with parchment paper or silicone baking mat.
Set aside.
 
In a large bowl using a hand-held mixer or stand mixer with paddle attachment, cream the butter and sugars together on medium speed until fluffy and light in color.
Mix in egg and vanilla.
Scrape down the sides as needed.
On low speed, mix in flour, cornstarch, baking soda and salt.
Stir in white chocolate chips and dried cranberries.
 
Chill dough (covered) for 30 minutes or up to 3 days -- I skipped this part.
 
Preheat oven to 350F.
Drop balls of dough onto cookie sheet OR used a standard-sized cookie scoop.
Bake for 8-9 minutes, until barely golden brown around the edges -- I baked mine for 6-7 minutes. Do NOT cook them longer than 9 minutes.
Remove and let cool for 5-10 minutes on the cookie sheet (If cookies do not spread at all, gently press down with a spoon when they come out of the oven.)
Transfer to cooling rack.