Facebook 1

Showing posts with label Red Velvet. Show all posts

Saturday, February 20, 2016

Red velvet cookies and cream muddy buddies

I was late to the muddy buddy party.  By decades.  Then the other day, while assembling goodies for my sister as part of a post-surgery recuperation package, I stumbled across cookies and cream muddy buddies. And I bought them. And proceeded to eat nearly a third of the bag on my subway ride home (and then toss the remainder of the bag in the nearest garbage can. Self control is clearly not my strong point.). Needless to say, I was hooked.


Lately the shelves have been stocked with fun and interesting flavored Oreos (case in point: cinnamon bun, red velvet, "filled cupcake"), and in my post-Valentine's day brain, I started thinking up muddy buddy flavors of my own.  Like red velvet cookies and cream!  Conveniently, I had purchased packages of all three new (techniically red velvet was available last year, seasonally) flavors, but had only cracked open the cinnamon bun ones to try (they're delicious, and I'm already working on a recipe for those!).  I had originally planned to dip the red velvet ones in white chocolate for Valentine's Day, but lost track of time, and so they were just sitting around.


These buddy buddies are delicious!  I loved the red velvet flavor mixed with the cream cheese flavor (from the filling) and the hint of vanilla from the coating.  Absolute perfection!  At least I won't have to worry too much about self control, since I will be shipping (most) of these off to work with B tomorrow!

Red Velvet Cookies & Cream Muddy Buddies
Adapted from this recipe

Ingredients:

6 cups chex cereal (I used corn)
12 oz white almond bark (I used white vanilla CandiQuik)
20 Red Velvet Oreos
1/2 cup powdered sugar (I ended up needing a little more)

Directions:

Put cereal in a large bowl.

Process the Oreos in a food processor until fine (my preferred method) or place in a sealed ziplock bag and crush with a rolling pin.

Melt CandiQuik (or almond bark) in it's tray (or a microwave safe bowl) and microwave in 30 second increments.
Stir.
Continue microwaving and stirring every 30 seconds until completely melted.

Pour melted CandiQuik/almond bark over cereal.
Stir carefully to coat it.

Immediately add the ground Oreos.
Toss/Stir to coat.
Next, toss on the powdered sugar and mix until coated.

I placed mine on a wax paper lined baking sheet so that the CandiQuik could dry.
I felt mine needed a little more powdered sugar, to I added 1 Tbsp at a time until all of the muddy buddies were coated in powdered sugar.

Friday, February 13, 2015

Red velvet Rice Krispie treat sandwiches

As soon as I saw these, I knew I had to make them for Valentine's Day.  They combine some of my favorite flavors -- all in one!


But, I'm always honest with you guys, so I feel like I need to come clean right away.  These use cake mix.  You know that boxed stuff, where you add eggs, oil, and water, and bake a cake?  Yeah, well thats in these.  But they're so good I decided to turn a blind eye to my boxed cake mix aversion (except for cake balls....I use it for those), and let you in on this tasty little secret!


See, you simply use a little extra butter when melting the marshmallows, and then you add some red velvet cake mix to the mixture before adding the rice krispies.  It's as simple as that!  And then once they're cooled, you cut the slab in half, cover half of it with some sweetened cream cheese, and then cover them with the other half of the Rice Krispie treats.  And then you cut them into squares.  They're really a deliciously sweet treat!

Red Velvet Cake Rice Krispie Treat Sandwiches
From Cookies & Cups
I adapted it ever so slightly (my changes are in italics)

Ingredients:

1/4 cup butter (4 Tbsp)
1 10 oz bag of marshmallows (10.5 oz bag of mini marshmallows)
1/3 cup dry red velvet cake mix
6 cups Rice Krispies cereal (I used 4.5 cups before I couldn't mix them anymore, and I wanted them all to be coated in the gooey red velvet marshmallow mixture...if you can add more, go for it)

1/2 cup butter or cream cheese, room temperature (I used cream cheese)
2 cups powdered sugar

White chocolate chips, for decoration (optional)

Directions:

Line a 10 x 15" jelly roll pan with foil.
Grease lightly with cooking spray.
Set aside.
I used a 9 x 13 inch baking pan, sprayed with cooking spray.

In a large sauce pan, melt butter over low heat.
Add marshmallows and stir until melted.
Remove from heat.
I melted the butter in a microwave safe bowl in the microwave in 30 second increments until all melted.
Then, add the marshmallows to the bowl and toss to coat.
Microwave until melted.  I usually do mine in 60-90 second increments.

Add in cake mix.
Stir until completely mixed with the marshmallow-butter mixture.
Pour into the prepared pan and press evenly (I use a piece of wax paper with cooking spray).
Let cool.

Make the filling by beating the butter or cream cheese with the powdered sugar (start low and add sugar according to taste -- I liked mine minimally sweet and ended up using about half the sugar).
Whip them really well.  I didn't whip mine as much as I would've liked (I was in a rush), and it makes it hard to see that delicious sweetened cream cheese layer in the center.

Cut the Rice Krispie treat sheet in half, so that you have two equal portions.
Spread filling on one of the halves.
Cover with the other piece of the Rice Krispie treat.
Cut into squares.

I debated drizzling some with melted white chocolate, but last minute decided against it.

Tuesday, July 15, 2014

Assorted birthday cupcakes

I wanted to throw B a birthday party for a while.  I originally mentioned it to him about three and a half months before his birthday.  I wanted to make sure (a) he wanted a party and (b) that I had plenty of time to plan!


So I spent the past few months planning his birthday party -- first from whether it would be a group dinner out at a restaurant or a party on his roof deck (I let him make that decision), and once the decision was made, there was lots more planning: from the color scheme to the treats I'd bake to the food I'd order to the drinks we'd serve to the favors I'd give out to the should-there-be-a-photo-booth-at-the-party debate to the guest list to the centerpieces, and so on and so on and so on.  Have I mentioned my OCD tendencies?!


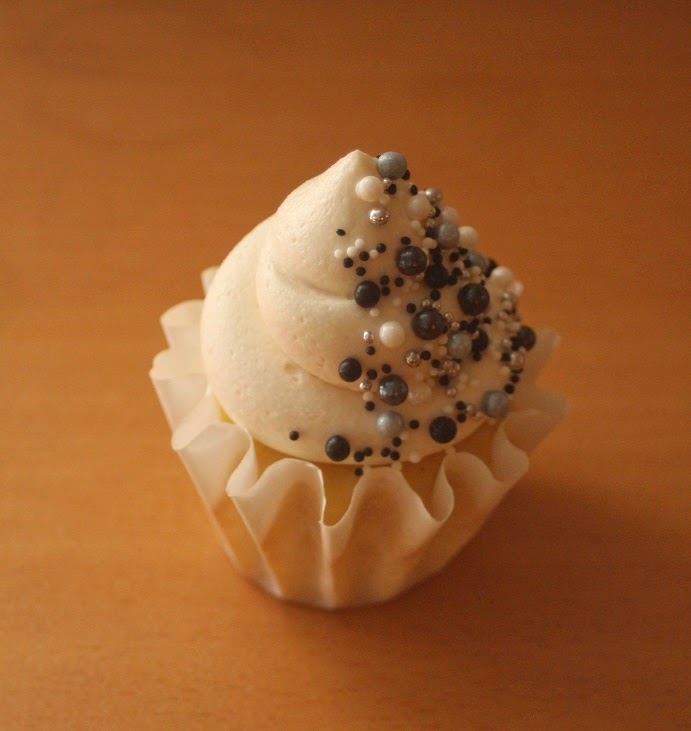
I wanted to make cupcakes.  But I couldn't make just one kind of cupcake.  Heck no!  There needed to be a variety of cupcakes...and other treats, too.  I am, after all, JulieBakes, and he has made it a habit of making me show people all of my baked goods when I meet them, so I couldn't embarass myself with just one kind of cupcake (even if it was his favorite cupcake).  So I made lots of cupcakes.  Lots and lots of them!  Iced with a perfectly piped heap of icing and beautifully decorated.  I mean, it is a PARTY, right?


So for the party, I made red velvet cupcakes with cream cheese frosting (I used dark cocoa powder since I loved the flavor it gave the red velvet bundt cake I made a few months ago).  And dark chocolate cupcakes and vanilla/yellow cupcakes, and then I made vanilla buttercream and chocolate buttercream (this time I used 1/3 dark cocoa powder and 2/3 regular cocoa powder), and then I made a mixture of cupcake combinations - chocolate cupcakes with vanilla buttercream, yellow cupcakes with chocolate buttercream, chocolate cupcakes with chocolate buttercream, and yellow cupcakes with vanilla buttercream.  On each cupcake, I piped the icing on in a swirling pile with a big round tip (Ateco 809).  And then I went to town decorating them.  I had seen these cupcakes on Pinterest and they were my inspiration for B's birthday cupcakes.  I totally copied them, but it was so worth it....the cupcakes were gorgeous!!

I had a bunch of "pearls" -- white, black, graphite grey/silver, and silver.  I used silver dragees as well.  And then I used white and black nonpareils, and teeny tiny silver dragees that were basically the size of nonpareils.  I started by strategically placing the pearls over half of the piped icing, and then after that was done to my liking, I started sprinkling a mixture of the silver, black, and white nonpareils (I mixed 2 Tbsp of each color together in a bowl and then used that mixture for the sprinkling) over the same half of the cupcake where I had placed the pearls.

I'm not going to lie, it's a bit time consuming, especially when it involved decorating 36+ cupcakes....but c'mon, look at the them....it was TOTALLY worth it.  Even I - who never brags - think they're pretty freaking adorable!

Thursday, March 20, 2014

Red velvet bundt cake

When I saw a recipe for a red velvet bundt cake a while ago, I was really intrigued.  I'd never seen a red velvet bundt cake before, but more importantly, I couldn't figure out why it had never occurred to me to make one before!  And while everyone loves my red velvet cupcakes, I didn't know if that recipe would work in a bundt cake or not, so when it came to making the bundt cake, I ended up using the recipe I found.


So the recipe sat in my virtual recipe box on Pinterest for a long time.  Until today.  See, B has family visiting from out of the country, and his visitor was talking about these cool new cupcakes at home, red velvet.  B told him how I baked all the time and made me show him pictures of my baking (I showed him B's favorite, the Samoa Cupcakes, and while he was flipping through pictures, he saw the red velvet ones I had made at that same time, about a year ago, for a friend's 30th birthday).


Since we're getting together at the end of the week, I figured I'd bake something red velvet for B's visitor.  Enter the aforementioned red velvet bundt cake.  The only thing I doctored with this recipe was the icing.  I wanted to make a white chocolate-cream cheese icing, so I decreased the powdered sugar (the white chocolate has sweetness of it's own), added the white chocolate, and added just a little extra milk to thin it out and make it pourable.  (And by the way, this makes a TON of icing....I ended up using about half of it on the cake.  I'm debating what I can use the rest of it for, but I'm sure I'll come up with something else to use it for.)


Red Velvet Bundt Cake
From Bird on a Cake

Ingredients:

For the cake:

2 1/2 cups all-purpose flour
2 cups granulated sugar
1 cup vegetable oil
1 tsp baking soda
1 tsp salt (as I type this up, I am not 100% sure if I ended up adding the salt, but having tasted the cake already, I can say that if I left it out, it was still delicious!)
3 Tbsp cocoa powder (I used dark cocoa powder out of laziness, and I have to say, it made it absolutely delicious!!)
1 tsp white vinegar (I used cider vinegar because thats what I had at home, and thats what my other red velvet cake called for)
1 tsp vanilla extract
2 eggs
1 cup buttermilk
1 oz red food coloring (thats 2 Tbsp.  I used 4 tsp (1 1/3 Tbsp) of gel coloring, which is richer and therefore I used a little less)

For the icing:

8 oz cream cheese, at room temperature
1/2 cup unsalted butter, at room temperature
4 cups confectioners' sugar (I used just over 3)
1 tsp vanilla extract
4 oz white chocolate, melted and slightly cooled
1/4 cup milk (I used closer to 1/3 cup)

Directions:

Preheat the oven to 325 degrees. 
Grease a Bundt pan really well (I used Pam for baking, and I sprayed it liberally, and the cake popped right out of the pan).  
Place one cupcake liner in a cupcake tin (this will be used for the garnish). 
In a medium bowl, mix eggs with a wire whisk. 
Add oil, vinegar, vanilla, buttermilk and food coloring. 
Whisk together and set aside.

In a large mixing bowl, mix together all the dry ingredients. 
Add the wet ingredients and mix on medium high until combined.  
Fill cupcake liner half full with batter, then pour the rest of the batter into your Bundt pan. 
Bake the cupcake for 20-25 minutes, and bake the cake for 50-55 minutes.

Let the cake cool.

Make the icing.

Mix together the room temperature butter and cream cheese.
Add the sugar and vanilla.  I add the sugar in about 1/2 cup increments, for 2 reasons - (1) if you add it all at once, you will inevitably be wearing powdered sugar, and (2) that way you can adjust the level of sweetness.
Add the white chocolate.
Add the milk.

Pour over the cooled cake.

Crumble the cooled cupcake.
Sprinkle over the iced cake.

Thursday, February 13, 2014

Happy Valentine's Day!

In case you're looking for some last minute ideas for Valentine's Day, I've come up with a few sweet ideas for your sweetie this Valentine's Day.


Red Velvet

Red Velvet and White Chocolate Chip Cookies
Red Velvet Cake Pops and Cake Balls
Red Velvet Thumbprint Cookies
Red Velvet Cupcakes (or Mini Cupcakes)


Anything Involving Hearts

The cookie below has a heart-shaped sprinkle placed on top of it.  You could easily bake a sprinkle into the top of each cookie if you so desired.

Lovin' Spoonfuls
Oreo pops with heart-shaped decorations
Heart-shaped cake pops (or regular cake pops with heart-shaped sprinkles), or these
Heart-shaped homemade marshmallows, either plain or chocolate-covered
Heart-shaped deep chocolate cookies, drizzled with white chocolate and topped with a few heart sprinkles
Chocolate covered pretzels with heart sprinkles


Chocolate (!!)

Frankly, in my opinion, anything chocolate will do, although I am particularly a fan of dark chocolate.  Here are just a few chocolate ideas for your sweetie on Valentine's Day.

Chewy Chocolate Cookies with White Chocolate Chips
Loaded Peanut Butter Chocolate Covered Potato Chip Dulce De Leche Fudge
"The Best" Fudge Brownies
Double Chocolate Chunk Cookies
Flourless Chocolate Earth Cake
"Death by Oreo" Mini Cupcakes
Chocolate Chip Cookie, Oreo, and Brownie Bars


...just to name a few!


Whatever you make, whatever you do to celebrate, I hope your Valentine's Day is sweet!!


Friday, August 2, 2013

Red velvet thumbprint cookies

A continuation of L's red velvet birthday treats are red velvet thumbprint cookies.  The first installment, red velvet white chocolate chip cookies, can be found here.


The red velvet white chocolate chip cookie taste tester, my sister who was staying at my apartment for a few days, is not a huge fan of sweets.  In retrospect, probably not the best option for a cookie taste tester, but regardless, she made a good point -- the white chocolate was very, very sweet. 

So when it came to baking these red velvet thumbprint cookies, I was hesitant to fill them with white chocolate, as the original recipe called for.  My first thought was to fill them with cream cheese icing, but the NYC heat, transport issues, and lack of refrigeration at work made me a little cautious.  Ultimately, I decided on a white chocolate cream cheese filling (similar to - and adapted slightly from - the icing on these cranberry white chocolate bars).  I think the cream cheese broke some of the sweetness of the white chocolate, while the white chocolate stopped it from becoming a soupy mess.  Plus, this way I got to impart some of the cream cheese flavor that I think needs to go with the red velvet.  And what a good decision it was!!  It was actually the best part of the cookie.


** I ended up not bringing these to the movie on the pier as they wouldn't survive the stacking.  But they ended up being pretty tasty.  Let them cool before eating them -- that's when the taste the best. **

Red Velvet Thumbprint Cookies

Ingredients:

1 cup butter, softened
1 cup sugar
1 egg
4 tsp red food coloring (I used my gel food coloring, so I cut it down to 3 tsp and they're very RED)
1 teaspoon vanilla
2 1/2 cups all-purpose flour
3 Tbsp unsweetened baking cocoa
1/4 tsp salt

Directions:

Heat oven to 350°F. Line cookie sheet with cooking parchment paper.

In large bowl, beat butter and sugar with electric mixer on medium speed about 2 minutes or until creamy.
Stir in egg, food coloring and vanilla until well blended. 
On low speed, beat in flour, cocoa and salt until blended.

Shape dough into 1-inch balls (I used my trusty cookie scoop).
On cookie sheets, place balls 2 inches apart.
Press thumb into center of each cookie to make indentation, but do not press all the way to the cookie sheet (I used the bottom of a 1/4 tsp measuring spoon to make the crater in the center; I sprayed it with Pam at the beginning).
 
Bake 12 minutes or until set.
Cool 2 minutes; quickly remake indentations with end of wooden spoon, if necessary.
Remove from cookie sheet to cooling rack.
Cool completely, about 10 minutes.
 
Fill the craters in the cookie with the cream cheese-white chocolate filling (see below).  You can use a ziplock bag with the corner cut off, or a piping bag with a decorative tip.
 
Cream Cheese-White Chocolate Filling

 Ingredients:

1 package (8 ounces) cream cheese, softened
1 cup powdered sugar, sifted
3 ounces white baking chocolate, melted

Directions:

In the microwave, melt white chocolate in a microwave safe bowl, in 30 second increments. 
Be sure not to burn the chocolate.

In a large bowl, beat the cream cheese and powdered sugar with an electric mixer until well-blended.
Gradually add melted white chocolate.
Beat until blended.

Wednesday, July 31, 2013

Red velvet white chocolate chip cookies

My friend L's birthday is coming up and she has chosen a movie on the pier to celebrate.  We're going to picnic with some treats and wine, and I figured that since we're celebrating L's birthday and that L loves red velvet, her birthday movie treats would be red velvet.

 
But again - as is pretty much customary in my life - I will be running to the movie straight from work, and that means whatever treats I make will have to first travel from my apartment to work (in Brooklyn) and the back to Manhattan for the movie.  Therefore, ease of transport was a must.  A cake was out.  Cupcakes, too (partially because I didn't want to have to squeeze my way onto the subway with a giant tray of cupcakes, and partially because I made them in a mini for L's 30th birthday party last year).  But cookies?  Those seemed doable.  And transportable.  And, knowing me, why stop at one kind?!  So I set out to make two different types of red velvet cookies.

First up are the red velvet white chocolate chip cookies.   Not too far off from a hybrid of the chewy dark chocolate chip cookies I made last summer (and brought to a movie in the park...for L's birthday) and the dried cranberry white chocolate chip cookies I made earlier in the month (they both use corn starch).


Red velvet became hugely popular a few years ago.  I'm unsure if its the novelty (at least at that time it was a novelty) or simply the fact that they're red (a conversation I had last week, in which B questioned whether an adult would ever admit that they like something simply because it's red).  They're flavor is interesting, with a little -- but not too much -- cocoa, and typically some apple cider vinegar in the batter, too.  But regardless of my opinion and questions regarding red velvet, some people absolutely adore it.  L is one of those people. 

So I started with the red velvet white chocolate chip cookies.  A ruby-hued, mildly chocolately cookie speckled with white chocolate chips.  Why white chocolate?  Well anyone who knows knows that red velvet cake/cupcakes should be topped with cream cheese frosting, and I think aesthetically the white chips mimic the white icing.   (That may be a little deep for a cookie blog post?  Maybe?)

Red Velvet White Chocolate Chip Cookies
With some slight adaptations from the original by yours truly

Ingredients:
 
1 1/2 cups all-purpose flour
2 1/2 Tbsp cocoa powder
1 tsp cornstarch
3/4 tsp baking powder
1/4 tsp salt
1/2 cup butter, softened
1 cup granulated sugar
1 tsp distilled white vinegar - I used cider vinegar.  Why?  Because that's what I always use when I make red velvet cupcakes....and it's what I had on hand
1 large egg
1 1/2 tsp vanilla extract
1 1/2 tsp red food coloring (I had a little snafu - my twist off top on my gel food color wasn't on tightly, and it started oozing out of the bottle....I was aiming for 1 tsp of the gel color because it's so rich, but I think I ended up with closer to the 1 and a half teaspoons)
3/4 cup white chocolate chips, divided (for the first batch of cookies, I divided the chips as the original recipe called for, and then pushed a few into the tops of the cookies before baking.  They turned brown and, in my opinion, not that pretty.  So I mixed them all in and then baked them.  Much easier.  So I don't recommend dividing the chips)
 
Directions:
 
Preheat oven to 375 degrees.
In a mixing bowl whisk together flour, cocoa powder, cornstarch, baking powder and salt, set aside.
 
In the bowl of an electric stand mixer fitted with paddle attachment (mine was in the dishwasher, so I used a good old hand mixer), whip together butter, sugar and vinegar until pale and fluffy, about 3 - 4 minutes.
Mix in egg.
Add in vanilla and red food coloring and mix until blended.
With mixer set on low speed, slowly add in dry ingredients and mix just until combine.
Mix in white chocolate chips (the original author said: I mixed in half of the white chocolate chips then set aside the other half to press into the tops of the rolled dough balls so more of them show through when baking...but she noticed that another baker just pressed some extra white chocolate chips into the tops of cookies AFTER baking, genius!).
Scoop dough out by the heaping tablespoonfuls (or use your handy dandy small cookie scooper, which I did) and shape into balls. If using a scooper, flatten the tops a little before baking, otherwise some cookies may look a little domed.
Transfer to Silpat or parchment paper lined baking sheets and bake in preheated oven 9 - 11 minutes (mine were smaller and baked for 7-8 minutes).
Allow to cool on cookie sheet before transferring to a wire rack to cool.
Store cookies in an airtight container.

Sunday, August 5, 2012

Red velvet cupcakes

The 30th birthday bash for my friend L was last night.  We went to a great dinner, and then to a fantastic bar for drinks afterwards.  I brought the treats to the bar....mini cupcakes and chocolate covered Oreo pops (that post will be up in the next few days).


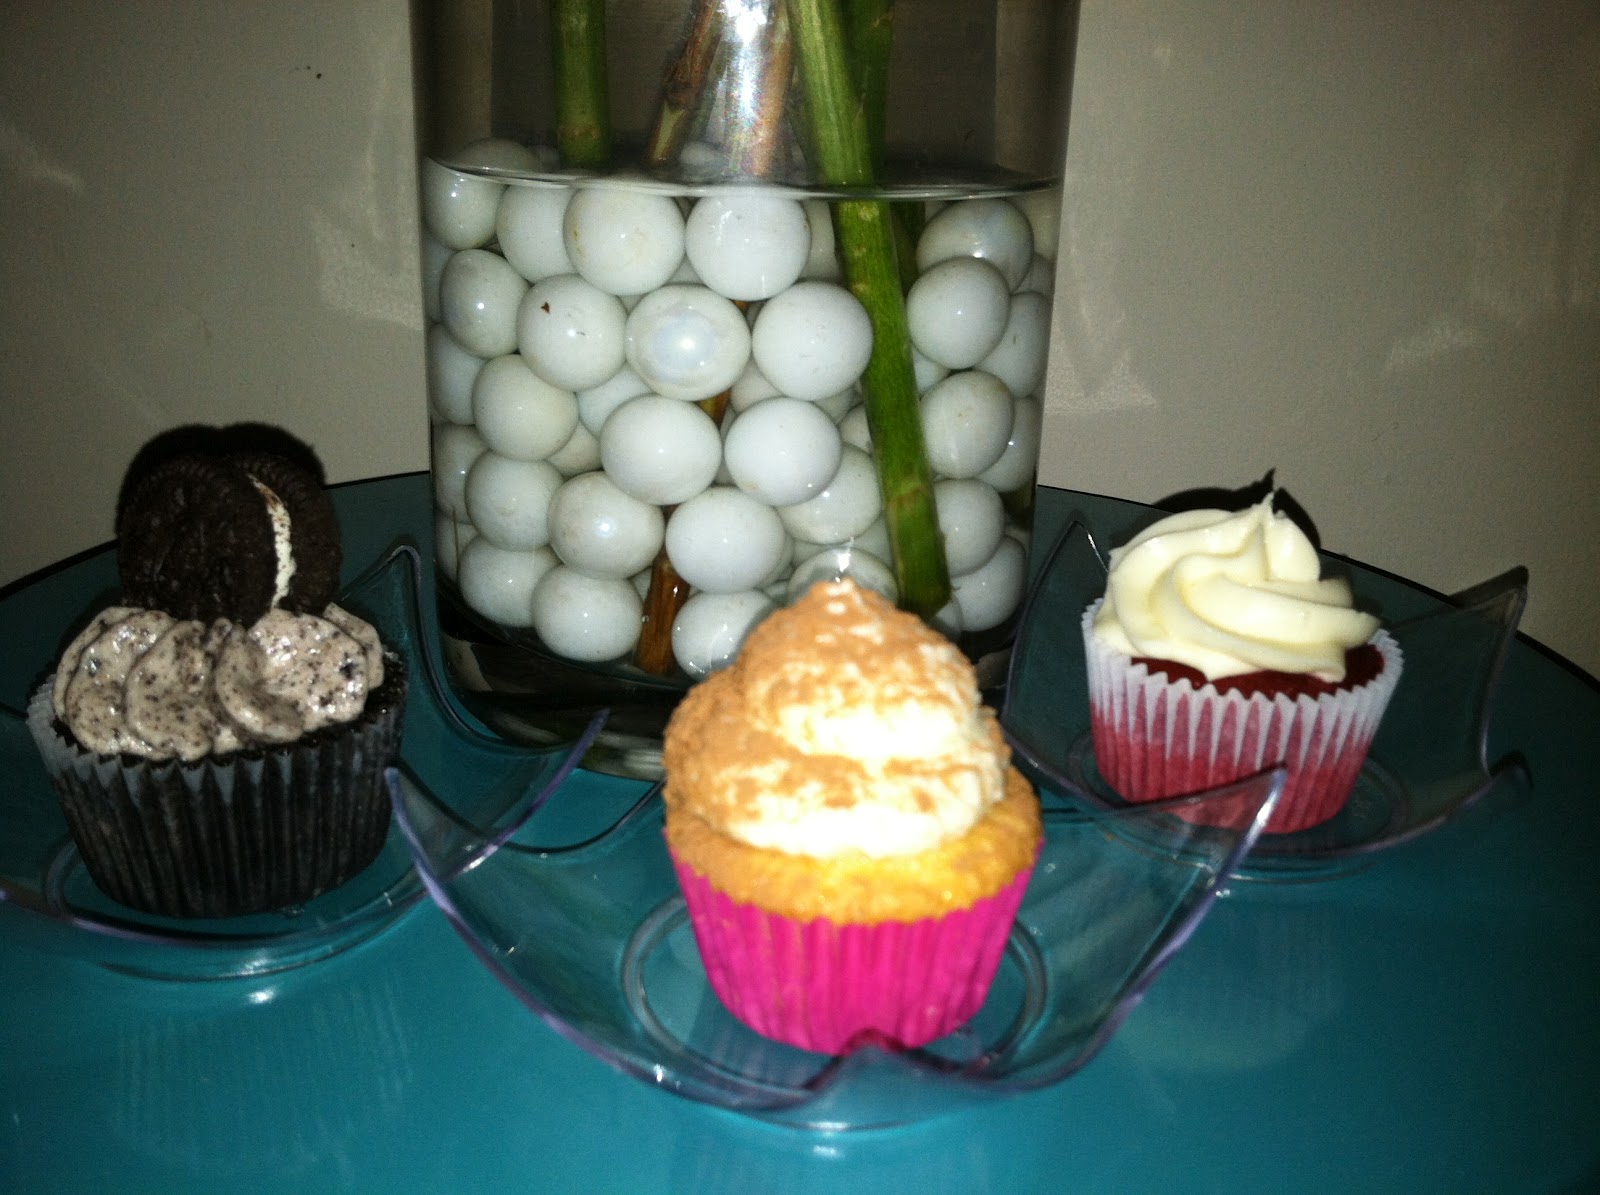
L's two favorite desserts are tiramisu and red velvet cake, so those cupcakes were givens for the party.  I also made some "Death by Oreo" cupcakes; as I stated last night "no self-respecting woman would show up with cupcakes and not bring chocolate ones." 


So I set out to make the cupcakes the night before and that day.  Three types of mini cupcakes, three different icings.  Three different piping tips.  Several washings of the kitchenaid bowl and attachments.  Two loads of dishes run.  But it was worth it - in taste, in presentation, in everything!


I made the tiramisu mini cupcakes and "Death by Oreo" cupcakes before.  I thought I had made red velvet cupcakes on here before, too, but a quick search through older posts proved me wrong.  Check the above links for the other two cupcakes, and below for the red velvet ones.  FYI, I halved the red velvet recipe and got 48 minis and 4 full-sized cupcakes.

I'm also posting a picture of all the cupcakes together:


Red Velvet (mini) Cupcakes

Ingredients (for the full batch):

3 1/2 cups cake flour (not self-rising)
3/4 cup (1 1/2 sticks) unsalted butter, softened
2 cups sugar
3 large eggs, at room temperature
6 tablespoons red food coloring (I use gel coloring, and use less than the recipe calls for as it is very strong food coloring)
3 tablespoons unsweetened cocoa
1 1/2 teaspoons vanilla extract
1 1/2 teaspoons salt
1 1/2 cups buttermilk
1 1/2 teaspoons cider vinegar
1 1/2 teaspoons baking soda

(their recipe uses a vanilla icing, but - in case you didn't know - red velvet (at least in my opinion, but I'm not the only one) should have cream cheese icing, so look below for that recipe)

Directions:

Preheat oven to 350°F.
Grease and lightly flour three 9- by 2-inch round cake pans, then line the bottoms with waxed paper.
Or use cupcake papers if making cupcakes or mini cupcakes.

In a small bowl, sift the cake flour and set aside.
In a large bowl, on the medium speed of an electric mixer, cream the butter and sugar until very light and fluffy, about 5 minutes.
Add the eggs, one at a time, beating well after each addition. In a small bowl, whisk together the red food coloring, cocoa, and vanilla.
Add to the batter and beat well.

In a measuring cup, stir the salt into the buttermilk.
Add to the batter in three parts alternating with the flour.
With each addition, beat until the ingredients are incorporated, but do not overbeat.
In a small bowl, stir together the cider vinegar and baking soda.
Add to the batter and mix well.
Using a rubber spatula, scrape down the batter in the bowl, making sure the ingredients are well blended and the batter is smooth.

Divide the batter among the prepared pans. Bake for 30-40 minutes (my mini cupcakes took about 8 minutes), or until a cake tester inserted in the center of the cake comes out clean.
Let the cupcakes cool.
Ice the cupcakes with:

Cream Cheese Icing
(this is originally from Epicurious but I can't find the original recipe anymore.  Since I make it all the time, I've somewhat memorized it....see below)

Ingredients:

3 8-oz packages of cream cheese, room temperature
1/2 stick of butter, room temperature
3-4 cups of powdered sugar (I think the original recipe called for 4 cups, but I usually go by taste, because I don't like it too sweet)
Vanilla to taste (I used 1 tsp)

Directions:

Blend together cream cheese and butter
Add vanilla and incorporate
Add powdered sugar, half to 1 cup at a time, to taste.