Facebook 1

Saturday, March 31, 2012

A twist on French macarons

I have weird cravings.  Not the type of craving where I want to eat something, let alone something weird, but they type of craving when an idea pops into my head and I feel that I must make it.  It's not even that I want to eat it once it's been made; I just want to make it.


This idea came into my head a while ago when I was searching for something else, and I am honestly shocked that I've waited this long to make them.  A few weeks ago, while doing some research on some Dr. Seuss-themed cupcakes, I came across these macarons.  Colored and flavored with....wait for it....Kool-Aid!  Yes, you read that correctly.  Blasphemous, right?  Kool-Aid and high-end French desserts, which sell for upwards of $2.50+ a piece, together?  But it's also kinda ingenious.  Flavor and color in one addition?  I was intrigued.  However, the flavors used for those macarons were not the least bit enticing to me, as I do not like fruit punch, and things that are dyed artificially blue weird me out a little.  Then I started thinking about flavor combinations that would sound good to me.  Chocolate always works but (a) there is no chocolate Kool-Aid that I know of, and frankly even if it did exist, I would NOT want to try it, and (b) I'm saving those for next week.  I kept coming back to lemon/lemonade, but ultimately settled on pink lemonade, because that would lend not only flavor to the macaron but also a hint of color.  Instead of buttercream, I decided that a homemade lemon curd would go really well with the slightly sweet/slightly tart pink lemonade.


They're not as pink as I had hoped, but look at those perfect feet!

Kool-Aid Flavored Macarons

110 grams almond flour (I found almond meal - at Trader Joe's - such a time saver!  Although the only almond meal I found had the skins on them, so my macarons are a little spotted.  In the past, I weighed out 110 grams of almonds and then pulsed them with the confectioner's sugar)
200 grams confectioners sugar
100 grams egg whites (from 3 eggs, separated 24 hours in advance or microwaved for 8-10 seconds - I got impatient and let mine sit for 13.5 hours)
50 grams granulated sugar
1 envelope Kool-Aid (I looked it up, 4.5 grams per packet....I couldn't find packets so I had to buy  an entire container - but I went with CountryTime pink lemonade since Kool-Aid only came in yellow lemonade.  I also had to do some playing around with it, since the packets of Kool-Aid say to add sugar, but the larger containers already contain sugar.  If you use packets of Kool-Aid without sugar in them, keep the original measurements.  If you use the sugar-already-added larger containers, subtract 4 grams of sugar from the original recipe, using 46 grams of granulated sugar.)
1-2 drops food coloring, optional

Lemon curd, see below.  If you choose other flavors of Kool-Aid, you can mix up the flavors of the filling.  Maybe a lime curd, or a raspberry coulis.  Or a good old chocolate or white chocolate ganache.  Or buttercream.  They'd all work, depending on the flavor of macaron that you choose to make.

Directions:

Pulse the almond flour (or almonds) and confectioner's sugar several times in your food processor until thoroughly mixed.
Place your aged egg whites in the bowl of your stand mixer and whisk until foamy.
Add the sugar and turn the mixer to high, whisking until you have a glossy meringue.
Add the Kool Aid and food coloring, if using, to the egg whites and let the mixer run a few circles through the batter to distribute.
Fold the dry ingredients into the egg whites gently, briskly at first to break up the meringue a bit, until thoroughly mixed. The batter will be a little lumpy but will relax.
Transfer the batter to a piping bag fitted with a large round tip and pipe rounds of 1.5 inches along two parchment-lined baking sheets.
Let sit one hour at room temperature (this allows them to get the "foot" that you see on the bottom of the macaron).
Heat oven to 300. Bake for 10-12 minutes. Cool completely and remove from the pan.
Not more than 24 hours before serving, pipe 1-2 tsp of frosting onto one cookie and top with the other, gently pressing down (because of the moistness of the lemon curd, I decided to wait to fill the macarons until just a few hours before serving).
Store tightly covered

Homemade Lemon Curd
(This lemon curd recipe is embedded in another recipe, a braided lemon bread, which is absolutely fantastic and I have made it several times - all before I started the blog.  It will eventually make its way onto the blog, but if you're impatient and want to make it beforehand, I highly recommend it!)

3 Tbsp freshly squeezed lemon juice
3/4 tsp fresh lemon zest, finely grated (perfect use for a microplane grater!)
3 Tbsp sugar
1 large egg
2 Tbsp unsalted butter, cut into small pieces

Directions:

Whisk together the lemon juice, lemon zest, sugar, and egg in a saucepan.
Stir in the butter and cook over moderately low heat, whisking frequently, until curd is thick enough to hold marks of whisk and first bubble appears on surface, about 4 to 5 minutes.
Transfer lemon curd to a bowl and cover with plastic wrap so that the wrap touches the surface of the curd, and allow it to chill until cold, at least 1 hour.

**Depending on how strictly you keep kosher for Passover, these macarons would be a nice addition to your Passover dessert repertoire, however I am personally hesitant to use Kool-Aid mix on Passover.  I will, however, have a more Passover friendly macaron coming up in the next week or so**

Wednesday, March 28, 2012

Basketball hoop cookies

My dad's birthday is at the end of April, and my sisters and I had planned to take him to a Knicks game to celebrate.  It's a flashback to our childhood when we used to alternate going to the games with my dad or mom, or both of them, in some combination.  The permutations were endless!  But we loved going, and over the years I even caught some pretty famous games.  The only problem is that we encountered a few little issues along the way.  Like Jeremy Lin and his "linsanity," which caused a huge influx of ticket purchases (and therefore fewer tickets for us to purchase).  A shortened NBA season.  The fact that there are only a handful of Knicks home games left, and that we can't coordinate our schedules (not even considering my dad's schedule).  We decided we'd keep the idea in place, but we wouldn't be making it to an acual game....this season.  So, we picked the first game that worked for us, which happened to be this week, roughly a month before my dad's actual birthday.


So the festivities were NY Knicks themed, or more generally, basketball themed.  The foods that we served were throwbacks to what we ordered when we went to the games: hot dogs, hot pretzels, knishes, and pizza (definitely not low carb).  The room was decorated in blue and orange streamers, a knicks balloon, and a Knicks sign.  Basketball paper plates and Knicks napkins rounded out the theme.  Of course, I made dessert.  I thought about cake balls decorated like basketballs, but my dad doesn't have a huge sweet tooth and cake balls are super sweet.  Then I came across these adorable cookies, and decided to make these.  A few little changes to make them a little more Knicks-y, and a substitution for the basketball (since I didn't have enough time to buy actual sugar basketball decorations), and I was good to go!

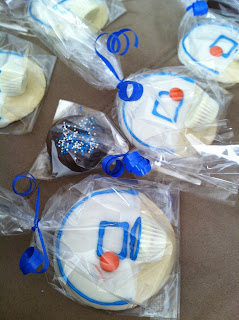
The finished results are these basketball hoop cookies.  I used orange Reese's pieces as basketballs, and I used blue piping icing instead of black because the Knicks colors are blue and orange.  I think they turned out pretty cute:


These would also be great for March Madness festivities!

I threw a few color-coordinated Oreo pops in, too!
Slam Dunk Cookies

6 Tbsp unsalted butter, softened
1/2 cup granulated sugar
1 egg
1/2 tsp vanilla extract
1 1/4 cup flour
1/2 tsp baking powder
1/4 tsp salt

Decorations:
1 package Vanilla CandiQuick Candy Coating (I presume that white chocolate will work, as well)
White Reese's mini peanut butter cups
Black food coloring or cake writing icing (use oil or powder based food coloring, only)
Basketball sugar lay-ons (or orange Reese's pieces or M&Ms)

Directions:
1. Preheat oven to 400F
2. Cream together butter and sugar until smooth.  Beat in egg and vanilla.  Stir in dry ingredients.
3. Roll dough on a well floured surface, leaving rolled dough 1/4 inch thick.  Cut the dough into approximate 3 inch circles.
4. Place cookies on baking sheet 1 inch apart.  Bake 6-8 minutes.  Cool completely.
5. Melt CandiQuik or chocolate according to directions. 
6. Dip 3/4 of each cookie in chocolate/coating.  Place on wax paper
7. Unwrap peanut butter cups, dip on in the coating and place on the bottom (un-coated) edge of the coating.  Press the basketball (or Reese's pieces) above the peanut butter cup.  Let set.
8. Once set, pipe on the backboard and hoop lines with colored candiquik or cake writing icing.

Candy bark

I melted some Vanilla CandiQuik for an upcoming project (more on that soon), and I had some leftover.  I've been told that it can be remelted and reused, but I had it in front of me, and I didn't have much success the first time I tried remelting it.  So what to do with just over half a tray of melted vanilla confection?  Clearly, my mind went straight to candy bark.  Tossing it was not an option, and I swore off Oreo-related treats for a while (that was my promise to you).  The question that remained was what to put into the bark.  Luckily for me, I impulse bought a bag of dark chocolate mint M&Ms yesterday, and I thought that they'd work pretty well.


The "recipe" is super easy.  Take melted CandiQuik (I used vanilla, you could use chocolate, too) or melted chocolate (milk, white, or dark).  Mix in candies (it could be anything really, Reese's pieces, M&Ms, any small candy), and then sprinkle some on top.  Let chill.  Break into pieces.  There it is.  Candy bark!

Sunday, March 25, 2012

First birthday party

My friend hosted a first birthday party for a friend's son at her restaurant. She asked me if I could make some - 60 - of those chocolate covered Oreo pops for the party (I guess I wasn't wrong when I hypothesized the first time I made them that they could be made for any occasion or celebration). I went with white and milk chocolate (actually vanilla and chocolate flavored coatings by CandiQuik - after searching far and wide, I finally found them in New York), sprinkled them with white and blue nonpareils, individually bagged them, and tied them with either blue or white curling ribbon. Sixty of them. There were a few extras, but after bagging, tying, and curling the ribbon on 60 of them, I wasn't in the proper mind frame to wrap the 7 remaining pops.


I really promise that my next several recipes will be Oreo-free! Until then, I hope you enjoy these...

Saturday, March 17, 2012

St. Patty's day

Happy St. Patty's Day!

I know what you're thinking; I can see it in your eyes.  You're thinking (to yourself, of course...you'd never say it to my face) "this blog isn't even 6 months old and she's repeating recipes.  REPEATING recipes.  The nerve!" -- and you'd be right.  But (and there's always a but), it's St. Patrick's Day, and despite having made this chocolate Guinness cake before, Guinness is almost synonymous with St. Patrick's Day (well Guinness and Irish soda bread).  I first thought about making Irish soda bread, but it's an acquired taste to most.  Then, I thought I'd make something dyed green (like a green velvet cake), but my mother hates anything artificially green (not that I'll be spending St. Patty's day with my mom, but it's a very random but true fact, ask me about it sometime).  So instead I figured I'd doctor up the cake.  And by doctor it up, I mean make some cupcakes, and add some shamrock sprinkles.  Then I figured why not add some Bailey's to the mix?  So I added some to the icing (just enough to give it some flavor).  Then, I brought them to the bar.  Because thats what I assume anyone who made a cake with beer and Bailey's would do.  Or rather, what they should do.


Now I did a few un-Julie things with this recipe.  First of all, I didn't make mini cupcakes.  Shocking, right?  I went with the old school, standard sized cupcakes (mainly because I had an idea in mind for the cupcake liner that I wanted to use, and I couldn't find it in mini, and also because making that many mini cupcakes seemed like a daunting task at the time.  But enough about that).  Secondly, I didn't half the recipe.  I actually got insanely overzealous and doubled the recipe.  I wasn't sure how many cupcakes one batch would make, and I didn't want to have to remake the batter, so I doubled it.  (The answer to that question, in the future, is about 24 cupcakes per recipe; I got 48(!?!).)


Get the recipe here.  For the cupcakes, I used about 1/3 of a cup of batter in each cup.  I added Bailey's until the icing got the flavor but wasn't overbearing.  I used a quasi-heaping teaspoon of icing for each cupcake, and then sprinkled them with the shamrocks.  Very St. Patty's Day!

Monday, March 12, 2012

Oreo's 100th birthday

Tuesday, March 6th marked the 100th birthday of the Oreo cookie.  In honor of this milestone birthday, Oreo came out with a special edition cookie, the Birthday Cake Oreo. 


And as a (belated) tribute, I decided to make homemade Oreos.  Besides the normal activities that deterred me from baking these cookies in a timely fashion (school, work, my "social life"), I had 35-40 chocolate lollipops to make for a friend's sister's theme birthday party and treats for another friend's sister's bridal shower.  Needless to say, I got around to these cookies a little bit after the date.  But I honestly don't think that Oreo minds all that much...

As I've mentioned, I'm not a huge fan of Oreo cookies.  Not that you'd know that based on the number of Oreo-themed treats I've made recently.  I assume some of it stems from the insanely high number of Oreos that we ate on vacation, and my body must be going through some sort of Oreo withdrawal.  The other reason is that I realize I am the minority, and that most people like love adore Oreos.

I found this recipe for homemade Oreos, it looked simple enough, and I liked that she talks about the amount of sugar in the cookies.  See, I think the best part of the Oreo is the cookie, while I think most people would say they like the filling better.  The best part of the cookies is that they aren't too sweet.  So I followed the directions and decreased the sugar for the cookies so that they'd be similar to the original Oreo cookie...


Homemade Oreos (from SmittenKitchen)

Ingredients:

Cookies:
1 1/4 cups flour
1/2 cup unsweetend Dutch press cocoa
1 tsp baking soda
1/4 tsp baking powder
1/4 tsp salt
1 cup granulated sugar (if you're going for the not-too-sweet Oreo cookie, 1 1/2 cups for a sweeter cookie)
1/2 cup + 2 Tbsp (1 1/4 sticks) unsalted butter, room temperature
1 large egg

Filling:
1/4 cup (1/2 stikc) unsalted butter, room temperature
1/4 cup vegetable shortening (I used Crisco)
2 cups confectioner's sugar, sifted
2 tsp vanilla extract (I used the real stuff, which is brown, and so the filling turned tan...but worry not, once you beat it and whip it, it looks white again)

Directions:
Preheat the oven to 375F
In a food processor or the bowl of a mixer, thoroughly mix the dry ingredients for the cookies. On low speed, add the butter and then the egg. Continue mixing until the dough becomes a big ball.
Take rounded tsps of batter and put on a parchment lined paking sheet, about 2 inches apart. Slightly flatten the dough. Bake for 9 minutes, rotating once for even baking. I made mine a little smaller, and baked for about 5 minutes.
Cool cookies on a baking rack.
Make the filling - mix butter and shortening in a mixing bowl and gradually add the sugar and vanilla, beat to incorporate. Turn to high and bear for 2-3 minutes until light and fluffy.
Assemble to cookies - fill a pastry bag fitted with a 1/2 inch round tip with the filling. Pipe teaspoon sized dallops of cream into the center of one cookie and top with another cookie approximately the same size. Lightly press the top cookie to work the filling evenly to the outside of the cookies. Repeat until all cookies are made.

Saturday, March 10, 2012

Bridal shower Oreo pops

My friend is getting married at the end of April, and this weekend is her bridal shower.  I offered to bake treats (this is the norm for me), but was informed by the matron of honor that one of the bridesmaids had insisted on ordering cupcakes from her favorite bakery.  Not a problem, I thought, I can sit this one out.  With the chocolate covered Oreo pops and 2 different kinds of chocolate lollipops of last week, plus the homemade Oreos I've been scheming to bake - and the school work - I wouldn't mind the break.  But I happen to know that the bride loves my homemade treats, so I asked my friend (the bride's sister and matron of honor) once again if she wanted me to make anything, and she asked for favors for the shower.  Sticking with my Oreo theme, I planned to make the chocolate covered Oreo pops with hearts and engagement rings - perfect little favors for a bridal shower!  But of course, "(wo)man plans and G-d laughs," and when I went to pop the dark and white chocolate engagment rings out of the mold, they all cracked.  Without the time - and the patience - to remake them, I stuck with the original big hearts and drizzled the other half with white chocolate and added mini hearts.  Bridal showers are all about the wedding the bride love, right, so hearts are an acceptable decoration (here I go rationalizing again....)

I promise I'll be done with Oreos soon....I just have so many at home and I want to use them up.


For the how-to on making chocolate covered Oreo pops, check this out.

Friday, March 9, 2012

And the Oscar goes to...

The Oscars were about 2 weeks ago (and to be honest, I'm not even sure I know what won best picture), but this weekend, a coworker/friend is throwing a birthday party for her sister.  The theme is red carpet/Oscars.  She wanted Oscar-shaped lollipops (it took a long time to find the mold!) and ultimately decided on milk chocolate.  I decided that in order to look like the real Oscar statue, I would need to spray them with edible gold "spray paint."  I individually bagged each lollipop and tied it with red and gold ribbons.  I think they really look like miniature (edible) Oscars!


I can't wait to hear what the birthday girl thought of them!

Sunday, March 4, 2012

Oreo "pops"

I came back from vacation relaxed, rejuvenated, and even a little tan. The first two disappeared pretty soon after I landed at the airport...I've had a busy week! I had a bunch of school work to catch up on, I had family visiting from out of town, my friend opened a bar (check it out here), and work was crazy, as usual.

I did, however, get some baking in. Well, not really baking as much as crafting in the kitchen. First up were Dora, Diego, & Boots lollipops for my friend's daughters 2nd birthday party. They were just solid milk, white, and dark chocolate, not really detailed like the Elmos I made last year. Instead of the cake pops, which I had done a practice run for a few weeks ago, I opted to make decorated "Oreo pops" - basically chocolate covered (double stuffed!!) Oreos on a stick. I made those in milk, dark, and white chocolate. I decorated them with Dora and flower icing decorations, number 2s, and some sprinkles. All were wrapped in individual bags and tied up with a bright pink ribbon. I mean honestly, what 2 year old girl doesn't like pink, right?

My friend purchased the Dora lollipop molds, so I can't tell you where they came from, however a quick online search led me to all of these.

I got the idea for the Oreo pops from pinterest, and then through some digging eventually got to this blog. I found that removing some of the Oreo cream with a toothpick and then putting the stick into the filling void worked better than pushing the stick directly into the filling, as I broke a cookie that way (and so I had to eat it...). Just don't make the cavities too big, otherwise the sticks can slip out. I liked - and used - the suggestion to put some chocolate on the removed cookie so that it adhered and stayed attached when I dipped them into the chocolate. After they were dipped and I got as much of the extra chocolate off as I could, I rested them flat side down on a wax paper-lined baking sheet. When the chocolate was still wet, I affixed the Dora and flower decorations to some and sprinkled some others with sprinkles. I let about a handful of them dry in the fridge, and then piped on 2s with a contrasting colored chocolate.


I have to admit, these chocolate covered Oreo pops are absolutely adorable.  I am already thinking of tons of different decorations I can put on them - different sprinkles and nonpareils, fondant decorations, other sugar decorations, maybe even chocolates....

Saturday, March 3, 2012

Peanut butter multigrain Cheerio treats

About a month ago, I went to Target for something (I don't recall what it was), but I do recall leaving there with several boxes of cereal.  I don't know why, considering I live alone and very rarely eat cereal for breakfast, but there were so many options and I couldn't decide on just one.

Earlier in the week I made those delicious rice krispie treats with Oreos, and then I started thinking...why not make gooey marshmallow treats with other cereals?  Out of the options I had, I narrowed it down to 2 choices: peanut butter multigrain Cheerios and dulce de leche Cheerios.  Assuming that the dulce de leche ones were going to be too sweet, I went with the peanut butter ones.  I threw in a few unmelted mini marshmallows and a few mini chocolate chips, and voilĂ , new tasty treat!  I like the subtle taste of the peanut butter and the marshmallows together.  I don't think the chocolate chips added much in terms of flavor, so I'd leave them out next time.  I might add some peanut butter chips, though.


Peanut Butter Multigrain Cheerio Treats

3 cups Peanut Butter Multigrain Cheerios (or any other variety of Cheerios you think would taste good)
3 cups mini marshmallows, 1/4 cup set aside
1.5 tablespoons of unsalted butter
Nonstick cooking spray

(I made this recipe in a roughly 8.5 x 6 inch pan.  Doubling the recipe should work well for a 9 x 13 inch pan).

Spray a spatula and pan with nonstick spray, set aside.

Melt butter and marshmallows in a large microwave safe bowl, for about 3 minutes.  The marshmallows expand a lot, so use a large bowl.

Mix in the dry cereal and reserved 1/4 cup of marshmallows.

Pour into prepared pan, and let cool. 

Cut into pieces and serve.  Store in an air-tight container.

Friday, March 2, 2012

Vote for JulieBakes

I've been nominated for "Best Recipe Blog" on thekitchn.com's Homie Awards.  In full disclosure, I nominated myself, but I've been trying to get this blog out there, and I figure this is a good way to do it.  Plus, I've already gotten some votes!

Before midnight on March 2nd, please vote for me by clicking on the link below, registering (if you haven't done so already), and choosing this here little blog, JulieBakes.  If I make it to the next round, I'll let you know the process after that.

http://www.thekitchn.com/best-recipe-blog-nominations-the-homies-2012-166621#nominate

Thanks!