Facebook 1

Showing posts with label Buttercream. Show all posts

Saturday, September 2, 2017

Yellow cupcakes

It's not every day that I get an American holiday off from work.  A day off where others have the day off, and make BBQs and have pool parties and general day-off fun shenanigans.  Sometimes I make it to the tail end of the festivities after my day of work.  But no, not this year!  This year the stars aligned, and not only did I get Labor Day off, I even got invited to B's friend's home and had a BBQ.


So what to do I do when I'm invited somewhere (just about anywhere?!)?  I bake.  And bake I did.  And it was exceptionally momentous because I christened my new Kitchen-Aid!!  It was sitting on the kitchen counter so lonely for over three months, since we got married, just begging to be used.  And today was it's lucky day!


I bought some super cute red, white, and blue star sprinkles for whatever treat I baked for our Labor Day BBQ, and I ultimately decided on cupcakes because, well, cupcakes are fun BBQ food, and I also haven't baked cupcakes in what seems like forever!  I was going to use my go-to yellow cake cupcake recipe but I couldn't, for the life of me, find my cake flour.  So I set off onto the internet to find a yellow cake recipe that didn't use cake flour.  I found it in the form of Brown Eyed Baker's yellow cake, which I turned into cupcakes.

One thing I'll say about these cupcakes is that they rise a lot, so filling them 2/3 of the way like I did with my first batch yielded cupcakes that overflowed a bit.  I filled them about 1/2 way for the second batch, and they didn't overflow.  I recommend filling them halfway -- with my first 18 cupcakes being filled 2/3 of the way and the rest being filled 1/2 way, I got 28 cupcakes.  My guess is you'll get closer to 33 to 3 dozen if you filled them all 1/2 way.

Yellow Cake Cupcakes
Recipe from Brown Eyed Baker, cupcake directions by me

Ingredients:

2 1/4 cups all-purpose flour
2 teaspoon baking powder
1 teaspoon baking soda
1 teaspoon salt
1/2 cup unsalted butter, at room temperature
1 1/2 cups granulated sugar
3 large eggs, at room temperature
1 teaspoon vanilla extract
1 1/4 cup buttermilk

Directions:

Preheat the oven to 350F.
Line cupcake tin with cupcake liners.
Set aside

In a medium bowl, whisk together the flour, baking powder, baking soda, and salt.
Set aside.

Using an electric mixer or stand mixer, cream together butter and sugar until light and fluffy, about 3 to 5 minutes.
Scrape down the sides of the bowl.
Beat in eggs, 1 at a time, beating for 1 minute between each addition.
Beat in vanilla extract.

Add the dry ingredients all at once.
Beat on low speed until just combined.
Add the buttermilk and beat on low for 1 minute.
Increase speed to medium and beat for 3 additional minutes.

Divide the batter evenly between prepared pans.  I recommend filling them halfway....more than that and mine overflowed.  You may need to bake them in two batches.
If filled 1/2 way, as recommended, bake for 16-18 minutes, or until a skewer inserted into the center of the came comes out with just a few moist crumbs attached.
Remove from the oven and cool for 10 minutes in the pans.
Remove, and place on wire racks.

Cool completely before icing.

Use the icing of your choice.  I went with this vanilla icing.  

Pipe icing onto cupcakes.
Top with sprinkles of your choice, if desired.

Friday, March 25, 2016

Unicorn bars

Sometimes a recipe just calls to me, and I feel compelled to make it, even if I don't have a reason/event to make it for. I saw these "unicorn bars" a while ago and wanted to make them.  Time got away from me, and the other day I received a shipment of sprinkles (gorgeous, stunning sprinkles that I ordered from the amazing sweetapolita!) and realized they'd look stunning on these bars!


So I set out to make them.  I realized that my new sprinkles (given their varying sizes, textures, and make-up (some have sixlets (chocolate-filled candies) in them) probably wouldn't mix into the bars well, so I used rainbow sprinkles for the bars themselves, and topped them with the fancy sprinkles.  (And I had fun playing around with my macro lens for my iPhone and took these close-ups of the sprinkles!)


Basically, they're a glorified funfetti cookie base covered in vanilla buttercream (in fun colors!!) and then topped generously with beautiful sprinkles (I used a combination of 4 different kinds of sprinkles -- some regular rainbow sprinkles and 3 different pretty sprinkles mixes that I had bought [in even amounts, because I'm OCD], minus the few sixlets that I picked out and ate while I was making the icing.....but shhhh, no one else needs to know that!). 


These really are gorgeous bars, and super tasty, too!  I made sure to package up a bunch for B to bring to work this weekend, and some others for drinks I have dinner plans with for tomorrow evening.

Unicorn Bars
from Cookies & Cups

Ingredients:

For the bars:

1 cup butter, melted
1 1/2 cups granulated sugar
2 tsp vanilla
3 eggs
1/2 tsp kosher salt (I recommend crushing it between your fingers as you add it)
2 cups flour
1/2 cup sprinkles

For the frosting:

1 cup butter, room temperature
4 cups powdered sugar
2-3 Tbsp milk
Blue food coloring
Pink/red food coloring (I ended up using some pink and then a drop of purple to get a richer purple)
Sprinkles for garnish

Directions:

Preheat the oven to 350F.
Line a 9 x 13" pan with foil, and coat the foil with nonstick spray
Set aside.

In a large bowl, whisk together the butter and sugar.
Add in the vanilla, eggs, and salt.
Whisk until smooth.
Using a rubber spatula, stir in the flour until just combined.
Finally, stir in the sprinkles.

Spread the batter into the prepared pan.

Bake for 25-30 minutes until the edges are set. 
The bars might seem underdone, but allow them to cool completely.

Make the frosting.

In the bowl of a stand mixer, beat the butter for 1-2 minutes until it's smooth.
Turn the mixer to low and slowly add in the powdered sugar.
Next, add in 2 tablespoons of milk.
Mix on medium speed until it's creamy, scraping the sides as necessary.
If the frosting is too stiff, add in 1 more tablespoon of milk until the desired consistency is reached.
Finally, add in 1-2 drops of blue food coloring.
Mix until a pale blue color is reached and evenly mixed.
Remove half of the frosting and place in a piping bag.  I chose not to use a piping tip on it, but you can use any tip that you'd like.
To the remaining frosting in the bowl, add 1-2 drops of pink/red food coloring or purple (if you have) and mix again until a pale purple/lavender color is reached and evenly mixed.
Add purple frosting to another piping bag.

Pipe or spread the frosting on top of the bars.
The original blogger piped rich swirls of frosting on the bars before cutting them  I was afraid that it would get too messy, so I cut them and then piped a little dallop of either the blue or purple frosting on top.

Garnish with more sprinkles, if desired.  Definitely, definitely liberally apply sprinkles!

Note: If you pipe the frosting on the uncut bars, with glorious swirls as the original blogger did, you will need to double the amount of frosting.  If you pipe it as I did, half the frosting recipe should be enough, but I'd make a full batch of frosting depending on how big you cut the bars (mine were quite small, about 1 x 1").

Sunday, April 26, 2015

Dad's birthday cupcakes

For my dad's 65th birthday, my mom went a little overboard (I talked a bit about it here...she made over a dozen hors d'ourves!), and seeing as I'm her daughter, it really shouldn't come as a surprise that I make a second birthday dessert for my dad at 9 a.m. before people came over for brunch.  Brunch was supposed to be out at a restaurant with an extensive brunch and champagne cocktails, but at the end, my dad decided he wanted round two of hour d'ourves, and my mom was happy to oblige -- plus she got to serve the remaining tasty treats that she didn't get to serve the night before.


Years ago, through a series of jokes, my father gave himself the nickname of being our "shining light."  And seeing as my dad likes chocolate (I didn't fall far from that parental "tree" either), I made some double chocolate cupcakes with sugar stars on them.  Seemed only fitting on his birthday :)


The cupcake recipe can be found here, and the icing recipe here.

Monday, March 2, 2015

Rolo cupcakes

I'm obsessed with those bags of mini candies they have now.....Miniature versions of classic candies that come unwrapped in bags -- which means they are easily addictive (unwrapping those snack sized candies really puts a damper on how quickly you can shove them in your mouth) and utterly adorable because they're mini, and, well, you know how I feel about all things mini.


So for my friend's bar's 3rd birthday party, I decided I'd bake up a few cupcakes for my friend and our trivia team (I LOVE bar trivia, and how fun that the birthday party coincides with trivia night?!).  I had bought a bag of mini Rolos candies to make cupcakes with, and I figured this was the perfect time to make them!


I made dark chocolate cupcakes, and put a Rolo in each before baking.  Then, I topped each with homemade caramel buttercream, a caramel drizzle, and finished with another mini Rolo on top!

I have to say, these turned out pretty darn cute.....and tasty!

Rolo Cupcakes

Dark chocolate cupcakes 

Ingredients:

8 Tbsp unsalted butter, cut into 4 pieces
2 ounces bittersweet chocolate, chopped (I used semisweet since the store didn't have bittersweet.  They're basically the same thing anyway).
1/2 cup Dutch-processed cocoa powder
3/4 cup all purpose flour
1/2 tsp baking soda
3/4 tsp baking powder
2 large eggs
3/4 cup granulated sugar
1 tsp vanilla extract
1/2 teaspoon table salt
1/2 cup sour cream

12-18 mini Rolos for cupcakes, plus an additional 12-18 to top the cupcakes (or full sized for stuffing in the cupcakes, if you feel like unwrapping them all....I used mini for both)

Directions:

Preheat the oven to 350F (325F if using a nonstick pan).
Line standard-sized muffin pan with cupcake liners.

Combine butter, chocolate, and cocoa in a medium heat proof bowl.
Set bowl over saucepan containing barely simmering water, and heat mixture until butter and chocolate are melted.
Whisk until smooth and combined.
(...or you could microwave the mixture at 50% powder, stirring every 30 seconds, until completely melted.  Which is exactly what I did.)
Set aside to cool until just warm to touch.

Whisk flour, baking soda, and baking powder in a small bowl to combine.

Whisk eggs in another bowl to combine.
Add sugar, vanilla, and salt until fully incorporated.
Add cooled chocolate mixture and whisk until combined.
Sift about 1/3 of the flour mixture over the chocolate mixture and whisk until combined.
Whisk in sour cream until combined.
Sift the remaining flour mixture over and whisk until batter is thick and fully incorporated.

Divide the batter evenly among the cupcake liners.
Place one Rolo, upside down, into batter.  Do not press in, just make sure that the top is flush with the top of the batter.
Bake until a skewer inserted into the center of the cupcakes comes out clean, about 18-20 minutes.

Cool cupcakes in muffin pan on a wire rack until they are cool enough to handle, about 15 minutes.
Place cupcakes on a wire rack.
Cool to room temperature before icing, about 30 minutes.

Caramel Buttercream 
adapted from here

Ingredients:

2 sticks butter, softened
1 teaspoons vanilla extract
1 cup caramel topping, plus more for drizzling
1 pound powdered sugar (about 4 cups), more as needed to thicken icing for piping
2-4 Tbsp cream or milk

Directions:

Cream butter until fluffy.

Add in vanilla extract and 1/2 cup caramel topping.
Add 2 cups powdered sugar and mix until smooth.
Add in the rest of the caramel topping.
Add in the remaining 2 cups of powdered sugar.
Add in 2 tablespoons of cream and beat on high.
If icing is still too thin add a bit more powdered sugar, and if it's too thick, add in some more milk or cream.

Assembly

When the cupcakes are cool, pipe on the icing.  I use a piping bag with a large tip.
Drizzle with caramel topping (I find that putting it in a small squeeze bottle makes the drizzling easier and prettier).

Top with a mini Rolo candy.  
Keep refrigerated until 30 minutes before serving.

Tuesday, February 17, 2015

Elmo smash cake

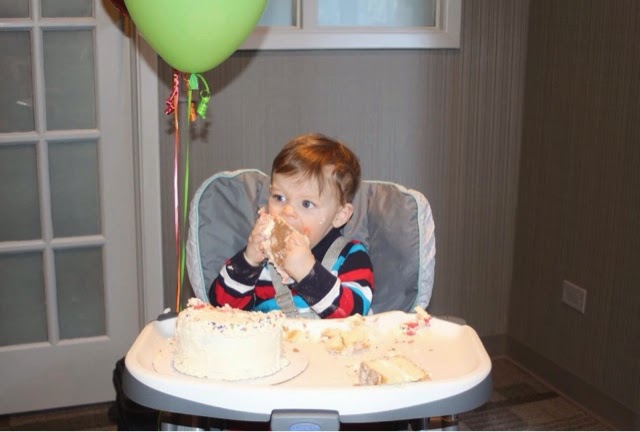
My friend's son turned 1 at the end of January, and they threw him a little first birthday party.  And apparently a first birthday party just isn't complete without a smash cake (don't worry, I'm already working on patenting the smash cake and starting a side business...I'm kidding (well, only sorta)).  I've been making treats for this little boy and his big sister since her baby shower 5 years ago.


The theme of the party was Elmo/Sesame Street, and so besides a bunch of chocolate Elmo lollipops (I even recycled the Elmo chocolate lollipop molds from his big sister's 1st birthday party in March 2010!), I made baby J a smash cake -- complete with a sugar Elmo face on top!  The cake itself was simple, just a 6" two layer cake of my go-to yellow cake with vanilla buttercream (which, coincidentally, I debuted on the blog on his big sister's 3rd birthday cupcakes), a few sprinkles, and a red buttercream "1" with an Elmo face stuck on top of the cake.


I have to admit the cake and the lollipops turned out pretty cute, but I have to say that the cute little boy who devoured his smash cake was definitely the cutest part of the party!


I might be wrong, but is looks like he was a little into the cake.... ;-)


Sunday, December 7, 2014

Piña colada cupcakes

I'm not generally a complainer. But if I'm going to be honest with you, the past few weeks have been a little rough. The shortest possible way to give you the rundown is this: I started having thumb pain about 5 weeks ago....when it wasn't feeling better, I bought myself a brace.....then, about a week and a half to two weeks ago, I noticed that my thumb was swollen and went to see my colleague at our adult office....I was diagnosed with synovitis and tendonitis, prescribed some meds, was told to keep wearing the brace, and told to get an X-ray if it wasn't getting better... so fast forward to this past Friday, my day off, where I went to the orthopedist, was diagnosed with tendonitis and a ligament injury (that thank g-d does not require surgery), and ended up getting a cortisone shot in my thumb. Before going home to bake these cupcakes. Did I mention that the cortisone shot was unpleasant, at best, and it didn't make my finger feel any better right away? Oh, and the added lidocaine? Numbed up my thumb completely. Yeah, so you might imagine I wasn't in the best condition to actually be baking and decorating 2.5 dozen cupcakes...but they were for our annual party that my friends host on Long Island and I wasn't going to let them down! So I made the cupcakes. Piña Colada cupcakes, to be exact, since the theme of this years party is summer!!


So these cupcakes had been on my "to bake" list for a while.  I wanted to throw a luau this summer just so that I could make them.  The luau didn't happen, but these cupcakes remained high on my list.  So when the theme for our annual fall/winter bash was decided, and it was "summer," I was so excited to have an event to make these cupcakes for!  I have to say that these cupcakes were delicious, partly because they were really well flavored and not too sweet.  But the standout was the coconut cream cheese icing, of which I am currently regretting dumping out the leftovers instead of freezing, because there's a good chance I would've eaten it with a spoon for dessert!


From Glorious Treats

For the cupcakes:

2.5 cups flour
1.5 tsp baking powder
1/2 tsp baking soda
1/2 teaspoon salt
3 eggs
1 3/4 cup sugar
1 cup vegetable oil (I used canola, since that's what I had on hand)
1 tsp vanilla extract
3/4 cup sour cream
1.5 cups canned crushed pineapple (drained slightly)

For the icing:

1/2 cup (1 stick) butter, cool
8 oz cream cheese (directly from fridge)
1/2 teaspoon vanilla extract
1 1/2 teaspoons coconut extract
4 cups powdered sugar (I'm pretty sure that, as i'm typing this up, I only used half of the powdered sugar, since I doubled the recipe but only remember using 1 box of powdered sugar....which might explain my previous "not too sweet comment."  But either way, the icing was AMAZING and I'd add the powdered sugar to taste)
1 Tbsp heavy cream, heavy whipping cream, or milk OR 1 Tbsp dark rum

For the garnish:

Maraschino cherries, with stems if you can find them
Toasted coconut
Cocktail umbrellas
Paper straws, cut into thirds
Pineapple wedges, I actually debated using crispy dried pineapple pieces, but opted not last minute

Directions:

Preheat oven to 350F.
Line a 12-cup cupcake tin with cupcake liners (I used cups, which I thought were adorable and very "summery").

Mix together flour, baking powder, baking soda, and salt in a medium bowl.
Set aside.

In a large bowl, beat the eggs and sugar with an electric mixer, until slightly thickened and a light cream color.
On low speed, add in oil and vanilla.
Add the pineapple and sour cream (don't worry if it looks too liquidy....it'll be fine!).
Mix until completely incorporated.

Add the flour mixture.
Blend until just combined and smooth.

Fill each of the cups about 2/3 full.

Bake cupcakes for about 22 minutes (mine took 18 minutes, so keep an eye on them towards the end).
Remove cupcakes from the pan and allow them to cool on a wire rack.

While cooling, make the icing.
If using toasted coconut, this is a good time to toast it.  Keep an eye on it as coconut tends to go from toasted to burnt VERY.  QUICKLY.

Place the butter in a large mixing bowl and blend until smooth.
Add cream cheese and blend until well combined.
Add the vanilla and coconut extracts.
Add the powdered sugar 1 cup at a time, blending at low speed until combined.  I add the last cup in 1/4 cup increments to make sure it doesn't get too sweet.
Once all sugar is added, increase to medium speed and beat until it begins to get fluffy.
Slowly add the heavy cream or rum (I used cream)
Beat again, until fluffy.

Frost the cupcakes.  I used a piping bag with a star tip.
Top cupcakes with the garnishes of your choice.

Tuesday, July 15, 2014

Assorted birthday cupcakes

I wanted to throw B a birthday party for a while.  I originally mentioned it to him about three and a half months before his birthday.  I wanted to make sure (a) he wanted a party and (b) that I had plenty of time to plan!


So I spent the past few months planning his birthday party -- first from whether it would be a group dinner out at a restaurant or a party on his roof deck (I let him make that decision), and once the decision was made, there was lots more planning: from the color scheme to the treats I'd bake to the food I'd order to the drinks we'd serve to the favors I'd give out to the should-there-be-a-photo-booth-at-the-party debate to the guest list to the centerpieces, and so on and so on and so on.  Have I mentioned my OCD tendencies?!


I wanted to make cupcakes.  But I couldn't make just one kind of cupcake.  Heck no!  There needed to be a variety of cupcakes...and other treats, too.  I am, after all, JulieBakes, and he has made it a habit of making me show people all of my baked goods when I meet them, so I couldn't embarass myself with just one kind of cupcake (even if it was his favorite cupcake).  So I made lots of cupcakes.  Lots and lots of them!  Iced with a perfectly piped heap of icing and beautifully decorated.  I mean, it is a PARTY, right?


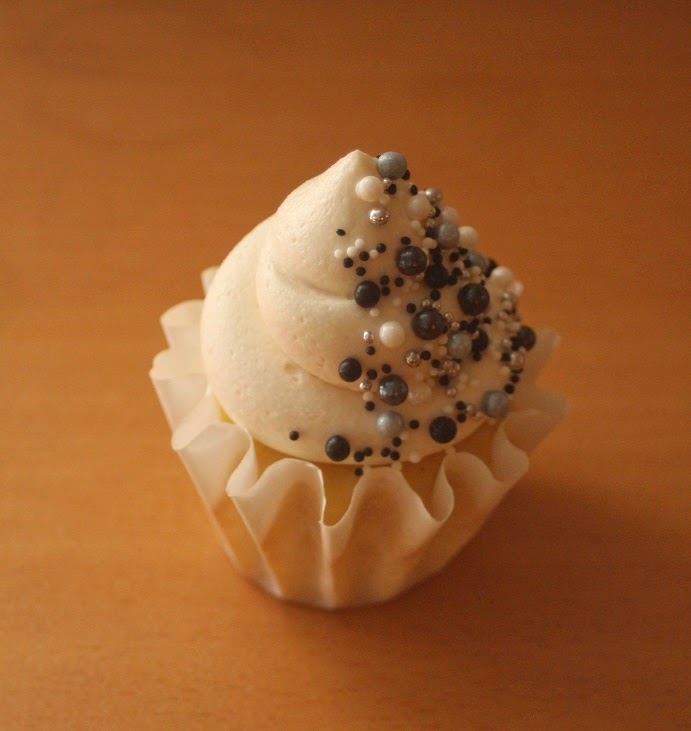
So for the party, I made red velvet cupcakes with cream cheese frosting (I used dark cocoa powder since I loved the flavor it gave the red velvet bundt cake I made a few months ago).  And dark chocolate cupcakes and vanilla/yellow cupcakes, and then I made vanilla buttercream and chocolate buttercream (this time I used 1/3 dark cocoa powder and 2/3 regular cocoa powder), and then I made a mixture of cupcake combinations - chocolate cupcakes with vanilla buttercream, yellow cupcakes with chocolate buttercream, chocolate cupcakes with chocolate buttercream, and yellow cupcakes with vanilla buttercream.  On each cupcake, I piped the icing on in a swirling pile with a big round tip (Ateco 809).  And then I went to town decorating them.  I had seen these cupcakes on Pinterest and they were my inspiration for B's birthday cupcakes.  I totally copied them, but it was so worth it....the cupcakes were gorgeous!!

I had a bunch of "pearls" -- white, black, graphite grey/silver, and silver.  I used silver dragees as well.  And then I used white and black nonpareils, and teeny tiny silver dragees that were basically the size of nonpareils.  I started by strategically placing the pearls over half of the piped icing, and then after that was done to my liking, I started sprinkling a mixture of the silver, black, and white nonpareils (I mixed 2 Tbsp of each color together in a bowl and then used that mixture for the sprinkling) over the same half of the cupcake where I had placed the pearls.

I'm not going to lie, it's a bit time consuming, especially when it involved decorating 36+ cupcakes....but c'mon, look at the them....it was TOTALLY worth it.  Even I - who never brags - think they're pretty freaking adorable!

Monday, July 14, 2014

Dark chocolate cupcakes

I did something very un-JulieBakes for B's birthday party.  I actually baked the cupcakes a few days before and then froze them so that they were still fresh for the party.  See, the week and a half before B's birthday party were going to be overly hectic for me, and there was no way I wasn't going to bake for the big birthday party.  So I had to come up with a way to have homebaked goods but not pull a bunch of all-nighters before the party (because then what fun would I be at the actual party?).  The answer was pretty clear: bake cupcakes, freeze cupcakes, thaw cupcakes, make icing, ice cupcakes, and then decorate cupcakes.  I figured I could make the icing the day before, ice the cupcakes, and then decorate them, so that they'd be homemade, delicious, and fresh :) [more on the cupcake decorations and where I  "borrowed" the super cute idea for sprinkles from here.]


But I wanted a new chocolate cupcake recipe.  I don't really know why - I have a few chocolate cupcake recipes that I really like - but then I saw a recipe for dark chocolate cupcakes.  DARK.  CHOCOLATE.  CUPCAKES!!  With cocoa powder and chocolate!  I figured they were worth a try, and trust me, they are!  They're super delicious and rich and decadent -- even B, my self-proclaimed vanilla-vanilla cupcake guy, thought these chocolate cupcakes were amazing!  The original recipe has them served with a peanut butter icing, which sounds fantastic, but I was planning on sticking with chocolate and vanilla icings for the party, so I just went with my go-to vanilla and chocolate buttercream recipes.  Totally delish!

Dark Chocolate Cupcakes
From Brown Eyed Baker
Makes 12 cupcakes (I got 12 cupcakes plus 9 mini cupcakes)

Ingredients:

8 Tbsp unsalted butter, cut into 4 pieces
2 ounces bittersweet chocolate, chopped (I used semisweet since the store didn't have bittersweet.  They're basically the same thing anyway).
1/2 cup Dutch-processed cocoa powder
3/4 cup all purpose flour
1/2 tsp baking soda
3/4 tsp baking powder
2 large eggs
3/4 cup granulated sugar
1 tsp vanilla extract
1/2 teaspoon table salt
1/2 cup sour cream

Directions:

Preheat the oven to 350F (325F if using a nonstick pan).
Line standard-sized muffin pan with cupcake liners.

Combine butter, chocolate, and cocoa in a medium heat proof bowl.
Set bowl over saucepan containing barely simmering water, and heat mixture until butter and chocolate are melted.
Whisk until smooth and combined.
(...or you could microwave the mixture at 50% powder, stirring every 30 seconds, until completely melted.  Which is exactly what I did.)
Set aside to cool until just warm to touch.

Whisk flour, baking soda, and baking powder in a small bowl to combine.

Whisk eggs in another bowl to combine.
Add sugar, vanilla, and salt until fully incorporated.
Add cooled chocolate mixture and whisk until combined.
Sift about 1/3 of the flour mixture over the chocolate mixture and whisk until combined.
Whisk in sour cream until combined.
Sift the remaining flour mixture over and whisk until batter is thick and fully incorporated.

Divide the batter evenly among the cupcake liners.
Bake until a skewer inserted into the center of the cupcakes comes out clean, about 18-20 minutes.

Cool cupcakes in muffin pan on a wire rack until they are cool enough to handle, about 15 minutes.
Place cupcakes on a wire rack.
Cool to room temperature before icing, about 30 minutes (this is the point where I froze the cupcakes for later use).

Choose your icings:
Chocolate Buttercream
Vanilla Buttercream

Thursday, June 12, 2014

Peanut butter and jelly cupcakes

I had wanted to make a peanut butter and jelly cupcake for a while.  How I was going to execute it was the hard part.  Peanut butter cupcake with strawberry icing?  Strawberry cupcake with peanut butter icing?  Peanut butter cupcake filled with jelly and topped with peanut butter icing?  But then I came up with my Fluffernutter Cupcake (even I was pretty impressed with the end result!)....and as I was filling them with fluff I thought to myself "what if I used jam?  I bet those would make a pretty tasty peanut butter and jelly cupcake!"  And thus the execution of the peanut butter and jelly cupcake was perfected, and I had created another keeper!


Now I know that there's a debate out there about what kind of jelly should be used in a peanut butter and jelly sandwich.  Let me tell you now - I love strawberry jelly and will not touch grape jelly at all.  Yes, if you are a grape jelly-lover, we can still be friends.  Just don't ever make me a PB&J sandwich.  I'm kidding....sorta.  But feel free to substitute whatever flavor jelly you prefer into your cupcakes (and, if it's other than strawberry, let me know how they turned out!).

The only thing that would make these cupcakes cuter would be a drizzle of strawberry jelly on top (I thought if that after the fact...).  I guess that's reason enough to make them again soon :)


Peanut Butter and Jelly (PB&J) Cupcakes
Cupcake idea by yours truly, each component listed with it's source

Yellow Cake Cupcakes
From SmittenKitchen (and featured on the blog here, here, and here -- to name a few)

Ingredients:

4 cups plus 2 Tbsp cake flour (not self-rising)
2 teaspoons baking powder
1 1/2 teaspoons baking soda
1 teaspoon table salt
2 sticks (1 cup) unsalted butter, softened
2 cups sugar
2 teaspoons pure vanilla extract
4 large eggs, at room temperature
2 cups buttermilk, well-shaken

Jelly (flavor of your choice), for filling cupcakes [* if you are using grape or another flavor that does not have pieces of real fruit in it, skip the straining step below]

Directions:

Preheat oven to 350F.
Line a cupcake tin with liners.

Sift flour, baking powder, baking soda, and salt together in a medium bowl.

In a large mixing bowl, beat butter and sugar with an electric mixer at medium speed until pale and fluffy.
Beat in vanilla.
Add eggs, 1 at a time, beating well and scraping down the bowl after each addition. 
At low speed, beat in buttermilk until just combined (mixture will look curdled).
Add flour mixture in 3 batches, mixing until each addition is just incorporated.

Fill the baking cups about 2/3 of the way full.
Bang the pan against the counter a few time to let out air bubbles.
Bake until golden and a toothpick inserted in the center of the cake comes out clean, about 15 minutes.

Cool in pan on a rack for 10 minutes, then remove from the pan and allow to cool completely.

* Prepare the jelly
While cupcakes are cooling, warm up your jam in a saucepan for a few minutes over low heat to loosen it.  
Strain into a bowl.
Allow it to cool before filling cupcakes.

Peanut Butter Buttercream
From Robicelli's, found here

Ingredients:

3 sticks unsalted butter, room temperature
1/2 cup natural peanut butter
1 teaspoon kosher salt
1 1/2 cups powdered sugar
1/4 cup heavy cream

Directions:

Cream together butter, peanut butter, and salt with a mixer set to high until light and fluffy.

Add powdered sugar, 1/4 cup at a time, beating well between each addition.
Add heavy cream.

Once combined, taste for flavor.  I have never not added more peanut butter - I start with heaping Tablespoons until I find the desired peanut butteriness that I want.

Continue to beat on high for an additional minute to incorporate air.

Assembly

Once completely cooled, cut a small crater in the center of each cupcake with a small paring knife or very carefully with a melon baller (these cupcakes are very fragile).
Pipe some jelly (about 1-1.5 teaspoons) into the newly cut hole in the center.  
Allow the jelly to settle for a few seconds - you may need to refill it a little as it settles a little.

Using the piping tip of your choice (I used star for some and round for others), pipe icing onto filled cupcakes. 

Thursday, June 5, 2014

Fluffernutter cupcakes

When we were kids, my friends had these sandwiches called "Fluffernutters" for lunch at school.  I was intrigued by them, and asked my mom if I could have one.  Turns out my mother didn't think marshmallow fluff and peanut butter sandwiched between two slices of white bread was a nutritious lunch, and we were "deprived" of fluffernutters as children.  I didn't even try marshmallow fluff until years later while at sleepaway camp (translation: mom wasn't there to see me try it).  But when I decided to bake some cupcakes to demo some decorating ideas (see "Background" below), I decided I'd play around with the idea of a fluffernutter....in a cupcake!  Enter my Fluffernutter Cupcake -- a yellow cupcake filled with marshmallow fluff, and covered in peanut butter buttercream!


Background: I've become a little obsessed with planning the perfect birthday party for B.  I spent the better part of my day off yesterday looking for cupcake decorations, decorating ideas for B's birthday cupcakes, and cupcake liners that go with my color scheme (I already decided what cake I'll be baking).  And yes, I realize that his birthday party is over 5 weeks away (37 days to be exact), but since I found the inspiration for the "headliner" cupcakes (on Pinterest, no less!), I figured I should try to practice the decorations in advance.  Since, you know, the week leading up to B's birthday party is insanely busy for me work-wise, and knowing myself I will have to have "all my T's crossed and my I's dotted" well before that week arrives (don't worry, the birthday party decorated cupcakes won't make it into this blog post....on the off chance that B looks at the blog...And because I need to keep some element of surprise!).  So on my day off I decided to bake up some cupcakes to decorate as a sort of test run for the birthday party.  Enter the Fluffernutter Cupcake!


Fluffernutter Cupcakes
Cupcake idea by yours truly, each component listed with it's source

Yellow Cake Cupcakes
From SmittenKitchen (and featured on the blog here, here, and here -- to name a few)

Ingredients:

4 cups plus 2 Tbsp cake flour (not self-rising)
2 teaspoons baking powder
1 1/2 teaspoons baking soda
1 teaspoon table salt
2 sticks (1 cup) unsalted butter, softened
2 cups sugar
2 teaspoons pure vanilla extract
4 large eggs, at room temperature
2 cups buttermilk, well-shaken

Marshmallow fluff, for filling cupcakes

Directions:

Preheat oven to 350F.
Line a cupcake tin with liners.

Sift flour, baking powder, baking soda, and salt together in a medium bowl.

In a large mixing bowl, beat butter and sugar with an electric mixer at medium speed until pale and fluffy.
Beat in vanilla.
Add eggs, 1 at a time, beating well and scraping down the bowl after each addition. 
At low speed, beat in buttermilk until just combined (mixture will look curdled).
Add flour mixture in 3 batches, mixing until each addition is just incorporated.

Fill the baking cups about 2/3 of the way full.
Bang the pan against the counter a few time to let out air bubbles.
Bake until golden and a toothpick inserted in the center of the cake comes out clean, about 15 minutes.

Cool in pan on a rack for 10 minutes, then remove from the pan and allow to cool completely.

Peanut Butter Buttercream
From Robicelli's, found here

Ingredients:

3 sticks unsalted butter, room temperature
1/2 cup natural peanut butter
1 teaspoon kosher salt
1 1/2 cups powdered sugar
1/4 cup heavy cream

Directions:

Cream together butter, peanut butter, and salt with a mixer set to high until light and fluffy.

Add powdered sugar, 1/4 cup at a time, beating well between each addition.
Add heavy cream.

Once combined, taste for flavor.  I have never not added more peanut butter - I start with heaping Tablespoons until I find the desired peanut butteriness that I want.

Continue to beat on high for an additional minute to incorporate air.

Assembly

Once completely cooled, cut a small crater in the center of each cupcake with a small paring knife or very carefully with a melon baller (these cupcakes are very fragile).
Pipe some marshmallow fluff (about 1-1.5 teaspoons) into the newly cut hole in the center.  
Allow the fluff to settle for a few seconds -- you may need to refill it a little as it settles a little.

Using the piping tip of your choice (I used star for some and round for others), pipe icing onto filled cupcakes. 

Thursday, May 29, 2014

Oreo surprise cupcakes

Almost everyone loves Oreos.  And almost everyone loves cupcakes.  So it's always fun to combine the two into one treat!  Like "Death by Oreo" (mini) Cupcakes....or Triple Oreo Yellow Cake Cupcakes.


This time, I went for what I call "Oreo Surprise" Cupcakes.  From the outside, it just looks like a simple vanilla cupcake with vanilla icing, topped with a sprinkling of some chopped Oreos (I really wanted to finely crush the Oreos and coat the entire dome of icing in Oreo crumbs a la the rainbow cupcakes, but I was too lazy and didn't want to make my food processor dirty, so I just crushed them with a hammer....I'm serious).  But when you bite inside, there's an Oreo in the bottom!  SURPRISE!


The background: I wanted to make a cupcake that was vanilla-vanilla without being boring (if you've read this blog before, you should know how I feel about vanilla).  But I didn't want to lose the vanilla flavor (the triple Oreo yellow cake cupcakes have crushed Oreos in the cupcakes as well as the icing).  So I stuck with the clever idea of using an Oreo in the bottom, but leaving the vanilla/yellow cake cupcake alone.  I have to say the finished product is great if you want to spice up a plain old vanilla cupcake with barely any added energy.  But if you're looking for the super-Oreo-y flavor, stick with the Triple Oreo Yellow Cake Cupcakes (or if you're like me a favor chocolate, the "Death by Oreo" ones).

Cupcakes 
From none other than Smitten Kitchen

I halved the recipe and ended up with 24+ cupcakes


Ingredients:


4 cups plus 2 tablespoons (480 grams) cake flour (not self-rising)
2 teaspoons (10 grams) baking powder
1 1/2 teaspoons baking soda
1 teaspoon (5 grams) table salt
2 sticks (1 cup, 1/2 pound or 225 grams) unsalted butter, softened
2 cups (400 grams) sugar
2 teaspoons (10 ml) pure vanilla extract
4 large eggs, at room temperature
2 cups buttermilk (475 ml), well-shaken


24 Oreos (I used double stuffed, since that's what I had)

Directions:

Preheat oven to 350°F. Line 2 12-cavity cupcake pans with paper liners.  

Place one Oreo in the bottom of each cupcake liner.

Sift together the dry ingredients EXCEPT for sugar in a medium bowl.
In a large mixing bowl, beat butter and sugar in a large bowl with an electric mixer at medium speed until pale and fluffy, then beat in vanilla.
Add eggs 1 at a time, beating well and scraping down the bowl after each addition.
At low speed, beat in buttermilk until just combined (mixture will look curdled).
Add flour mixture in three batches, mixing until each addition is just incorporated.

Bake until golden on top and cooked throughout (the cupcakes took about 17 minutes, give or take a few).

Cool in pan on a rack 10 minutes.


Classic Vanilla Buttercream Frosting
From SavorySweetLife

Ingredients:

1 cup unsalted butter (2 sticks), softened (but not melted!)
3-4 cups confectioners (powdered) sugar, SIFTED (I used 3 cups)
¼ teaspoon table salt
1 tablespoon vanilla extract
4 tablespoons milk or heavy cream (I used heavy cream, since thats what I had....and only ended up using 2 Tbsp)
Food coloring, optional

Several Oreos, crushed (or pulverized in a food processor, which was my original goal)

Directions:

Beat butter for a few minutes with a mixer with the paddle attachment on medium speed.
Add 3 cups of powdered sugar and turn mixer to the lowest speed (so the sugar doesn’t blow everywhere) until the sugar has been incorporated with the butter.
Increase mixer speed to medium and add vanilla extract, salt, and 2 tablespoons of cream and beat for 3 minutes. 


If your frosting needs a more stiff consistency, add remaining sugar. If your frosting needs to be thinned out, add remaining milk 1 tablespoons at a time.


Assemble the cupcakes

Pipe vanilla icing onto the cupcakes.
Sprinkle the top of the cupcake with crushed Oreos.