Facebook 1

Showing posts with label Baby Shower. Show all posts

Saturday, November 11, 2017

Lemon bars

I've been baking for a long time.  I estimate I've been baking from scratch for at least two and a half decades.  I started baking on my own before that for friends in high school, with boxed mixes, even before that.  I've made countless brownies, cupcakes, cakes, fudges, and enough cookies to feed a small army.  One thing I've never made, until today?  Lemon bars!


I honestly don't know why it's taken me this long to bake them.  I think the actual idea got planted in my head when I was shopping at Trader Joe's recently, and they had candied lemon slices. I (obviously) bought them without thinking about it, and then was trying to figure out what I could use them for.  Originally I thought about using them as a garnish on a lemon cupcake, but then the thought came to me: lemon bars!


I have to say that these lemon bars are super easy to make.  Make the shortbread dough, and while it's baking in the oven, prepare the lemon filling.  Then, pour the filling over the hot shortbread crust and pop them back in the oven.  That's it!  The hardest part wasn't actually hard, it was more time consuming -- I had tiny lemons and had to juice them all by hand.  The real hardest part is waiting over 2 hours before being able to cut into them!  (Don't worry, I cheated to taste them -- they're delicious!).


I made these for a baby shower that my friend L and I hosted for our friend E, who is expecting a baby girl at the beginning of February.  The ladies at the shower loved and devoured them!  I had a few leftover at the end of the shower that went to the soon-to-be-daddy, my dad, and B.


I really recommend these lemon bars -- the super thick lemony layer is the real proverbial icing on the cake (or rather filling on the bar ;-))

Thick Lemon Bars
from Little Sweet Baker

Ingredients:

Crust

1 1/4 cup all-purpose flour
1/2 cup powdered sugar
1 Tbsp corn starch
1/2 cup unsalted butter, softened

Filling

3 large eggs
1 1/2 cups sugar
zest of 1 lemon
1/2 cup fresh lemon juice (about 2 large/regular sized lemons)
1/2 cup all-purpose flour

Decorations

Powdered sugar for dusting
Lemon slices or dried lemon slices

Directions:

Preheat oven to 350F.
Line an 8x8" square baking pan with parchment paper (I don't have an 8x8" pan so I used my trusty 9x9" pan).

Toss flour, powdered sugar, and cornstarch together.
Cut in the softened butter using a fork or pastry cutter until mixture is crumbly.  You can also pulse with a food processor.
Press into the prepared baking pan.
Bake for 10 minutes.

Meanwhile, whisk together he eggs, sugar, lemon zest, and lemon juice.
Slowly add the flour, whisking to prevent lumps.
Pour the mixture over the hot crust.
Bake for another 25 minutes or until the lemon filling is set.

Let stand at room temperature to cool.
Chill in the fridge for 2 hours.

Dust with powdered sugar and top with lemon slices.

Note: Lemon bars can be refrigerated in an airtight container

Thursday, November 9, 2017

Mini pumpkin spice crumb muffins

I've been looking forward to this weekend for a few weeks, since my friend and I are hosting a baby shower for another friend of ours!  There were a thousand things I wanted to bake, but only a day or two to get things done (work schedule is packed and I work super long days three days a week now).  These muffins definitely made the list, though!


Now I've said it before and I'll (have to) say it again: I hate pumpkin spice.  Like ugh, gross, despise it.  But almost everyone else loves it, including the mom-to-be, who told me she was "bad" when she got a pumpkin spice latte (caffeine is OK when pregnant, so I'm not sure why she thinks she was "bad," but I digress....).  So when hosting a baby shower for 13 women, including at least one who has confirmed her love for pumpkin spice, these muffins were a given!  Plus, they have the most heavenly looking crumb topping.  [I debated making these pumpkin spice latte cupcakes, but wanted something more breakfast/brunch-y.  And again, remember, crumbs!]


I ended up making mini muffins, since they were being served before lunch.  I halved the recipe since I didn't want to have an insane amount of muffins, and as it was I got 27 mini muffins with a half recipe.  I didn't, however, half the crumb topping since I figured mini muffins = more surface area, and I'd probably need extra crumbs.  As it ended up, I had leftover crumb topping, but that's fine.  Better to have too much than not enough!


* Full disclosure, it took me a long time to post this blog post, despite having written it and staging the photos at the time I baked them.  When I went to put the final edits on the post and add the recipe, the original link I had was defunct.  When I searched the blog again, I came across this recipe, which from my recollection is the same * 

Pumpkin Crumb Cake Muffins

Ingredients:

For the muffins:

1 3/4 cups all purpose flour (spooned and leveled)
1 tsp baking soda
2 tsp ground cinnamon
1 tsp pumpkin pie spice
1/2 tsp salt
1/2 cup canola or vegetable oil
1/2 cup granulated sugar
1/2 cup packed light or dark brown sugar
1 1/2 cups canned pumpkin puree
2 large eggs, at room temperature
1/4 cup milk, at room temperature

For the crumb topping:

3/4 cup all purpose flour (spooned and leveled)
1/4 cup granulated sugar
1/4 cup packed light or dark brown sugar
1 tsp pumpkin pie spice
6 Tbsp unsalted butter, melted

For the (optional) maple icing:

1 1/2 cups confectioners' sugar
2 Tbsp pure maple syrup
2 Tbsp milk

Directions:

Preheat oven to 425F.
Spray a 2 x 12 count muffin pan with nonstick spray or line with cupcake liners.  This recipe makes 15 full sized muffins, so you'll need a second pan. (I made mini muffins, and used a 24-cavity mini muffin pan, but chose to use liners instead of spraying it; I halved the recipe and got 27 mini muffins, so you'd need do to this for at least 2 muffin pans).

Prepare the muffins.
In a large bowl, whisk the flour, baking soda, cinnamon, pumpkin pie spice, and salt together until combined.
Set aside.
In a medium bowl, whisk the oil, granulated sugar, brown sugar, pumpkin puree, eggs, and milk together until combined.
Pour the wet ingredients into the dry.
Fold everything together gentlyy, just until combined and no flour pockets remain.

Spoon batter into liners, until almost full.

Make the crumb topping.
Whisk together the flour, granulated sugar, brown sugar, and pumpkin pie spice until combined.
Using a fork, lightly mix in the melted butter until crumbs form.
Do not over mix.

Spoon crumbs evenly on top of the batter and gently press them down into the batter.

Bake for 5 minutes at 425, then while the muffins are still in the oven, reduce the temperature to 350F.
Bake for an additional 16-17 minutes or until a toothpick inserted in the center comes out clean.
For my mini muffins, I baked at 425 for 5 minutes, then lowered the heat to 350F and baked for 8 more minutes.  The newer version of this recipe says to bake mini muffins for 11-13 minutes at 350F the entire time.

Allow the muffins to cool in the pan for 10 minutes as you make the icing.

To make the icing, whisk the milk, maple syrup, and confectioners' sugar together until combined and smooth.  
Drizzle over muffins and serve warm.

*These can be stored at room temp for 1-2 days, in the fridge for up to a week, and can be frozen (with or without the icing, though I generally recommend freezing without icing and icing them once they've thawed).

Friday, September 9, 2016

Nonpareils

I had the day off.  The usual activities for me on my day off are an early morning (OK, 9 a.m., but still, it's my day off....) barre class followed by errands and a walk, and then some baking.  Today I made some hand-piped milk chocolate nonpareils.  Because, really, why not?  I was just playing around in the kitchen, so I don't have exact measurements for you, but I do promise the next time I make them, I'll be sure to give measurements.  I promise!


The thing I like about these is that you can make them in different sizes; large, small, mini (like the ones I made).  And also different colors!  How cute would pale pink and white be for a baby shower for a little girl?  Orange, black, and yellow for Halloween?  Pink, red, and white for Valentine's Day?  Green and gold for St. Patty's Day?  The list could go on....and on....and on!  Or, you could play around with the chocolates you use.  I went with milk this time.  White and dark would also be tasty.  Or what about a trio?  I'm thinking those would be super cute favors for said baby shower...Or even different colored "chocolates."


Rainbow Nonpareils

Ingredients:

Chocolate, either chocolate chips or wafers such as Mercken's or Wilton Candy Melts
Rainbow nonpareil sprinkles.

Directions:

Line an 8x8" or 9x9" pan with wax paper.
Put a thin layer of nonpareils on the bottom of the pan.

Melt the chocolate in the microwave in 30 second intervals, stirring between each.
Make sure not to burn the chocolate.
Let the chocolate cool a little so it is not HOT to the touch.

Spoon the chocolate into a piping bag.
Cut a small hole at the opening.

Moving quickly but carefully -- be careful not to hit the pan and move the nonpareils -- pipe little (or larger, your call) dots of chocolate onto the sprinkles, leaving a small space between them.  I made them about the size of chocolate chips.

When the entire layer of nonpareils is covered with chocolate dots, carefully place it into the fridge.
Let the chocolate harden.

In the mean time, remove all the chocolate from the piping bag and place it bag into the bowl.

Once the candies are hard, remove them from the sprinkles and place into a ziplock bag or airtight plastic container.
Redistribute the sprinkles into a thin layer.
Melt the chocolate again.

Repeat the steps above until all the chocolate is used up.
Add more sprinkles as needed.

Saturday, October 4, 2014

Jalapeño cheddar scones

Last up, a tried and true scone that I swear by: Jalapeno-Cheddar Scones from Smitten Kitchen!!  I've made these before, several times, but shared them on the blog with you about a year and a half ago here.  They're SO good, that I decided to share the recipe again below, so that you don't have to flip back and forth between this post and the previous one!

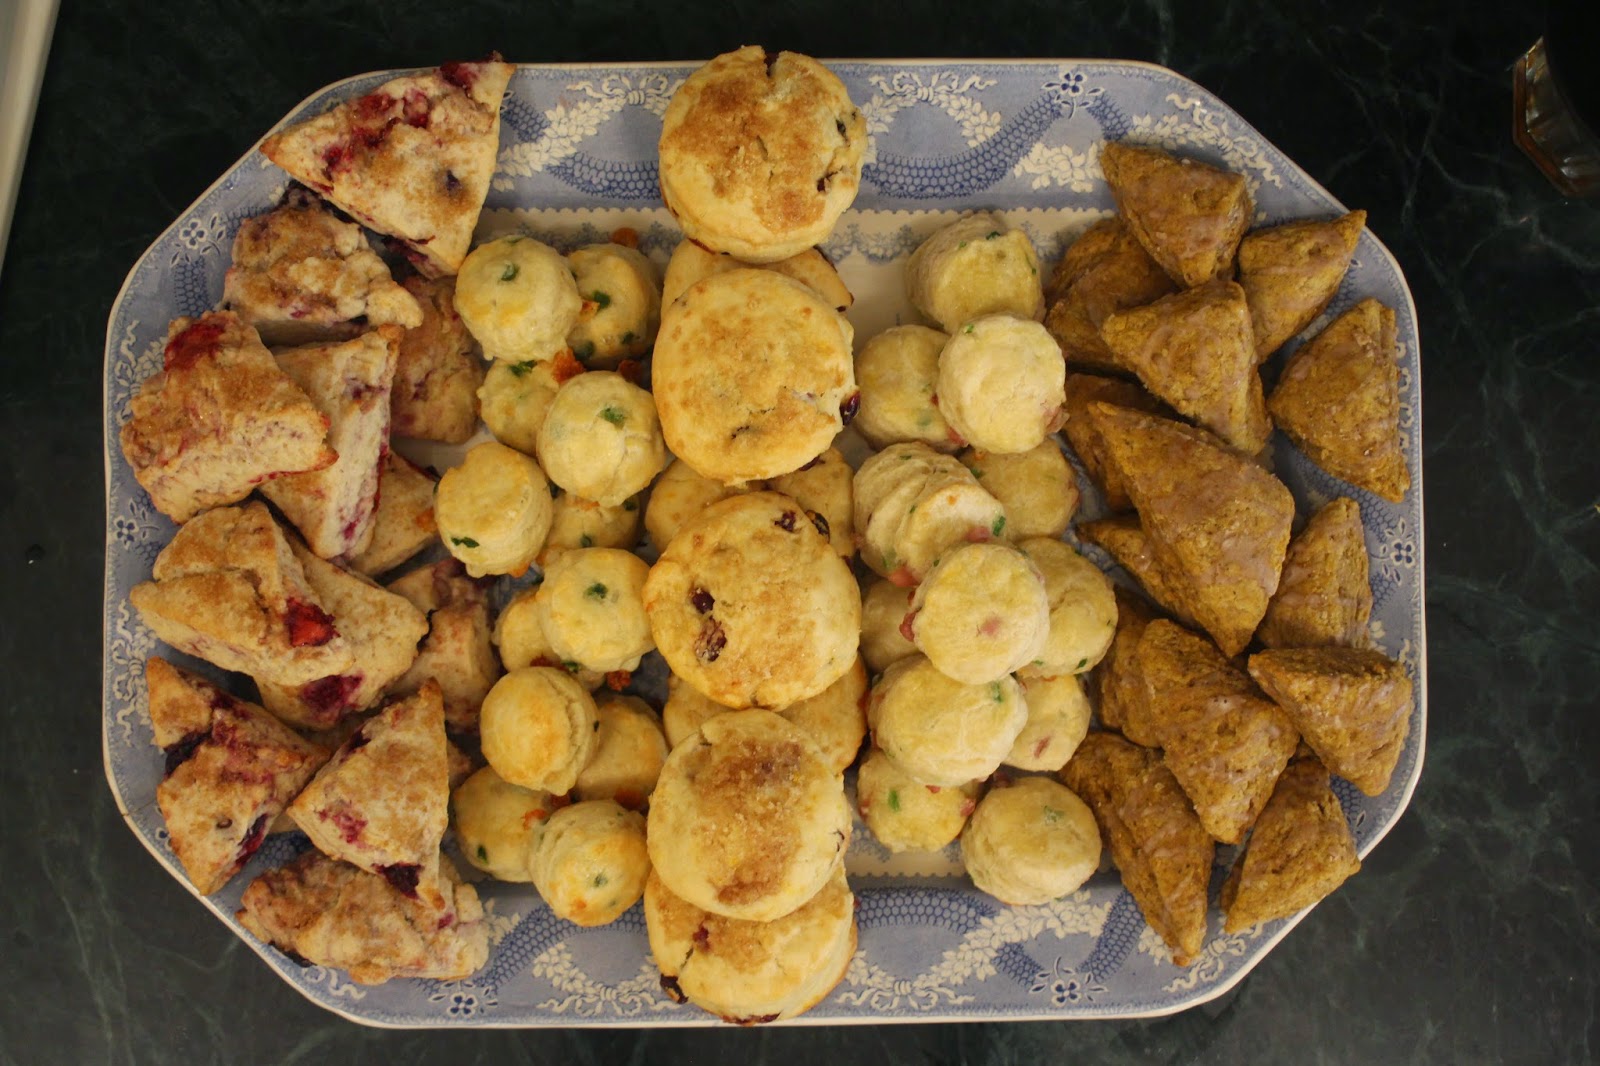
Jalapeño Cheddar Scones are the second from the left.
Jalapeño-Cheddar Scones (from SmittenKitchen.com)

Ingredients:

2 cups all-purpose flour
1 tablespoon baking powder
1 teaspoon salt
8 tablespoons (1 stick or 4 ounces) cold butter, diced
1/2 cup heavy cream
3 eggs, divided
1/4 pound sharp Cheddar cheese, diced - I always use white cheddar, although i'm not completely sure why.  I've also thought about trying monterey jack or pepper jack cheese, but I always stop myself, because why fix something that doesn't need fixing?
2 small jalapeño peppers, minced

Directions:

Preheat oven to 400°F.

In a small skillet, melt 1/2 tablespoon of butter and sauté the jalapeños in it until soft.
Let them cool, then mix them with the cheddar cheese in a small bowl and coat them with one tablespoon of the flour.

Combine the remaining flour with the baking powder and salt.
Cut in the remaining butter with a pastry blender, fork or two knives, until the butter bits are pea sized.

Lightly whip two of the eggs and cream and add to the flour-butter mixture.
Using a wooden spoon, fold mixture until it begins to come together.
Add the cheddar-jalapeño mixture to the dough and mix until everything is well-mixed.

Put the dough on a well-floured surface and gently knead it till it comes together well (less than one minute).
Pat dough out to a 3/4- to 1-inch thickness and either cut into 8 triangles or the shape of your choice with a biscuit cutter. I made mine mini for the shower (and generally make them mini when serving as an appetizer).

I then froze mine, and actually baked them up AT the shower, since I think they are THE BEST when they're fresh out of the oven.

When ready to bake the scones, remove the from the freezer and then start from here:

Make an egg wash by beating the remaining egg with a teaspoon of water.
Brush the scones with egg wash and place on a parchment-lined (or well-oiled) baking sheet.
Bake for 25 minutes or until golden brown.  My mini ones take much less, about 8-12 minutes depending on the oven.

Cranberry orange scones

The fourth variety of scones that I made for L's baby shower were these cranberry orange scones.

These cranberry orange scones are in the center.

I know I've said it before, but i'll say it again: I don't love orange zest in baked goods.  But something about this recipe -- and the fact that people seem to love the orange and cranberry combination -- made me want to make these for the shower.  I have to admit, though, that these were pretty darn good (and that's coming from the orange zest hater)!  And easy to make, too.


Just beware -- this recipe makes a TON of scones!  And I made mine without the glaze, but included it for you in case you prefer glazed scones.


Ina Garten's Cranberry Orange Scones

Ingredients:

4 cups plus 1/4 cup all purpose flour
1/4 cup sugar, plus additional for sprinkling
(I used Turbinado sugar for sprinkling, and only used 1/4 cup of granulated sugar)
2 Tbsp baking powder
2 tsp kosher salt
1 Tbsp orange zest
3/4 pound cold unsalted butter, diced
4 extra-large eggs, lightly beaten (I didn't see the "extra" part of that until I copied the recipe NOW, 2 weeks later, but I used large eggs and they were fine)
1 cup cold cream
1 cup dried cranberries

1 egg beaten with 2 Tbsp water or milk, for egg wash (I left this off until I took them out of the freezer to bake them)
Turbinado sugar
1/2 cup confectioners sugar, plus 2 Tbsp
4 Tbsp freshly squeezed orange juice

Directions:

Preheat the oven to 400F.

In the bowl of an electric mixer fitted with a paddle attachment, mix 4 cups of flour, 1/4 cup sugar, baking powder, salt, and orange zest.
Add the cold butter and mix at the lowest sped until the butter is the size of peas.
Combine the eggs and heavy cream and, with the mixer on the low speed, slowly pour it into the flour mixture.
Mix until just blended.  The dough with look lumpy!
Combine the dried cranberries with 1/4 cup of flour.
Add to the dough.
Mix on low speed until blended.

Dump the dough onto a well floured surface and knead it into a ball.
Flour your hands and a rolling pin and roll the dough 3/4 inch thick.  I prefer to do this between 2 pieces of floured wax or parchment paper.
You should see small bits of flour in the dough.  Keep moving the dough so that it doesn't stick.

Flour a 3 inch round plain or fluted cutter and cut circles of dough.  I used a slightly smaller cutter, maybe 2 or 2.5 inches.
I once learned a trick that says you're supposed to just push the cutter into the scone and remove it, and NOT to twist the cutter, since it makes the scones not rise as well....so I'm passing that tip along to you.

Place the scones on a baking sheet lined with parchment paper.
Collect the scraps neatly.
Roll out the scraps.
Cut more circles.
I froze mine here.

(If you freeze your scones, remove them from the freezer to bake them.  There is no need to defrost them, as I baked mine when they were still frozen and have baking times listed below.)
Brush the tops of the scones with egg wash.
Sprinkle with (Turbinado) sugar.
Bake for 20-25 minutes.  Out of the freezer, ,my (slightly smaller) scones took 18 minutes to bake.
Tops should be browned and the insides fully baked; the scones will feel firm to the touch.

Allow the scones to cool for 15 minutes.

If using the glaze, make the glaze:
Whisk together the confectioners sugar and orange juice.
Drizzle over the scones.

Sunday, September 28, 2014

Pumpkin scones

Third up in the week of scones are these pumpkin scones.   (Sorry for the delay in posts, as the past few days were the Jewish Holiday of Rosh Hashanah and I was away from the computer.)

The pumpkin scones are all the way on the right.
I've mentioned it before, but I'll say it again.  I'm not a huge fan of pumpkin pie spices, but I figured that pumpkin would be a nice fall flavor for the baby shower.  Boy was I right -- a bunch of people came up to me and saying that their favorite was the pumpkin scone!


These froze up beautifully, and then I just popped them into the oven to bake them.  If you do like pumpkin pie flavors, these are the scones for you!

Pumpkin Scones
from Damn Delicious

Ingredients:

For the scones:

2 cups flour
1/3 cup brown sugar, packed
1 tsp cinnamon
1 tsp baking powder
3/4 tsp ground cloves (I decreased this just a bit, since cloves and I are not friends)
1/2 tsp ground ginger
1/2 tsp ground nutmeg
1/2 tsp baking soda
1/4 tsp salt
1/2 cup (1 stick) unsalted butter, cut into cubes
1/2 cup pumpkin puree
3 Tbsp milk
1 large egg
2 tsp vanilla extract

For the glaze (I left this off, due to lack of time):

1 cup confectioners sugar
2 Tbsp milk

For the spiced glaze:

1 cup confectioners sugar
1/4 tsp cinnamon
1/4 tsp ground cloves
1/4 tsp ground ginger
Pinch of nutmeg
2 Tbsp milk

Directions:

Preheat the oven to 400F.
Line a baking sheet with parchment paper or a silcone baking mat.
Set aside.

In a large bowl, combine flour, sugar, cinnamon, baking powder, cloves, ginger, nutmeg, baking soda, and salt.  You can also use a Kitchen-Aid mixer or a food processor.
Add cold butter, using your fingers to work the butter into the dry ingredients until it resembles coarse crumbs.

In a large glass measuring cup or another bowl, whisk together pumpkin puree, milk, egg, and vanilla.
Pour mixture over dry ingredients and stir using a rubber spatula until a soft dough forms.

Working on a lightly floured surface, knead the dough 3-4 times until it comes together.  I like to do this on floured waxed or parchment paper, making clean up much easier.
Using a rolling pin, roll the dough into a 10 by 7 inch rectangle, about 1" thick.
Using a large knife or pizza cutter, cut the rectangle in half lengthwise, then cut into 2 even pieces crosswise, making 4 rectangles.
Then cut each rectangle into two triangles, making 8 triangles.
I cut mine differently, making smaller triangles, since I wanted mini scones.

Place scones onto prepared baking sheet.
Place the baking sheet into the oven and bake for 10-12 minutes, or until a tester inserted in the center comes out clean.

Make the glaze.
Combine the confectioners sugar and milk.
Whisk until smooth.
If the glaze is too thick, add more milk as needed; set aside.

Make the spiced glaze.
Combine the confectioners sugar, cinnamon, cloves, ginger, nutmeg, and milk.
Whisk until smooth.
Mine was too thin, so I added some extra confectioners sugar.
Set aside.

When the scones are done, cool for 10 minutes.
Spoon the glaze on each scone (I skipped this stage, since I didn't make the plain glaze).
Then, drizzle with the spiced glaze.

Allow the glazes to set before serving.

Monday, September 22, 2014

Prosciutto, cheese, and scallion scones

For L's baby shower this past weekend, I wanted to add some savory scones to the sweet ones that I was going to make.  These were my first savory scone that I baked for the shower, and also happen to be the second installment of the week of scones!

The Prosciutto, Scallion, and Gruyere Scones are the 4th from the left.
These were also pretty easy to make, in part to the pre-chopped prosciutto that I found near the deli counter.  What a time saver!  Definitely appreciated given the sheer variety of scones that I was making (plus, there were cupcakes, too!).  I made these mini, too, since there were going to be so many varieties of scones, and I figured people might want to try more than one flavor.  I ended up getting 19 mini scones, plus I had tons of leftover dough that I just re-kneaded and made about 10 more mini scones.

I have to say, I'm a HUGE fan of these savory scones!  They're perfectly savory, salty, and delicious without being too salty!  My only regret?  The minis are so mini...I want to eat more than one at once!

Prosciutto, Gruyere, and Scallion Scones
from Kitchen Confidante

Ingredients:

2.5 cups flour
2 Tbsp sugar
1 Tbsp baking powder
1 tsp kosher salt
1/2 cup butter
2 large eggs
2/3 cups buttermilk
2/3 cup shredded gruyere (I hand grated mine)
1/2 cup chopped prosciutto
1/4 cup grated parmesan, plus extra for sprinkling
1/4 cup chopped green onion (scallion)
2 Tbsp half and half
Sea salt

Directions:

In a large bowl, whisk together the flour, sugar, baking powder, and salt.
Using a pastry cutter (or two forks, or knives, or a food processor), cut the butter into the flour mixture, until you have course crumbs.

Whisk the eggs lightly and combine with the buttermilk.
Add to the flour mixture and stir until just moist.

In a small bowl, mix together the cheeses, prosciutto, and scallions.
Add this to the batter and mix lightly.
* The dough will be sticky.

On a lightly floured surface, turn the dough out and knead lightly until all the cheese, prosciutto, and scallions are incorporated into the dough.
Roll the dough 3/4 inch thick.
Cut out 3 inch squares, then cut diagonally to make triangles.  You should have about 10.
Or, you can make mini scones like I did, with a 2" circle cutter.  Punch down with the cutter, but do not twist.
Place the scones onto a baking sheet lined with parchment or a silicone mat.
Lightly brush the top of the scones with half and half.
Sprinkle with sea salt.

Place the scones in the freezer for 30 minutes.

*Since I made the scones a few days before and planned to bake them the morning of the shower, I left off the half and half and salt when I froze them, and did that when I took them out of the freezer to bake them.  I ended up using an egg wash and left off the salt, since I was afraid that they might be too salty.

Preheat the oven to 400F.

Once the scones are chilled, bake for 20 minutes, or until golden.
I baked my mini scones for about 10 minutes.
Sprinkle with additional parmesan cheese and serve warm.
Since I did this at L's mother-in-law's apartment and I forgot to bring the parmesan cheese with me, I inadvertently left that off.  Oops!

Sunday, September 21, 2014

Mixed berry scones

My friend L is expecting a little girl next month.  Two of her friends and her mother-in-law threw her a baby shower yesterday.  On the menu?  Tea and scones.  And -- as i'm sure you guessed -- yours truly offered to bake up some scones for the momentous occasion!

5 different kinds of scones for L's baby shower.  Every day this week I'll post one or two recipes.
These mixed berry scones are all the way on the left of the picture!
Which one will be featured tomorrow??

I wanted to make a variety of scones, and since the hosts said they'd need about 40 scones, I figured I had the perfect opportunity to test out a few different scone flavors.  So, as you may have figured out, this week will be scone week on JulieBakes!

First up were these mixed berry scones.


First off, if done right, scones are pretty easy.  I love the fact that you don't have to wait for the butter to warm up to room temperature (it's often times the most time-intensive part of baking, and I've yet to find an alternate way of doing it besides leaving it on the counter and allowing it to warm up and soften).  I don't have a pastry blender, though, so getting the butter to break up into pea sized bits is a bit difficult with a fork, but it's worth it.

I made the scones ahead of time and then froze them.  Scones are really the best the same day they're baked, and savory ones (you'll see some of those this week) I find are best fresh out of the oven.  This way, I got to pop the scones of the freezer and bake them up that morning, without having to pull an all nighter getting 5 (or more....) types of scones made and freshly baked that morning!  The only problem?  Since these had frozen fruit in them,when I went to bake these they ended up a little watery and I didn't think they were pretty enough to serve, so I ended up making a quick fresh batch yesterday morning for the shower.  So, take note, these are a make the day of scone (translation: don't pre-make and freeze these [spoiler alert: the rest of the scones this week can be frozen]).

The scones were served with assorted jams, clotted cream, and butter.

I cut the scones as directed, but found that they were a bit thick and big,  So when I made them the second time, I rolled them out and then cut them into triangles free-hand.  I got about 18 medium-sized scones.  They baked up for about 12 minutes and were perfectly delicious!

Mixed Berry Scones
(these scones call for a glaze, which I left off.  But I've included the recipe for the glaze in case you're interested)
Original recipe from Averie Cooks.

Ingredients;

2 cups flour, plus more for dusting hands and work surface
1/2 cup granulated sugar
1 Tbsp baking powder
Pinch of salt
1/2 cup unsalted butter, cold
1 large egg
1/2 cup sour cream (light is OK)
1 tsp vanilla extract
1 heaping cup of mixed berries (both the original recipe and I used frozen mixed berries -- so easy and I highly recommend it!), if using frozen berries, do not defrost them
1 Tbsp orange or lemon zest, optional (I used lemon zest and loved the bright lemony pop that it gave, and I thought it went really well with the berries.)
Turbinado, raw, or coarse sugar, optional (which I opted for, and I used turbinado sugar)

For the glaze (which I left off):
1 cup confectioner's sugar
1 Tbsp, approx, of cream or milk (or you can substitute in orange or lemon juice)

Directions:

Preheat the oven to 400F.
Line a baking sheet with a Silpat or parchment paper.
Set aside.

In a large bowl, mix 2 cups flour, granulated sugar, baking powder, and optional salt.
Whisk to combine.

Cube the butter.
Add the butter to the flour mixture, and with a pastry cutter or two forks, cut the butter in (you can use a food processor, too, or a Kitchen-Aid mixer....which I did the morning of the shower when I needed every time-saving trick I could come up with).
Once the pieces of butter are smaller, you can mush them up with your hands.
Some larger pea-sized clumps of butter are OK.
Set aside the bowl.

In a small bowl, whisk together the egg, sour cream, and vanilla.

Pour the wet mixture over the dry.
With a soft-tipped spatula, fold until just combined.
Be sure not to overmix the scones -- the dough should be wet and shaggy.

Fold in the berries and zest, if using.

Sprinkle about 2 Tbsp of flour onto a Silpat or clean work surface (I use wax paper or parchment paper on the counter) and lightly coat hands.

Turn the dough onto the work surface and knead it into an 8 inch round circle -- This is where I did mine differently...
I kneaded mine a few times, and then sprinkled some flour on top.
I placed another piece of waxed paper or parchment paper on to[p of the dough and then rolled it out. I cut them into 2 to 3 inch wide strips, and then cut them into triangles.

Using a flat spatula, transfer the scones to the prepared baking sheet, being sure to place them at least 2 inches apart.
Tip - try to avoid exposed berries touching the baking sheet, since they're prone to burning (although I couldn't do that with all my scones, and none of them burned).

If using sugar on top (which I did), sprinkle each wedge with a generous pinch or turbinado sugar, about 1 tsp each.

Bake for about 18 minutes (mine were a little smaller, about 10-12 minutes was enough), if using fresh (not frozen) berries, they will likely need a shorter baking time, so just be aware.
A toothpick inserted in the center should come out clean or with a few moist crumbs, but no batter.

Allow the scones to cool on the baking tray for about 5 minutes before removing and transfering them to a rack to finish cooling.

While the scones are cooling, make the glaze, if using.

Whisk together the confectioners sugar and cream/milk/citrus juice (whichever you choose to use....but just use one!).
Depending on desired consistency, you may need to add more sugar or cream/milk/citrus juice.

Evenly drizzle the glaze over the scones before serving.

* Scones are best served fresh.  These will keep in an airtight container at room temperature for up to 4 days. *

Monday, May 12, 2014

Chocolate covered Oreos

Almost every time I go into the baking store, I end up leaving with (at least) one thing I didn't anticipate buying when I walked in.  The last time was no exception (I left with two "surprise" purchases).


B and I got a later lunch near the store, and after lunch we parted ways...him to run some errands, me to run some errands of my own, including a trip to the baking store to buy some cupcake containers for the Margarita Cupcakes for Cinco de Mayo.


While inside, something ended up catching my eye, and I came across some chocolate-covered Oreo molds.  They looked like regular chocolate-making molds, but instead had deep circular wells with little designs at the bottom. And one of them had onesies!  It was a sign, since a good friend of mine had recently told me she was expecting. So I picked up the mold and figured I'd end up putting it to good use to make treats or favors for her baby shower (it's going to become part of a long standing tradition of me baking for her life events, like her bridal shower, bachelorette party, her WEDDING cupcakes, her first anniversary, her 30th birthday (these AND these)...and several other birthdays...but I digress).


But the other day she found out she's having a girl!!  So when we made dinner plans with another friend on Sunday night for Monday, I came in from my Mother's Day celebration and whipped up a few of those chocolate covered Oreos with pink onsies on them to bring to dinner (I even made one for her to bring home to her husband).  * P.S. I'm totally going to spoil that little girl :). *

I think they ended up turning out adorable!  The coating of chocolate is a little thicker than I'd generally put on a hand-dipped chocolate-covered Oreo, but I love the look of the chocolate onesie on it (my other option was to hand dip Oreos in chocolate and then adhere one of these sugar onesies.  

(Of course, as is the case with all of our lives, we got busy and dinner got pushed back...but these were too cute not to share [dont worry - I already showed them to her first ;-)])

Monday, February 10, 2014

Chocolate cookies with white chocolate chips

For the bris this past weekend, I made those dark chocolate and milk chocolate chunk cookies.   But I didn't stop there!  Then I made those cranberry white chocolate chip oatmeal cookies.  But I didn't stop there, either.  You know me.  I had a few more cookies up my sleeve.


Next up were these chocolate cookies with white chocolate chips.  I made them years ago and they were such a hit.  They happen to be one of my all time favorite cookie recipes on the blog (they're also a top 10 most popular post on the blog!).  Which is why I almost scrapped making them.  See, I went on a diet and I've been SO good, and I knew that if I made these cookies there was a good chance I'd eat a bunch of them.  But they were too good to not make, and plus, I've been getting much better at that whole willpower thing!

The other reason I made these anyway?  The baby's grandma LOVES white chocolate.   It's the least I could've done for her!  Sure, there were white chocolate chips in the cranberry oatmeal cookies, and even some white chocolate lollipops, but I love the creaminess and sweetness of the white chocolate chips in this super dark, decadently chocolate cookie.  I think it really gives the white chocolate a chance to shine, without being all too sweet!

Chewy Chocolate Cookies with White Chocolate Chips

Ingredients:

1 3/4 cups flour
1 1/4 cups cocoa powder (I used Hershey’s Dark Chocolate Cocoa Powder)
1 cup white sugar
3/4 cup brown sugar
2 tsp baking soda
1 cup butter, room temperature
2 eggs
1 tsp. vanilla
1/4 tsp salt
2 cups white chocolate chips

Directions:

Preheat oven to 350 degrees and grease cookie sheet (or line with parchment paper).

In a large bowl, cream together the butter, brown sugar and white sugar until light and fluffy. 
Add eggs one at a time, beating well with each addiction. 
Add the salt and vanilla.

In another bowl, combine the flour, cocoa and baking soda.
Gradually add to the creamed mixture 

Fold in chocolate chips. 
Drop by rounded spoonfuls onto the prepared cookie sheet.  I used my mini scooper to make smaller cookies.

Bake for 8 to 10 minutes until fluffy but still soft.  My smaller cookies baked for about 6 minutes.
Allow cookies to cool on baking sheet for 5 minutes before removing to a wire rack to cool completely.

Cranberry white chocolate oatmeal cookies

When I made the oatmeal cranberry cookies for the baby shower last month, I debated adding white chocolate chips to them. I knew I should've, but for some reason, I decided against it.  The oatmeal cranberry cookies were absolutely delicious, and I loved the sweet-and-tartness of the dried cranberries.  But I did want to try them with the white chocolate chips.


So the next variety of cookies I made for baby J's bris were these cranberry white chocolate oatmeal cookies.  I added a little cinnamon to them, because I love cinnamon, and because I thought it would go well with the other flavors in the cookies.  Boy, was I right!  I'm so happy I added it (although I'm sure the cookies would be delish without the cinnamon, too!).

Oatmeal Cranberry Cookies with White Chocolate Chips

Ingredients:

1 cup butter, softened

1 cup packed brown sugar
1/2 cup granulated sugar
1 egg
1 Tablespoon vanilla
2 cups all-purpose flour
1 teaspoon baking soda
1/2 teaspoon baking powder
1/2 teaspoon salt
3/4 tsp of ground cinnamon
2 cups sweetened dried cranberries (we both used Craisins)
1 and 1/4 cups old fashioned oats -- for some reason, these were left out in the directions below, so I added them in
2 cups white chocolate chips

Directions:

Preheat oven to 375.
Line baking sheets with parchment paper or Silpat. 

Combine flour, baking soda, baking powder, cinnamon, and salt in a medium bowl and whisk to combine.  
Set aside. 

Beat butter at medium speed with mixer until creamy.  

Add sugars, beating well.
Add egg and vanilla, beating until blended.  
I added the oats here.
Gradually add flour mixture and beat until blended, scraping bowl as needed.  
Stir in cranberries and white chocolate chips.  I did that using a spatula, since the dough was thick and getting stuck in my hand mixer.
 
Drop dough by heaping spoonful onto cookie sheet.  I pressed them down a little to flatten them.
Bake for 9-11 minutes or until cookies are lightly browned.  

Cool on sheet for about 2 minutes before transferring to cooling rack. 

Dark chocolate chunk cookies

Last month I made a bunch of giant cookies for my friend's friend's baby shower (the milk chocolate chunk, oatmeal cranberry, peanut butter monster cookies, and the coconut oatmeal chocolate ones).  I also made extra cookies to take to a friend's birthday celebration but the bar wouldn't let me bring them in.  What to do with the extra cookies?  Well, I started by bringing one of each flavor to B.  B and I agreed that the milk chocolate chunk cookies were the best of the bunch (I knew he was smart!).


So when my friend had a baby at the end of January, and they were planning the bris, I offered to make some treats.  Of course I was going to make some chocolate lollipops, but I wanted to make something else too.  We decided on an assortment of cookies to be served at the brunch.

While I definitely made some milk chocolate chunk cookies, I also decided I would make a second batch with dark chocolate chunks.  The original recipe called for semisweet chocolate anyway.  Even though I made an entire batch of milk chocolate chunk cookies, I'll spare you yet another blog post about them.  So why did I mention them in the first place?  I just didn't want you thinking that I only made a few varieties of cookies for the bris.


I have to say, these cookies are so delicious, you could put just about anything in them (trust me, I'm thinking about it now...).  So it's not at all a surprise that these dark chocolate chunk cookies are as delicious as their milk chocolate counterparts!

Dark Chocolate Chunk Cookies
Originally from Smitten Kitchen, and posted as "Milk Chocolate Chunk Cookies" on this blog

Ingredients:

2 cups all-purpose flour
1/2 teaspoon baking soda
1/2 teaspoon salt
3/4 cup unsalted butter, melted
1 cup packed brown sugar
1/2 cup white sugar
1 tablespoon vanilla extract
1 egg
1 egg yolk
2 cups semisweet chocolate chips -- I used 2 cups of dark chocolate chunks, which I got from cutting a giant dark chocolate bar cut into chunks

Directions:

Preheat the oven to 325°F (165°C). 
Grease cookie sheets or line with parchment paper.

Sift together the flour, baking soda and salt; set aside. 
In a medium bowl, cream together the melted butter, brown sugar and white sugar until well blended. 

Beat in the vanilla, egg, and egg yolk until light and creamy. 
Mix in the sifted ingredients until just blended. 

Stir in the chocolate chips by hand using a wooden spoon. 
Drop cookie dough 1/4 cup (for a ridiculously large cookie, one or two tablespoons for more standard-sized cookies.  I used my cookie scoop, which if I had to estimate, is about 1-1.5 Tbsp) at a time onto the prepared cookie sheets. 
Cookies should be about 3 inches apart. 
I pressed the tops of my cookies a little to make them more like discs, since I wanted them bigger and flat.

Bake for 15 to 17 minutes (closer to 12 minutes for non-1/4 cup scoop cookies...Mine took 15 minutes and came out perfectly!) in the preheated oven, or until the edges are lightly toasted. 
Cool on baking sheets for a few minutes before transferring to wire racks to cool completely.

Sunday, February 9, 2014

White chocolate lollipops

My friends R + R had a baby just over two weeks ago.  R + R, kinda funny, since that's the complete opposite of what they're getting with their newborn, who apparently likes to sleep well during the day and is up often at night to 'party.'  But I digress.  They had an adorable little boy, and this morning was his bris.

For his older sister's baby shower 4 years ago, I made a ton of baby-themed chocolate lollipops and sugar cookies with royal icing in baby shapes.  So when it came to the bris, I asked R if I could bring anything.  We decided on something a little different than the last time, but I did end up making cookies (just several cookies in 4 flavors, but I had to skip the royal icing because of the busted Kitchen-Aid).  I also made a few chocolate lollipops, to give out to the kids and to a few lucky adults (especially the baby's grandma, who adores white chocolate)!


These were from his big sister's baby shower almost exactly 4 years ago:


Monday, January 20, 2014

Chocolate oatmeal coconut cookies

So by now those of you who know me (either personally or through the blog) know that when it comes to baking, I tend to do things in excess.  My friends 30th birthday a few years ago?  Yeah, I made two cakes.  My birthday this year?  A week of treats (ok, ok, it was only 4 days...).  A 30th birthday party last year resulted in 36 cupcakes for about 15 people (red velvet and Samoa).  And when we went wine tasting this past fall, I brought another 36 cupcakes (this time cannoli-inspired and chocolate-peanut butter-pretzel ones).  I could go on, but I think you get the picture...

So when my friend P asked me to bake cookies for a baby shower last weekend, I couldn't stop at one, two, or three varieties.  I needed to make a fourth type.  I debated a fifth, but we can talk about that later.


This time I set out to make some chocolate oatmeal coconut cookies. For some reason, they intrigued me. I used to hate coconut, but lately it's been growing on me.  I think it started with those Samoa cupcakes, but then there were also the toasted coconut marshmallows and the coconut caramel cupcakes on New Years.

These cookies were really good, but I think you lose out on a little by making them so big.  Therefore, my bottom line with these cookies is make them, just don't make them huge!

Chocolate Oatmeal Coconut Cookies
from Taste and Tell

Ingredients:

1 cup unsalted butter, at room temperature
1 cup brown sugar, packed
6 tablespoons sugar
2 eggs
1 1/2 teaspoons vanilla
1/2 teaspoon salt
1/2 teaspoon baking soda
1 1/2 cups flour
2 1/4 cups oats
1 1/2 cups coconut
12 oz semi-sweet mini chocolate chips (2 cups)
 
Directions: 
 
Preheat the oven to 350F.

In a mixer, beat together the butter and the sugars until light and fluffy.
Add the eggs one at a time, beating well after each addition.
Beat in the vanilla, salt, and baking soda.
Add in the flour and beat just until combined.
Add in the oats, coconut and chocolate chips.
Beat until combined.
 
Place 1/4-cup scoops of the dough on a greased cookie sheet, at least 3 inches apart.
Pat down to circles 1/2-inch high.
 
Bake in the preheated oven for about 15 minutes, rotating cookie sheet halfway through the baking time.
Cool on cooling racks.

The result?  19 ginormous cookies!

Peanut butter monster cookies

I try not to make the same thing on the blog, but sometimes, it's just so fitting that I have to let my "no repeats" rule slide by the wayside.  These cookies are one of those exceptions!


I made these peanut butter monster cookies for my birthday last year, but unfortunately didn't get to share them with many people.  Which is a complete shame, since they were amazing.  And HUGE.  So when my friend asked me to make some cookies for a baby shower she was attending last weekend, and we settled on a variety of large cookies, I knew I had to include these!  And since I knew I was making large cookies, I knew these would totally fit the bill!


These are a peanut butter lovers dream!  There's peanut butter in the cookie dough, peanut butter chips in the cookies, and then they're studded with Reese's Pieces!  Did I mention they're fantastic??

Peanut Butter Monster Cookies
Originally from here, and reposted on the blog

Ingredients:

2 cups all-purpose flour
2 and 1/4 teaspoons baking soda
1/2 teaspoon salt
1 cup unsalted butter, softened
1 cup peanut butter
1 cup sugar
2/3 cup packed brown sugar
2 large eggs at room temperature
1 teaspoon vanilla extract
1/2 cup rolled oats
1/2 cup peanut butter chips
1/2 cup chocolate chips
Reese’s Pieces mini candies, 1 bag (They suggested two bags, since there weren't enough to coat all of the cookies with one bag - and I needed about 1/5 of an additional bag)

Directions:

Whisk together flour, baking soda and salt in a small bowl.
Set aside.

In a large bowl (or the bowl of a stand mixer) cream together butter, peanut butter, sugar and brown sugar (I used light brown sugar).
Beat until light and fluffy.
Add eggs one at a time, beating well after each addition.
Add vanilla, and beat to combine.
Slowly add dry ingredients, and beat just until combined.
Don’t over beat at this stage.
Stir in oats, peanut butter chips and chocolate chips.
Refrigerate dough for 15 minutes, meanwhile preheating oven to 350 degrees (F).

Prepare a cookie sheet with parchment paper.
Pour Reese’s Pieces candies onto a plate or into a flat bowl.

Using a large cookie scoop (about 3 Tablespoons - I actually used an ice cream scooper, which I purchased specifically for these cookies!) drop cookie dough into the bowl of candies.
Gently use your hand to press the dough down into the candies and flatten the dough into a disc, then transfer to cookie sheet.
Bake, six at a time, for 12-15 minutes or until the edges are just beginning to darken.

Allow to cool on cookie sheet for 5-10 minutes.
*If you skip this step, the cookies might break when you transfer them to a cooling rack.*

Allow to cool on a wire rack for 30 minutes before serving.  Enjoy!

Sunday, January 19, 2014

Oatmeal cranberry cookies

Remember that baby shower I posted about yesterday?  The one where I said I was going to make a few varieties of cookies and that you should stay tuned?  Well, you should be glad you did because these next cookies that I made were pretty darn awesome!


I personally love oatmeal raisin cookies and find that too many people add nuts to theirs, therefore making me dislike them (if you're new to this blog, you should know for the future that I really don't like nuts in my baked goods).  I also love craisins, and find oatmeal craisin cookies to be delicious...I particularly like the tart dried cranberries in the sweet brown sugary cookie.  I debated trying some with white chocolate chips but was afraid that the white chocolate might be too sweet in the cookie, so I skipped the white chocolate chips this time. 

Because my friend had basically requested a cookie per person, I didn't want to skimp on the cookies and make them mini, so I went the complete opposite route and made massive cookies!  I tried to keep them the same size as the chocolate chunk ones.  I think I did a pretty decent job (the trick?  Using the same sized scooper for the cookies -- in this case an ice cream scoop).

Oatmeal Cranberry Cookies (with and without White Chocolate Chips)
From Yums and Loves

Ingredients:

1 cup butter, softened
1 cup packed brown sugar
1/2 cup granulated sugar
1 egg
1 Tablespoon vanilla
2 cups all-purpose flour
1 teaspoon baking soda
1/2 teaspoon baking powder
1/2 teaspoon salt
2 cups sweetened dried cranberries (we both used Craisins)
1 and 1/4 cups old fashioned oats -- for some reason, these were left out in the directions below, so I added them in
2 cups white chocolate chips -- I skipped this this time

Directions:

Preheat oven to 375.
Line baking sheets with parchment paper or Silpat. 

Combine flour, baking soda, baking powder, and salt in a medium bowl and whisk to combine.  
Set aside. 

Beat butter at medium speed with mixer until creamy.  

Add sugars, beating well.
Add egg and vanilla, beating until blended.  
I added the oats here.
Gradually add flour mixture and beat until blended, scraping bowl as needed.  
Stir in cranberries and white chocolate chips.  I did that using a spatula, since the dough was thick and getting stuck in my hand mixer (which I'm using since I haven't been able to get my Kitchen-Aid fixed yet).
 
Drop dough by heaping spoonful onto cookie sheet.  I used my ice cream scoop, and again pressed them down a little into discs.
Bake for 9-11 minutes or until cookies are lightly browned.  
Cool on sheet for about 2 minutes before transferring to cooling rack. 

I ended up getting 16 GIGANTIC cookies!