Facebook 1

Sunday, September 28, 2014

Pumpkin scones

Third up in the week of scones are these pumpkin scones.   (Sorry for the delay in posts, as the past few days were the Jewish Holiday of Rosh Hashanah and I was away from the computer.)

The pumpkin scones are all the way on the right.
I've mentioned it before, but I'll say it again.  I'm not a huge fan of pumpkin pie spices, but I figured that pumpkin would be a nice fall flavor for the baby shower.  Boy was I right -- a bunch of people came up to me and saying that their favorite was the pumpkin scone!


These froze up beautifully, and then I just popped them into the oven to bake them.  If you do like pumpkin pie flavors, these are the scones for you!

Pumpkin Scones
from Damn Delicious

Ingredients:

For the scones:

2 cups flour
1/3 cup brown sugar, packed
1 tsp cinnamon
1 tsp baking powder
3/4 tsp ground cloves (I decreased this just a bit, since cloves and I are not friends)
1/2 tsp ground ginger
1/2 tsp ground nutmeg
1/2 tsp baking soda
1/4 tsp salt
1/2 cup (1 stick) unsalted butter, cut into cubes
1/2 cup pumpkin puree
3 Tbsp milk
1 large egg
2 tsp vanilla extract

For the glaze (I left this off, due to lack of time):

1 cup confectioners sugar
2 Tbsp milk

For the spiced glaze:

1 cup confectioners sugar
1/4 tsp cinnamon
1/4 tsp ground cloves
1/4 tsp ground ginger
Pinch of nutmeg
2 Tbsp milk

Directions:

Preheat the oven to 400F.
Line a baking sheet with parchment paper or a silcone baking mat.
Set aside.

In a large bowl, combine flour, sugar, cinnamon, baking powder, cloves, ginger, nutmeg, baking soda, and salt.  You can also use a Kitchen-Aid mixer or a food processor.
Add cold butter, using your fingers to work the butter into the dry ingredients until it resembles coarse crumbs.

In a large glass measuring cup or another bowl, whisk together pumpkin puree, milk, egg, and vanilla.
Pour mixture over dry ingredients and stir using a rubber spatula until a soft dough forms.

Working on a lightly floured surface, knead the dough 3-4 times until it comes together.  I like to do this on floured waxed or parchment paper, making clean up much easier.
Using a rolling pin, roll the dough into a 10 by 7 inch rectangle, about 1" thick.
Using a large knife or pizza cutter, cut the rectangle in half lengthwise, then cut into 2 even pieces crosswise, making 4 rectangles.
Then cut each rectangle into two triangles, making 8 triangles.
I cut mine differently, making smaller triangles, since I wanted mini scones.

Place scones onto prepared baking sheet.
Place the baking sheet into the oven and bake for 10-12 minutes, or until a tester inserted in the center comes out clean.

Make the glaze.
Combine the confectioners sugar and milk.
Whisk until smooth.
If the glaze is too thick, add more milk as needed; set aside.

Make the spiced glaze.
Combine the confectioners sugar, cinnamon, cloves, ginger, nutmeg, and milk.
Whisk until smooth.
Mine was too thin, so I added some extra confectioners sugar.
Set aside.

When the scones are done, cool for 10 minutes.
Spoon the glaze on each scone (I skipped this stage, since I didn't make the plain glaze).
Then, drizzle with the spiced glaze.

Allow the glazes to set before serving.

Monday, September 22, 2014

Prosciutto, cheese, and scallion scones

For L's baby shower this past weekend, I wanted to add some savory scones to the sweet ones that I was going to make.  These were my first savory scone that I baked for the shower, and also happen to be the second installment of the week of scones!

The Prosciutto, Scallion, and Gruyere Scones are the 4th from the left.
These were also pretty easy to make, in part to the pre-chopped prosciutto that I found near the deli counter.  What a time saver!  Definitely appreciated given the sheer variety of scones that I was making (plus, there were cupcakes, too!).  I made these mini, too, since there were going to be so many varieties of scones, and I figured people might want to try more than one flavor.  I ended up getting 19 mini scones, plus I had tons of leftover dough that I just re-kneaded and made about 10 more mini scones.

I have to say, I'm a HUGE fan of these savory scones!  They're perfectly savory, salty, and delicious without being too salty!  My only regret?  The minis are so mini...I want to eat more than one at once!

Prosciutto, Gruyere, and Scallion Scones
from Kitchen Confidante

Ingredients:

2.5 cups flour
2 Tbsp sugar
1 Tbsp baking powder
1 tsp kosher salt
1/2 cup butter
2 large eggs
2/3 cups buttermilk
2/3 cup shredded gruyere (I hand grated mine)
1/2 cup chopped prosciutto
1/4 cup grated parmesan, plus extra for sprinkling
1/4 cup chopped green onion (scallion)
2 Tbsp half and half
Sea salt

Directions:

In a large bowl, whisk together the flour, sugar, baking powder, and salt.
Using a pastry cutter (or two forks, or knives, or a food processor), cut the butter into the flour mixture, until you have course crumbs.

Whisk the eggs lightly and combine with the buttermilk.
Add to the flour mixture and stir until just moist.

In a small bowl, mix together the cheeses, prosciutto, and scallions.
Add this to the batter and mix lightly.
* The dough will be sticky.

On a lightly floured surface, turn the dough out and knead lightly until all the cheese, prosciutto, and scallions are incorporated into the dough.
Roll the dough 3/4 inch thick.
Cut out 3 inch squares, then cut diagonally to make triangles.  You should have about 10.
Or, you can make mini scones like I did, with a 2" circle cutter.  Punch down with the cutter, but do not twist.
Place the scones onto a baking sheet lined with parchment or a silicone mat.
Lightly brush the top of the scones with half and half.
Sprinkle with sea salt.

Place the scones in the freezer for 30 minutes.

*Since I made the scones a few days before and planned to bake them the morning of the shower, I left off the half and half and salt when I froze them, and did that when I took them out of the freezer to bake them.  I ended up using an egg wash and left off the salt, since I was afraid that they might be too salty.

Preheat the oven to 400F.

Once the scones are chilled, bake for 20 minutes, or until golden.
I baked my mini scones for about 10 minutes.
Sprinkle with additional parmesan cheese and serve warm.
Since I did this at L's mother-in-law's apartment and I forgot to bring the parmesan cheese with me, I inadvertently left that off.  Oops!

Sunday, September 21, 2014

Mixed berry scones

My friend L is expecting a little girl next month.  Two of her friends and her mother-in-law threw her a baby shower yesterday.  On the menu?  Tea and scones.  And -- as i'm sure you guessed -- yours truly offered to bake up some scones for the momentous occasion!

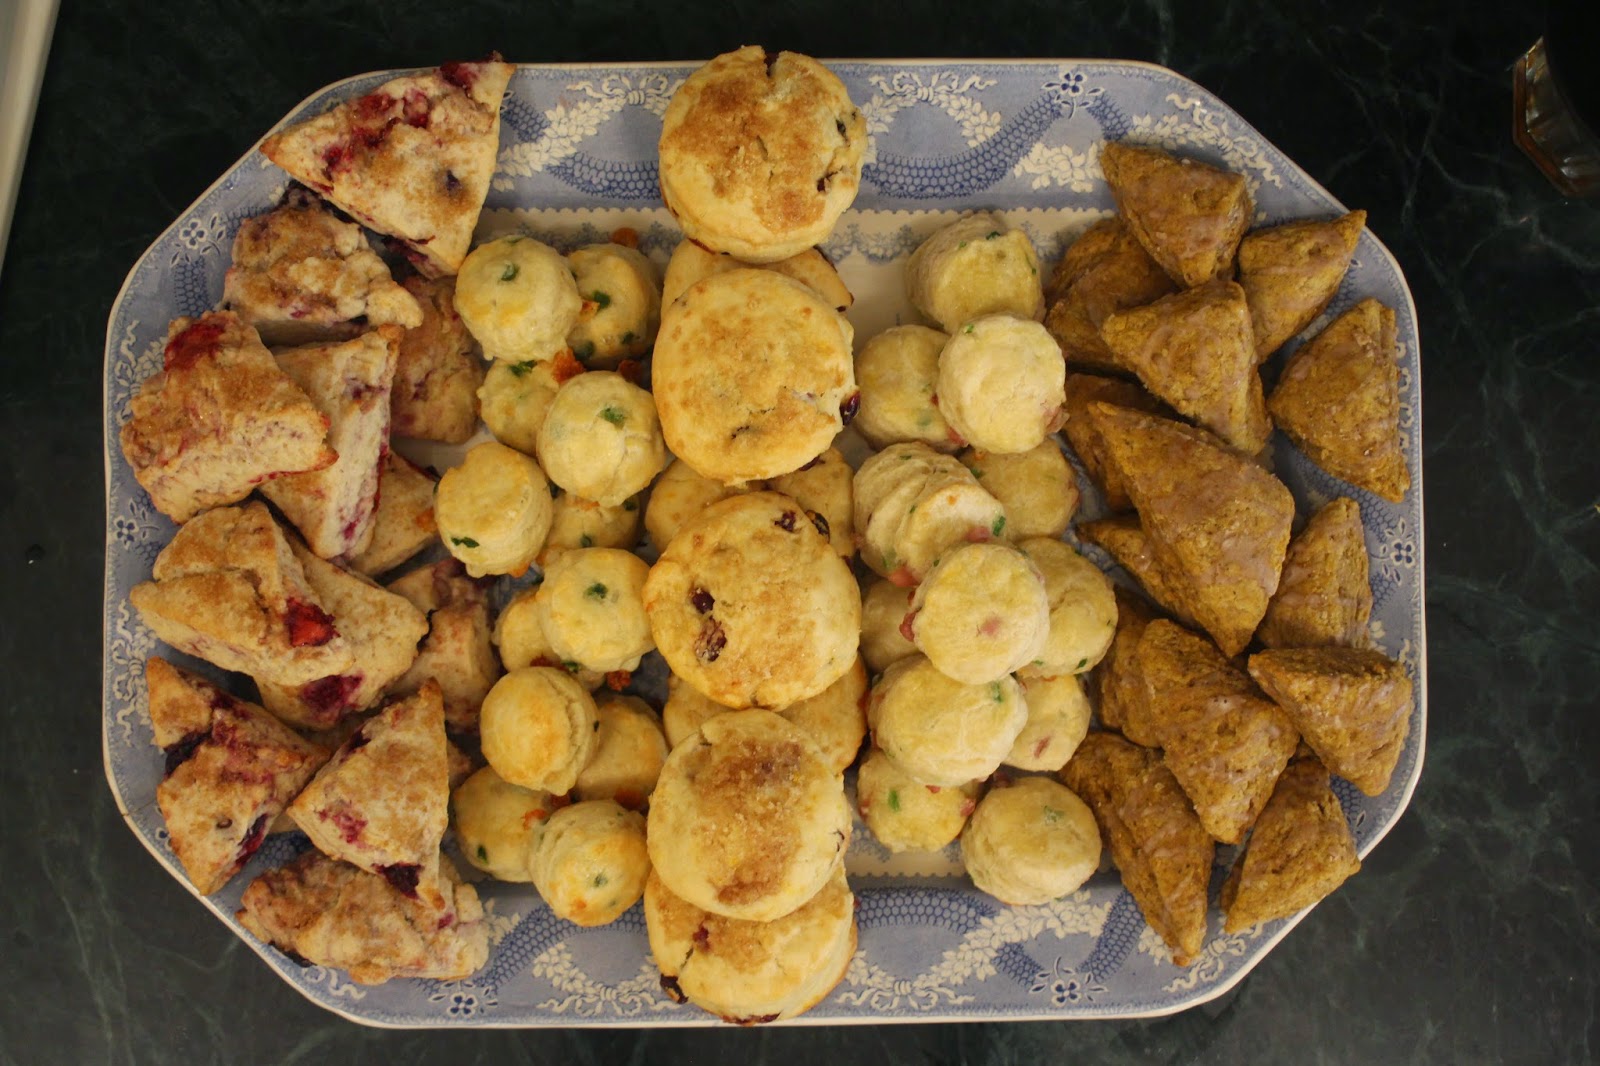
5 different kinds of scones for L's baby shower.  Every day this week I'll post one or two recipes.
These mixed berry scones are all the way on the left of the picture!
Which one will be featured tomorrow??

I wanted to make a variety of scones, and since the hosts said they'd need about 40 scones, I figured I had the perfect opportunity to test out a few different scone flavors.  So, as you may have figured out, this week will be scone week on JulieBakes!

First up were these mixed berry scones.


First off, if done right, scones are pretty easy.  I love the fact that you don't have to wait for the butter to warm up to room temperature (it's often times the most time-intensive part of baking, and I've yet to find an alternate way of doing it besides leaving it on the counter and allowing it to warm up and soften).  I don't have a pastry blender, though, so getting the butter to break up into pea sized bits is a bit difficult with a fork, but it's worth it.

I made the scones ahead of time and then froze them.  Scones are really the best the same day they're baked, and savory ones (you'll see some of those this week) I find are best fresh out of the oven.  This way, I got to pop the scones of the freezer and bake them up that morning, without having to pull an all nighter getting 5 (or more....) types of scones made and freshly baked that morning!  The only problem?  Since these had frozen fruit in them,when I went to bake these they ended up a little watery and I didn't think they were pretty enough to serve, so I ended up making a quick fresh batch yesterday morning for the shower.  So, take note, these are a make the day of scone (translation: don't pre-make and freeze these [spoiler alert: the rest of the scones this week can be frozen]).

The scones were served with assorted jams, clotted cream, and butter.

I cut the scones as directed, but found that they were a bit thick and big,  So when I made them the second time, I rolled them out and then cut them into triangles free-hand.  I got about 18 medium-sized scones.  They baked up for about 12 minutes and were perfectly delicious!

Mixed Berry Scones
(these scones call for a glaze, which I left off.  But I've included the recipe for the glaze in case you're interested)
Original recipe from Averie Cooks.

Ingredients;

2 cups flour, plus more for dusting hands and work surface
1/2 cup granulated sugar
1 Tbsp baking powder
Pinch of salt
1/2 cup unsalted butter, cold
1 large egg
1/2 cup sour cream (light is OK)
1 tsp vanilla extract
1 heaping cup of mixed berries (both the original recipe and I used frozen mixed berries -- so easy and I highly recommend it!), if using frozen berries, do not defrost them
1 Tbsp orange or lemon zest, optional (I used lemon zest and loved the bright lemony pop that it gave, and I thought it went really well with the berries.)
Turbinado, raw, or coarse sugar, optional (which I opted for, and I used turbinado sugar)

For the glaze (which I left off):
1 cup confectioner's sugar
1 Tbsp, approx, of cream or milk (or you can substitute in orange or lemon juice)

Directions:

Preheat the oven to 400F.
Line a baking sheet with a Silpat or parchment paper.
Set aside.

In a large bowl, mix 2 cups flour, granulated sugar, baking powder, and optional salt.
Whisk to combine.

Cube the butter.
Add the butter to the flour mixture, and with a pastry cutter or two forks, cut the butter in (you can use a food processor, too, or a Kitchen-Aid mixer....which I did the morning of the shower when I needed every time-saving trick I could come up with).
Once the pieces of butter are smaller, you can mush them up with your hands.
Some larger pea-sized clumps of butter are OK.
Set aside the bowl.

In a small bowl, whisk together the egg, sour cream, and vanilla.

Pour the wet mixture over the dry.
With a soft-tipped spatula, fold until just combined.
Be sure not to overmix the scones -- the dough should be wet and shaggy.

Fold in the berries and zest, if using.

Sprinkle about 2 Tbsp of flour onto a Silpat or clean work surface (I use wax paper or parchment paper on the counter) and lightly coat hands.

Turn the dough onto the work surface and knead it into an 8 inch round circle -- This is where I did mine differently...
I kneaded mine a few times, and then sprinkled some flour on top.
I placed another piece of waxed paper or parchment paper on to[p of the dough and then rolled it out. I cut them into 2 to 3 inch wide strips, and then cut them into triangles.

Using a flat spatula, transfer the scones to the prepared baking sheet, being sure to place them at least 2 inches apart.
Tip - try to avoid exposed berries touching the baking sheet, since they're prone to burning (although I couldn't do that with all my scones, and none of them burned).

If using sugar on top (which I did), sprinkle each wedge with a generous pinch or turbinado sugar, about 1 tsp each.

Bake for about 18 minutes (mine were a little smaller, about 10-12 minutes was enough), if using fresh (not frozen) berries, they will likely need a shorter baking time, so just be aware.
A toothpick inserted in the center should come out clean or with a few moist crumbs, but no batter.

Allow the scones to cool on the baking tray for about 5 minutes before removing and transfering them to a rack to finish cooling.

While the scones are cooling, make the glaze, if using.

Whisk together the confectioners sugar and cream/milk/citrus juice (whichever you choose to use....but just use one!).
Depending on desired consistency, you may need to add more sugar or cream/milk/citrus juice.

Evenly drizzle the glaze over the scones before serving.

* Scones are best served fresh.  These will keep in an airtight container at room temperature for up to 4 days. *

Thursday, September 18, 2014

Dark chocolate toffee brownie cups

Last weekend my friends E & G invited a few of us over for their newly opened roof deck on the 45th floor of their apartment building.  Since I need a lot less of a reason to bake, I gladly offered up some homemade treats for the event.


I wanted something transportable (I was going over straight from work) but also something tasty.  And I didn't want to make cookies (I don't know why; it could've been those time intensive Brookies I made recently).  So I opted for brownies, but then figured that brownies baked in cupcake tins would be even easier, so I went with that.  I found a recipe for a dark chocolate brownie, and then added a good helping of toffee bits (leftover from those Peanut Butter Monster Cookie Bars), because toffee makes just about everything better.


These brownies are uber rich and chocolate-y -- just the way I like them!!

Dark Chocolate Brownie Cups with Toffee Pieces
I got the brownie recipe from here, but then left off the ganache and added in toffee...but I can't wait to make her original recipe, too!

Ingredients:

3/4 cup unsalted butter, melted
2 large eggs
1 cup granulated sugar
2/3 cup packed light brown sugar
2 Tbsp coffee or water (I used water, since I didn't feel like making a pot of coffee for 2 Tbsp)
2 tsp vanilla extract
3/4 cup unsweetened natural cocoa powder or dark cocoa powder (I used dark, since that's my favorite!)
1 tsp instant espresso granules/powder (optional, but it is recommended)
3/4 cup flour

Heath toffee bits, about 1/3 to 1/2 cups....I started with 1/3 cup but then kept adding without actually measuring it, so 1/2 cup is my best estimate

Directions:

Preheat the oven to 350F.
If making cupcake brownies, line a 12 cup cupcake tin with waxed cucpake papers (I used regular white paper liners and the brownies stuck a little bit.  Waxed liners would probably work a little better, but there's really no harm in using regular papers if that's what you have/want)
If making a tray of brownies, line a 9x9" pan with foil and then spray the foil with cooking spray.

In a large microwave safe bowl, melt the butter.
I do mine in 30 second increments so that the butter doesn't get too hot and/or splatter all over my microwave.
Let the butter cool a little, so that it won't scramble the eggs.
Add the eggs, sugars, vanilla, and coffee.
Whisk to combine.
Add the cocoa powder and instant espresso, if using.
Whisk until it is all incorporated and is smooth, and there are no lumps.
Add the flour and stir until it's just incorporated, making sure to not overmix.
Add the toffee bits and fold in with a rubber spatula, a few times only to make sure the pieces geet mixed in, without overmixing.

If making brownie cups, use an ice cream scooper to fill the cups, about 2/3-3/4 of the way full.  I had enough for just over 14 brownie cups.
If baking a tray of brownies, pour the batter into the prepared pan/
Smooth the top lightly with a spatula to make the top as flat as possible.

Bake for 25-29 minutes (for brownies, about 19-22 minutes for brownie cups, but watch them closely to make sure they don't burn), or until the top is just set but isn't jiggly in the center.  Inserting a toothpick in the center and checking to make sure it comes out clean or with a few moist crumbs (but no batter).

Allow brownies to cool completely in the pan,

Sunday, September 14, 2014

Peanut butter monster cookie bars

About ten days ago -- actually, MORE THAN TEN WHOLE DAYS AGO!! -- I decided to make some peanut butter monster cookie bars.  I just felt like having a yummy, chunky bar to bite into.  But just one.  I wanted to be good on my diet, so I planned to give most of them away (and for once, I succeeded!!).


I thought I had written a blog post on these already -- I had definitely talked about them enough on facebook, but alas, there is no post here.


So, without much ado, but definitely much belated, here are these delicious (and easy!!) Peanut Butter Monster Cookie Bars!

Peanut Butter Monster Cookie Bars
From Averie Cooks

Ingredients:

1/2 cup (1 stick) unsalted butter, melted
1 large egg
1 Tbsp vanilla extract
1 cup packed light brown sugar
1/2 cup (heaping) creamy peanut butter (the original recipe says to skip homemade or natural since they're too runny, but I used Skippy natural and it worked just fine)
1 cup flour
1 cup peanut butter M&Ms, plus a few extra for the top
3/4 cup semi-sweet chocolate chips, chunks, or a combination (I used a mixture)
1/2 cup peanut butter chips
1/3 cup toffee bits

Directions:

Preheat the oven to 350F.
Line an 8x8" pan with foil.
Spray foil-lined pan with cooking spray.
Set aside.

In a large, microwave-safe bowl, melt the butter.
I did mine on 30 second intervals, to make sure it didn't get too hot.
Let cool for a few minutes, so that you don't scramble the eggs when you add them.
Add the egg, brown sugar, and vanilla.
Whisk until smooth.

Add the peanut butter, and with a whisk, incorporate until smooth.
Add the flour and stir until just combined, being sure not to overmix.
Add the add-ins (M&Ms, chips and chunks, and toffee bits).
Fold until incorporated.

Pour the batter into the pan.
With a spatula, smooth the top to make it flat.
Place a few of the peanut butter M&Ms on top, since it'll make them look extra pretty :)

Bake for about 24 minutes, or until the top is set.
Inserting a toothpick in the center is a good way to check -- it should come out clean or with a few moist crumbs.  If there is batter, they are undercooked and need to bake longer.
Allow them to cool in the pan for at least a half hour, before cutting them.

Monday, September 1, 2014

Halloween preview

I know I've said it before, but I don't love Halloween.  Mostly cause I don't love getting dressed up. While creative in almost every aspect of my life, I completely lack creativity when it comes to a Halloween costume.  If forced to dress up in the past, I always went with "doctor" - I just wore some scrubs and flung my stethoscope around my neck so as to look authentic.

But you know what I do like about Halloween?  The adorable treats I can make!  This was exacerbated Labor Day weekend when I stumbled (ok, ok, I intentionally went there.  I had a great coupon burning a whole in my pocket) into the craft store Michaels and left with a thorough - albeit expensive - haul of Halloween supplies!

Check it out...this is just a sampling of my new goodies:


October will be full of Halloween treats -- my goal is to get you at least one Halloween treat a week during the month of October!!

Happy Halloween!!