Facebook 1

Showing posts with label Cinnamon. Show all posts

Thursday, November 9, 2017

Mini pumpkin spice crumb muffins

I've been looking forward to this weekend for a few weeks, since my friend and I are hosting a baby shower for another friend of ours!  There were a thousand things I wanted to bake, but only a day or two to get things done (work schedule is packed and I work super long days three days a week now).  These muffins definitely made the list, though!


Now I've said it before and I'll (have to) say it again: I hate pumpkin spice.  Like ugh, gross, despise it.  But almost everyone else loves it, including the mom-to-be, who told me she was "bad" when she got a pumpkin spice latte (caffeine is OK when pregnant, so I'm not sure why she thinks she was "bad," but I digress....).  So when hosting a baby shower for 13 women, including at least one who has confirmed her love for pumpkin spice, these muffins were a given!  Plus, they have the most heavenly looking crumb topping.  [I debated making these pumpkin spice latte cupcakes, but wanted something more breakfast/brunch-y.  And again, remember, crumbs!]


I ended up making mini muffins, since they were being served before lunch.  I halved the recipe since I didn't want to have an insane amount of muffins, and as it was I got 27 mini muffins with a half recipe.  I didn't, however, half the crumb topping since I figured mini muffins = more surface area, and I'd probably need extra crumbs.  As it ended up, I had leftover crumb topping, but that's fine.  Better to have too much than not enough!


* Full disclosure, it took me a long time to post this blog post, despite having written it and staging the photos at the time I baked them.  When I went to put the final edits on the post and add the recipe, the original link I had was defunct.  When I searched the blog again, I came across this recipe, which from my recollection is the same * 

Pumpkin Crumb Cake Muffins

Ingredients:

For the muffins:

1 3/4 cups all purpose flour (spooned and leveled)
1 tsp baking soda
2 tsp ground cinnamon
1 tsp pumpkin pie spice
1/2 tsp salt
1/2 cup canola or vegetable oil
1/2 cup granulated sugar
1/2 cup packed light or dark brown sugar
1 1/2 cups canned pumpkin puree
2 large eggs, at room temperature
1/4 cup milk, at room temperature

For the crumb topping:

3/4 cup all purpose flour (spooned and leveled)
1/4 cup granulated sugar
1/4 cup packed light or dark brown sugar
1 tsp pumpkin pie spice
6 Tbsp unsalted butter, melted

For the (optional) maple icing:

1 1/2 cups confectioners' sugar
2 Tbsp pure maple syrup
2 Tbsp milk

Directions:

Preheat oven to 425F.
Spray a 2 x 12 count muffin pan with nonstick spray or line with cupcake liners.  This recipe makes 15 full sized muffins, so you'll need a second pan. (I made mini muffins, and used a 24-cavity mini muffin pan, but chose to use liners instead of spraying it; I halved the recipe and got 27 mini muffins, so you'd need do to this for at least 2 muffin pans).

Prepare the muffins.
In a large bowl, whisk the flour, baking soda, cinnamon, pumpkin pie spice, and salt together until combined.
Set aside.
In a medium bowl, whisk the oil, granulated sugar, brown sugar, pumpkin puree, eggs, and milk together until combined.
Pour the wet ingredients into the dry.
Fold everything together gentlyy, just until combined and no flour pockets remain.

Spoon batter into liners, until almost full.

Make the crumb topping.
Whisk together the flour, granulated sugar, brown sugar, and pumpkin pie spice until combined.
Using a fork, lightly mix in the melted butter until crumbs form.
Do not over mix.

Spoon crumbs evenly on top of the batter and gently press them down into the batter.

Bake for 5 minutes at 425, then while the muffins are still in the oven, reduce the temperature to 350F.
Bake for an additional 16-17 minutes or until a toothpick inserted in the center comes out clean.
For my mini muffins, I baked at 425 for 5 minutes, then lowered the heat to 350F and baked for 8 more minutes.  The newer version of this recipe says to bake mini muffins for 11-13 minutes at 350F the entire time.

Allow the muffins to cool in the pan for 10 minutes as you make the icing.

To make the icing, whisk the milk, maple syrup, and confectioners' sugar together until combined and smooth.  
Drizzle over muffins and serve warm.

*These can be stored at room temp for 1-2 days, in the fridge for up to a week, and can be frozen (with or without the icing, though I generally recommend freezing without icing and icing them once they've thawed).

Thursday, September 14, 2017

Fruity rum bundt cake

I saw this recipe for this fruity rum cake almost a year ago.  I had wanted to make it for New Year's Eve last year, but with my work schedule and the fact that bundt cakes take a long time to bake, well, let's just say it wasn't in the cards.  I thought about it on and off since then, but never had an occasion to make it.  Until now.


Rosh Hashanah is upon us.  The season of apples and honey and all things sweet for a sweet New Year.  But wait?!  There aren't apples or honey in this cake!  Blasphemy!


I decided that golden raisins and dried apricots and dried (ok, these are tart) cherries are definitely sweet, and therefore totally appropriate for Rosh Hashanah!  The only adjustment I made to this recipe is that I used 1/2 tsp cinnamon instead of cloves, because I utterly hate them.  Since cloves are, in my opinion, stronger than cinnamon, I used a little more.  And I have to say, the flavor of this cake was Ah-maz-ing!  B and I were devouring the cupcakes I made with the extra batter!


When I served it at the holiday meal, it was met with a resounding round of approval.  My father, who doesn't like rum, said the cake flavor was great and there was just a hint of rum that was delicious.  My grandmother, who is (rightfully so) a critic of baked goods, said it was delicious, and even took home a piece to enjoy the following day!!!  This cake is a total winner!

Fruity Rum Bundt Cake
From Bon Appetit

This cake calls for a 12 cup bundt pan.  If you have a 10 cup bundt cake pan (like I do), the recipe recommends reserving 2 cups of batter and baking into 8 cupcakes.

Ingredients:

1/2 cup chopped dried apricots
1/2 cup dried tart cherries
1/2 cup golden raisins
1/2 cup plus 2 Tbsp gold rum, divided
3 Tbsp plus 3 cups all purpose flour, plus more for pan
1 cup (2 sticks) unsalted butter, room temperature, plus more for pan
5 tsp baking powder
1.5 tsp Kosher salt
1/4 tsp ground cloves -- I used 1/2 tsp ground cinnamon instead
2 Tbsp vegetable oil (believe it or not, they did not have vegetable oil at my Whole Foods.  I used Canola oil)
1 1/4 cups plus 2 Tbsp (or more) sour cream -- I ran out of sour cream and ended up using 1 cup sour cream plus 1/4 cup applesauce....by the time I iced the cake, I was able to pick up more sour cream for the icing
2 cups raw sugar, plus more for serving
1 vanilla bean, split lengthwise
7 large egg yolks
1 large egg
1 cup powdered sugar
Gold sugar, for a festive touch

Directions:

Combine apricots, cherries, raisins, and 1/2 cup rum in a small bowl.
Let sit for 30 minutes to allow fruit to rehydrate.
Drain, reserving the rum.
Sprinkle the fruit with 3 Tbsp flour and toss to coat.
Set aside.

Preheat oven to 350 degrees.
Thoroughly butter the pan (don't skimp!), making sure to get into all the curves and grooves of your pan.
Dust with flour (do this even if your plan has a nonstick coating).
Whisk together the baking powder, salt, cloves (or in my case cinnamon), and 3 cups of flour in a medium bowl to combine.
Whisk reserved rum, oil, and 1 1/4 cups sour cream (in my case sour cream + applesauce) in another medium bowl to combine.

Using an electric mixer (I used my kitchenaid), beat 2 cups of raw sugar and 1 cup of butter in a large bowl until light and fluffy, about 4 minutes.
Scrape in seeds of vanilla bean (reserve pod for another use.....vanilla sugar, anyone?!).
Add yolks and egg, 1 at a time, beating to blend after each addition.
Beat until mixture is light and very fluffy, about 4 minutes.
Reduce speed to low.
Add dry ingredients in 3 additions, alternating with sour cream mixture in 2 additions, starting and ending with dry ingredients.
Fold in reserved dried fruit.

Scrape batter into prepared pan.
Smooth top of cake.
Tap pan firmly a few times on the counter to force batter into the edges of the pan.

Bake cake until golden brown and a tested inserted into the cake comes out clean, 60-70 minutes.
Transfer pan to a wire rack.
Let cake cool in pan for 15 minutes.
Invert cake onto a serving plate and carefully remove the pan.
Brush the warm cake with the remaining 2 Tbsp of rum.
Let cool completely, about 3 hours.

(I froze my cake, since I was serving it a few days later.  I recommend freezing the cake wrapped in saran wrap and tin foil, uniced.  Thaw cake before serving and ice cake.)

Mix powdered sugar and remaining 2 tbsp sour cream in another small bowl.
Thin with more sour cream if desired, until smooth.
Drizzle glaze over cake, working along the center of the top of the cake for even coverage,
Sprinkle with raw and gold sugar.
Let sit 10 minutes for glaze to set before slicing with a serrated knife.

Friday, December 9, 2016

Churro Chex mix

Every winter, my friends on Long Island throw a huge party.  Each year, as of late, it has had a theme.  Two years ago?  It was a summer themed party (remember these PiƱa Colada cupcakes I made for it?), last year was Oktoberfest themed (my desserts did not match the theme at all), and this year it's Cinco de Mayo themed.  Since Cinco de Mayo themed desserts can be pretty awesome (tres leches...churro....Mexican chocolate...margarita....Yes, to all of them!), I figured it would be easy to arrive to the party with an arsenal of delicious Cinco de Mayo treats!


First up?  Churro Chex mix.  I guess technically they're muddy buddies, but I just like the sound of churro Chex Mix better.  This recipe actually came about by a serious of errors.  The recipe called for cinnamon chips.  I even had them!  See, I can't find them at my local grocery store, but they sell them at -- of all places -- the Hershey's Store in Times Square.  So if I ever find myself in that touristy area of the city, and if the line isn't too long, I pick up a bag or two.  Unless it's swamped with tourists and has a long line, in which case, I skip it.  Which is precisely what happened when I was there the past two times.  But I digress.  I had 2 bags in my cabinet, and even though it was past the "best by" date, I figured I try them.  Simply put?  They did not work.  But as they were not melting, I noticed that they were probably cinnamon flavored white chocolate chips.  So I set up with batch number two, this time using white chocolate chips and a heaping half tablespoon of cinnamon.  This time, though, the butter and white chocolate wouldn't fully combine, so instead of tossing batch number two, I poured off as much of the butter as I could.  Problem solved!  (If you don't feel like going though the task of melting -- and then disposing of -- a stick of butter, you can skip that step and look for the cheat in the recipe below).  The result is a cinnamon-y delicious addictive Chex mix!


Churro Chex Mix (aka Triple Cinnamon Chex Mix)
adapted from this recipe from Oh, Sweet Basil

Ingredients:

1 regular sized box of cinnamon chex (about 8 cups)
2 cups of white chocolate chips
1 1/2 Tbsp ground cinnamon, divided
1/2 cup butter
1 cup powered sugar
1/2 cup sugar

Directions:

Place the cereal in a large bowl.
Cover 2 cookie sheets with parchment paper.

In a saucepan over medium heat, add the butter and begin to melt it down halfway.
Add the chocolate chips.
Stir until combined.
Add a heaping 1/2 Tbsp of cinnamon.
Drain any butter that is not incorporated.

*Alternately, you can melt 2 Tbsp butter with the chocolate chips in the microwave in 30 second increments, stirring inbetween, until fully incorporated.  If you do this, I would add 1 tsp of ground cinnamon instead of the heaping 1/2 Tbsp. *

Meanwhile, gently stir together the powdered sugar, sugar, and cinnamon in a bowl.
Set aside.

Once the chips are all melted (and the butter drained), pour over the cereal.
Fold with a rubber spatula to coat.
Then add half of the cinnamon sugar mixture.
Continue folding to coat.
Spread out on the cookie sheet and sprinkle with remaining cinnamon sugar mixture.
Toss to coat.

All to cool on the baking tray before packaging up (if there's any left....have I mentioned how addictive this it?!).

Sunday, November 20, 2016

Pumpkin spice candied nuts

At my grandfather's 90th birthday (!!) celebration last night, my aunt (who hosts Thanksgiving) asked me if I was baking anything for Thanksgiving.  Of course, the answer was yes!  I asked her what she wants, and I heard the most beautiful words ever: "you have free reign."  As in I can bake whatever I want!  And what's even more, my cousin (whom I love dearly, and we will all miss at Thanksgiving dinner) with the nut allergy won't be there, I can really bake anything!


Like these nuts.

OK, OK, they don't technically fall under "baking," however they do go in the oven, so they are technically baked.

I had been toying with the idea of making some pumpkin spice candied nuts for a while.  But as you probably know, I'm not a huge fan of pumpkin spice.  And when I came home and got ready to bake them, the pumpkin spice mix I thought I had at home was nowhere to be seen.  So with that little snafu (combined with the fact that my Trader Joe's was out of pumpkin spice, too!) as my disdain for pumpkin spice flavors, I made these candied nuts with a combination of spices found in pumpkin spice, but not all of them.  Which is fine for me, since the missing spices are actually the spices I don't like in pumpkin spice flavored foods and drinks.

I chose to package these nuts in a clear cube box (meant for cupcakes).  With a nice bow and cute hanging tag, they'd be a perfect holiday hostess gift...or gift for the pumpkin spice lover in your life!

Pumpkin Spice Candied Nuts
Adapted from these candied cinnamon sugar nuts

Ingredients:

6 cups of nuts (I used mixed nuts.  I wanted to make sure to have some pecans in it, since I think pumpkin pie and pecan pie are synonymous with Thanksgiving.  After devouring half the recipe, B and I decided that the pecans were the best part.  No one would fault you if you went ALL pecans or half pecans and half other nuts.)
2 egg whites
2 Tbsp water
2 cups granulated sugar
2 1/2 teaspoons ground cinnamon
1/2 tsp ground ginger
1/2 tsp ground nutmeg
2 tsp salt

Optional (if you want to really make them "pumpkin spice"-y):

pinch of ground allspice
pinch of ground cloves

Directions:

Preheat the oven to 300F.
Line two large baking sheets with parchment paper or a silicon baking mat.
Spray with non-stick spray (if using parchment paper).
Set aside.

Mix nuts in a large bowl.
Set aside.

Using an electric mixer, beat egg whites and water on medium-high speed until still peaks form, about 4-5 minutes.
Add the sugar, cinnamon, nutmeg, ginger, and salt.
Stir until well combined.

Pour sugar mixture over nuts.
Stir to coat completely.
Spread nuts over the baking sheets.
Bake for 45 minutes, stirring every 15 minutes.

Allow to cool completely.
Enjoy.

Store nuts at room temperature, covered.

Saturday, October 1, 2016

Fresh apple cake with honey glaze

Every Rosh Hashana, I debate for a second or two about making a non-apple dessert.  But, alas, I always end up with an apple centered dessert.  Four years ago I made an apple pizza, something I remember distinctly, since it was right after B and I met. But I digress...


This apple cake appealed to me for two reasons.  First off, it has a honey glaze.  Honey.  The other big sweet food for Rosh Hashana.  Apples and honey are used to symbolize the beginning of a sweet new year (choruses of the kids Rosh Hashana song are ringing in my head now...."dip the apples in the honey...have a happy sweet new year"). Secondly, it's a bundt cake.  Bundt cakes are, in my opinion, way easier to transport than a beautiful layer cake. And considering that my apple cake is going from downtown Manhattan to Brooklyn (via a 2.5 mile walk) and then back up to midtown Manhattan, before a train ride to Westchester, I figured a dessert that was less likely to be demolished en route was a nice option. 

The one change I made to the cake was that I cut the oil down and replaced it with some apple sauce.  Given the fact that we'll be eating a super huge meal (my mom's brisket....OMG I'm drooling just thinking about it!), plus the added apple flavor from the apple sauce, I thought that it would be a nice addition!

Paula Deen's Uncle Bob's Fresh Apple Cake
From Food Newtork

Ingredients:

For the Honey Glaze:

1 cup confectioner's sugar
2 Tbsp honey
2 Tbsp milk

For the Apple Cake:

3 cups diced peeled Granny Smith apples, about 2 apples (I needed 2.5 apples)
1 cup lightly toasted chopped walnuts
2 tsp vanilla extract
2 tsp ground cinnamon
3 cups all purpose flour
1 tsp baking soda
1 tsp salt
2 cups sugar
1 1/4 cups vegetable oil (I used 3/4 cups apple sauce and 1/2 cup canola oil)
3 eggs

Directions:

Make the glaze:

Add all the glaze ingredients to a small bowl and stir until smooth.
Set the bowl aside.

Make the cake:

Preheat the oven to 325F.
Lightly grease a bundt or tube pan.  I debated flouring it afterwards but decided against it since the recipe didn't say.  My cake got stuck when I tried taking it out and actually broke.  So I instantly regretted not flouring the pan.  I recommend you do so.

Toast the walnuts.
Let cool.

In a bowl, mix together the apples, walnuts, vanilla, and cinnamon.
In a separate bowl, sift together the flour, baking soda, and salt.

Using an electric mixer, beat together the sugar, oil, apple sauce, and eggs in a large bowl.
Add in the dry ingredients.
Beat until completely combined.
Fold in the apple mixture.

Scrape the batter into the prepared pan.
Bake for 1 hour and 30 minutes or until a tester inserted into the middle of the cake comes out clean.  Mine was done after about 1 hour and 15 minutes.  I'd say start watching after an hour.

Allow the cake to fully cool in the pan, about 1 hour.
Turn the cake out onto a plate.

Drizzle the cake with some honey glaze before serving.

The cake can be wrapped tightly and stored in the fridge for 3-5 days.

Friday, December 18, 2015

Gingerbread marshmallows

After making that batch of fluffy peppermint swirl marshmallows the other day, I set out to make another festive holiday-flavored marshmallows.  But what flavor?  Thoughts of egg nog danced in my head (I must've seen them online somewhere), and cinnamon is always tasty, too, but then poof! as if a baking lightening bolt hit me, I thought Gingerbread!  And thus, that's what I made.


I doctored up two recipes and came up with my own.  These are super gingery spiced, but I think in the future I may try to get some molasses into the marshmallows, to give it that real authentic gingerbread flavor.  Not that there's anything wrong with these -- they have a pop of ginger, cinnamon, and nutmeg (I left out cloves.  I hate cloves.  But I put them in the recipe below because if you love cloves, or want that real gingerbread flavor, I most definitely won't hold it against you!).


I keep getting the fluffiest marshmallows with this (base) recipe, and end up cutting them into squares that are over 2" cubes, so when it came to these gingerbread marshmallows, and the fact that I wanted to cut them with a cookie cutter (shaped marshmallows -- could I get any cuter?!), I ended up using a larger pan to get flatter marshmallows -- and they were STILL fluffy.  But the final product is so cute!


Gingerbread Marshmallows
adapted from this recipe, and my go-to marshmallow recipe

For the Marshmallows:

1 cup water, divided
3 Tbsp + 1 1/2 tsp unflavored powdered gelatin (3 x 1/4 oz envelopes)
2 cups granulated white sugar
1/2 cup dark corn syrup
1/2 tsp fine salt
2 tsp pure vanilla extract
1/2 tsp ground cinnamon
1/2 tsp ground ginger
1/2 tsp freshly grated nutmeg (in a pinch, pre-ground works, which is what I used)
pinch of cloves (I left these out, but for the real gingerbread flavor, I'd use them)

For the coating:

3/4 cup powdered sugar
1/2 cup corn starch

Directions:

Spray a 9 x 13 inch baking pan, and line the bottom with parchment paper.
In a stand mixer fitted with a whisk attachment, pour in 1/2 cup of water and sprinkle the gelatin on top.
Let stand.

In a medium sauce pain over high heat, stir together the sugar, corn syrup, salt, and remaining 1/2 cup of water.
Stir until sugar dissolves and mixture begins to boil.
Stop stirring once the mixture comes to a rolling boil.
Continue boiling for 1 minute.

Remove from the heat.
CAREFULLY pour the hot mixture into a 2-cup glass measuring cup.

Turn the mixer to low and mix he gelatin a bit to loosen it.
Very slowly and carefully add the hot sugar mixture by pouring it gently down the side of the bowl.
Continue to mix on low until all the sugar mixture is added.

Turn the mixture to high and whip the mixture for 2 minutes.
Then, add the dry spices.
Continue whipping until almost tripled in size, about 8-10 more minutes.
If you have a smaller mixer bowl, you may need to scrape down the sides of the bowl frequently to avoid the batter from overflowing as it grown.
Stop the mixer, add the vanilla, and then whip briefly to combine.

Transfer the mixture to the prepared baking pan.
Use a spatula or bench scraper to spread the marshmallow evenly into the pan, pushing it down into the corners.
Work quickly, as the marshmallow becomes more difficult to manipulate as it begins to set.

Spray a sheet of plastic wrap liberally with cooking spray and lay it across the top of the marshmallow, spayed side down.
Using your fingers, smooth the plastic wrap on top of the marshmallows a bit to seal it smoothly and tightly against the mixture.

Leave the marshmallow to set at room temperature for at least 3 hours or, even better, overnight.
The marshmallow will be too sticky and soft to cut if you try too soon.

When ready to cut the marshmallows, mix the coating ingredients in a bowl.

When the marshmallows are ready, grab the edges of the parchment and life the marshmallow from the pan.

Remove the plastic wrap from the top.
Take a small handful of coating mixture and spread over the top of the marshmallow slab.
Using a pizza cutter or large knife, cut the slab into 1 x 1 inch squares, or use a small cookie cutter.
Roll each cut marshmallow into the coating mixture.
Lay them on a baking sheet to dry slightly before packaging them up (about 30-45 minutes)

Friday, November 27, 2015

Cinnamon apple crumb cake

Thanksgiving was a blur.  B's mom came in town so that we could all celebrate at my parent's, but my work schedule was such that I did a lot of running around.  I ended up leaving work early on Thanksgiving, and making it to my parent's without a hitch, but then working on Friday (and again on Sunday) meant that I was one tired lady come the end of the weekend!


But that's OK, because when I finally did get a chance to sit down and relax, albeit briefly, on Saturday morning, I got to partake in a (leftover) slice of this cinnamon apple crumb cake.  This heavenly cinnamon apple crumb cake.  Loaded with crumbs, there's barely any cake to hold it together...but that's just the way crumb cakes are supposed to be!  (I so wish you could see the delicious middle layer of this cake with cinnamon crumb and apple deliciousness and the tasty cider glaze drizzle in this picture.)


I didn't have an 8" springform pan, so I ended up using a regular 9" cake pan.  Not a worry at all, but it did make my cake layers ever so slightly thinner.  It did not affect the taste at all, but it did make for a not-as-pretty photo op of the cake.  Please, don't go by the look of my photos, this cake is totally a keeper.  And easy.  And delicious.  Well, you get the picture (no pun intended, I swear!)...

Cinnamon Apple Crumb Cake

Ingredients:

For the cinnamon streusel crumb:

1.5 cups flour
1/2 cup brown sugar
1/4 cup granulated sugar
1/2 tsp salt
1 tsp cinnamon (I pretty much use a heaping teaspoon of cinnamon in every recipe that calls for a tsp of cinnamon, so that's what I did here, as well....so good!)
1/4 tsp nutmeg
1/2 cup butter melted
1/2 tsp vanilla

1 large (or 2 small) tart apples -- peeled and chopped

For the cake:

4 Tbsp butter -- room temperature
1/2 cup granulated sugar
1 large egg
1 tsp vanilla
1/2 cup sour cream
1 cup flour
1/4 tsp baking soda
1/4 tsp alt
1/2 tsp baking powder

For the cider glaze:

1/2 cup powdered sugar
1.5-2 Tbsp apple cider

Directions:

Preheat the oven to 350F.
Grease an 8" springform pan (or 8" or 9" cake pan) and line the bottom with the parchment paper.
Set aside.

Make cinnamon streusel crumb mixture.
Whisk together dry ingredients.
Add melted butter and vanilla.
Stir until the mixture if evenly moist.
Set aside.

Peel and dice apples.  
Cover loosely with saran wrap to avoid apple turning brown.
Set aside.

Make the cake.
Cream together 4 Tbsp butter with 1/2 cup sugar until light and fluffy.
Add the egg and beat well.
Add vanilla and sour cream.
Beat again.

In another bowl, stir together 1 cup flour, baking soda, alt, and baking powder.
Add to the butter mixture.
Stir until just combined.

Spread half of the cake mixture on the bottom of the pan (it will be a very thin layer).
Spread the apple chunks evenly over the batter.
Sprinkle 1 cup of the cinnamon streusel crumbs over the apples.
Spread the remaining batter over the crumbs.
Top with the remaining crumb mixture.

Bake 35-40 minutes or until a tester inserted in the center comes out clean.

Before removing from the pan, run a knife around the cake.

Make the glaze.
Whisk together the powdered sugar with apple cider.
Drizzle over the cake.

Wednesday, October 14, 2015

Blueberry coffee crumb cake cookies

Over two years ago, I baked a New York Style Crumb Cake with blueberry jam that my youngest sister absolutely fell in love with!  My self-proclaimed lover-of-savory-foods and hater-of-almost-all-sweet-things sister.  The one that shocked me when she asked me when I was going to bake this for her again.


Once I picked my jaw up off the floor, and after we polished off the cake, I told myself I'd make it for her again.  But then, well, that just never happened.  She's been asking for it a lot again lately, namely for our non-traditional Thanksgiving dinner this year (can anyone say lamb?  That's the proposed protein for the meal....but I digress).


So when I made these Coffee Crumb Cake Cookies for break fast this year, I had the brilliant idea to add blueberry jam to them for my sister.  Because cookies are so much easier to transport than a cake, and plus, the cookies were met with such rave reviews, that I just had to try them with the addition of blueberry jam.  They came out deliciously!

P.S. Don't fret....my sister will still get her coffee cake soon!

Blueberry Coffee Crumb Cake Cookies
Adapted from Cookies & Cups

Ingredients:

For the crumb topping:

1/2 cup butter, softened
1/3 cup brown sugar
1/3 cup granulated sugar
1 tsp cinnamon
1/2 tsp salt
1 2/3 cup flour

For the cookie:

10 Tbsp butter
1/2 cup shortening
1 cup light brown sugar
1/2 cup granulated sugar
1.5 tsp cinnamon
2 eggs
2 tsp vanilla
2 tsp baking powder
1 tsp salt
3 1/3 cup flour

Blueberry jam, about 1/2 cup

Optional:

powdered sugar, for dusting

Directions:

Preheat the oven to 350F.
Line cookie sheets with parchment paper or silicon liner.
Set aside.

Make the crumb topping.
Mix all the crumb ingredients together in a medium bowl.
Cut together with a pastry cutter or a fork until evenly mixed.
Refrigerate while making the dough.

Make the cookies.
Mix together the butter, shortening, and both sugars for 1-2 minutes on medium speed, until combined and smooth.
Add in cinnamon, eggs, and vanilla.
Continue mixing until evenly combined.
Turn mixer to low and mix in baking powder, salt, and flour.
Mix until dough comes together evenly.

Scoop cookies out using a cookie scoop or spoon (about 3 Tbsp) and place on lined cookie sheets.  If using a spoon, roll dough into balls.
Make an indentation in the center of the cookie dough.
Place about 1/4 to 1/2 tsp of jam into the indentation.
Scoop at least 1 Tbsp of the crumb topping into the center of the dough, pressing lightly to stick.  Don't be afraid to cram it in!
Bake cookies for 9-10 minutes, or until edges start to get golden.
Remove from oven and allow to cool for 3 minutes on cookie sheet.
Transfer cookies to a wire rack to finish cooling.

Dust cooled cookies with powdered sugar, if you'd like.

Saturday, October 10, 2015

Spiced apple cider marshmallows

Last fall I made pumpkin spice marshmallows.  They were actually tasty, despite my dislike of pumpkin and pumpkin pie spices.  I gave them out to friends and family and they were met with such rave reviews!  So this fall, I figured why not try something new?  Another fall themed marshmallow?


So I went with my favorite fall beverage, apple cider.  I simply loooooove it!  It's the only drink with calories I'll have (besides coffee with milk and booze).  I'm not a juice drinker (I actually hate apple juice), but I love apple cider.  So when I saw it on the shelves in the grocery store last week, I bought myself a quart.  


Which brings me back to these marshmallows.  At first I thought about how to get the apple flavor into them (they started out in my head as apple pie marshmallows).  At first I thought I'd use some apple sauce.  Then I realized that I had the apple cider in the fridge.  So I went with all apple cider to make sure that I got that appl-y good flavor just right!  (But I'm sure I'll get back to those apple pie marshmallows soon enough!)  


Spiced Apple Cider Marshmallows

Ingredients:

For the marshmallows

1 cup of your favorite apple cider, divided
3 Tbsp. + 1 1/2 tsp. unflavored powdered gelatin (3 envelopes – envelope is 1/4 oz. each, for 3/4 oz. total)
2 cups granulated white sugar
1/2 cup light corn syrup
1/2 tsp. fine salt
1/2 tsp cinnamon
1/4 tsp ground ginger
1/8 tsp nutmeg
pinch of ground cloves (more to your taste, I'm personally not a huge fan)

For the coating

3/4 cup powdered sugar
1/2 cup corn starch
1 tsp ground cinnamon

Directions:

Spray a 9x9 or 7x11 inch baking pan and line with parchment paper (Recommendation: cut to fit flat on the bottom, with the edges of the paper over-hanging the sides. The ends are fine just sprayed.)

In a stand mixer fitted with a whisk attachment, pour 1/2 cup of apple cider
Mix a few times to allow them to mix.
Sprinkle the gelatin over the cider.
Let stand.

In a medium saucepan over high heat, stir together the sugar, corn syrup, salt and the remaining 1/2 cup of cider.
Stir until sugar dissolves and mixture begins to boil.
Stop stirring and once mixture comes to a rolling boil, continue boiling for 1 minute.
Remove from the heat.
Pour the mixture into a 2-cup glass measuring cup, to make it easier to pour into the mixer.  *The mixture is very, very, very hot.  Be extremely careful!*

Turn the mixer to low and mix the gelatin a bit to loosen.
Very slowly and carefully add the hot sugar mixture by pouring it gently down the side of the bowl.
Continue to mix on low until all the sugar mixture is added.

Turn the mixer to high and whip the mixture for 10 to 12 minutes until the marshmallow batter almost triples in size and becomes very thick and opaque.

While the mixer is going, mix the spices in a small bowl.
Stop the mixer, add the spice mixture, and then whip briefly to combine.

Transfer the mixture to the prepared baking pan and use a spatula or bench scraper to spread the marshmallow evenly in the pan, pushing it down into the corners.
Work quickly, as the marshmallow becomes more difficult to work with as it begins to set.

Spray a sheet of plastic wrap really well with cooking spray and lay it across the top of the marshmallow, sprayed side down.
Smooth the plastic wrap on top of the marshmallows a bit to seal it smoothly and tightly against the mixture.

Leave the marshmallow to set at room temperature for at least 3 hours or, even better, overnight.
The marshmallow will be too sticky and soft to cut if you try too soon.

Meanwhile, mix the coating ingredients in a bowl.

When marshmallows are ready, grab the edges of the parchment and lift the marshmallows from the pan.
Remove the plastic wrap from the top and fold down the parchment on the sides.
Using a pizza cutter or a large knife, cut the slab into 1x1 inch squares.
Roll each of the freshly cut marshmallow squares in the coating mixture.
Put them on a baking sheet to dry slightly before packaging them up (about 30 – 45 minutes).

Saturday, October 3, 2015

Pumpkin spice latte cupcakes

It's early October in New York City, and despite last week being sunny and in the 70s, this weekend is utterly cold (last night it was below 50 degrees!) and rainy.  Doesn't help that there's a hurricane threatening to dump more rain and wind on us in the next few days.  So I figured a homemade cupcake version of the Starbucks pumpkin spice latte (which aficionados of the drink affectionately refer to as a PSL, I hear) -- which is synonymous to most people with fall -- was the perfect treat to bake today!


I'm not a huge pumpkin spice fan, but I decided to give these a go anyway.  Part of it was that they were perfect for this weather, and part of it is because I was less likely to eat them all.  Plus, I really really really wanted to try this cream cheese whipped cream frosting.  Because how awesome does that sound?!


Pumpkin Spice Latte Cupcakes
From Brown Eyed Baker

Ingredients:
Makes 12 cupcakes (I got 18) with extra icing

For the Cupcakes:

1 1/3 cups flour
4 1/5 tsp espresso powder
1 tsp baking powder
1 tsp baking soda
1/2 tsp salt
1/2 tsp ground cinnamon
pinch of nutmeg
pinch of cloves
3/4 cup canned pumpkin
1/2 cup granulated sugar
1/2 cup dark brown sugar (packed)
1/2 cup vegetable oil (I used canola, since that's what I had)
2 eggs
1/4 cup brewed coffee, for brushing

For the Frosting:

8 oz cream cheese, at room temperature
1/2 cup granulated sugar
1 1/2 tsp vanilla extract
2 cups heavy cream

For the Garnish:

Ground cinnamon
Salted caramel sauce
Coffee syrup (optional)

Directions:

Make the cupcakes.
Preheat the oven to 350F.
Line a 12-cup muffin pan with paper liners.
Set aide.

In a medium bowl, whisk together the flour, espresso powder, baking powder, baking soda, salt, cinnamon, nutmeg, and cloves.
Set aside.

In a large bowl, whisk together the pumpkin, both sugars, and the oil until completely combined.  Make sure to break up any clumps of brown sugar.
Whisk in the eggs, 1 at a time.
Add the flour mixture in 2 additions, folding with a rubber spatula (I continued to use my whisk) until no flour pockets remain.

Divide the batter between the baking cups, filling each about 2/3 full.  I opted to fill mine until they were 2/3 full and ended up with 6 extra cupcakes, although one was a bit small).
Bake until a toothpick inserted into the center comes out clean, about 18-22 minutes (mine were done at 18 minutes).
Allow to cool in the pan for 5-10 minutes.
Remove cupcakes and leave to cool on a wire rack.
While the cupcakes are still warm, brush the tops with the brewed coffee (next time I might try some coffee syrup instead).
Let each coat soak in before applying the next one.  I only did 2 coats each since I didn't want them to get soggy.
Allow the cupcakes to cool completely before frosting.

Make the frosting.
On medium speed, beat the cream cheese, sugar, and vanilla extract in a mixer with the whisk attachment until smooth and completely combined, about 2 minutes.
Slowly add the cream and scrape the side of the bowl.
Increase speed to medium high and whip until stiff peaks form.

Assemble the cupcakes:
Pipe the frosting onto the cupcakes.
Sprinkle with cinnamon.
Drizzle with caramel sauce, coffee syrup, or both, if desired.

Serve immediately, or store in an airtight container in the fridge for up to 3 days.

Monday, September 21, 2015

Coffee cake cookies

My family has all the holidays divvied up quite nicely and evenly.  Since as far back as I can remember, since my grandmother vacated her role of preparer of break fast (the meal after the fast of Yom Kippur, when I eat almost 300 times more calories in one meal than I typically eat in a day), my aunt has held the title.  And although the meal is chock full of delicious food (appetizing and bagels and cream cheese, oh my!) we feel the need for dessert.  Even though a typical breakfast doesn't have dessert, our break fast always does.


My grandmother still usually makes the coffee cake -- handed down to her from her mother, my great grandmother, and possibly (and likely) from generations before her -- but since she did some sort of acrobatics last month and ended up with a fractured shoulder (she's healing quite nicely and is quite the champ!), I graciously usurped the cake-baking responsibilities for her.  Here's the problem.  This recipe I talk of?  This heavenly coffee cake?  Well it's a family secret.  It's always referred to as "Nanny Rose's Coffee Cake," and even if you promised to call it "Julie's Great Grandmother Rose's Coffee Cake," I don't think my family would ever forgive me for sharing it with you.  I did bake it and talk about it on the blog almost 3 years ago (see here for that post and a fabulous picture of four generations of women on my mom's side -- me, my mother, my grandmother, and my two great grandmothers), but I figured it wasn't fair to have another post about the cake and leave you drooling with no recipe, so I decided it was only fair to also make some coffee cake cookies.  Because that recipe I can share with you!

My Great Grandmother's Coffee Cake


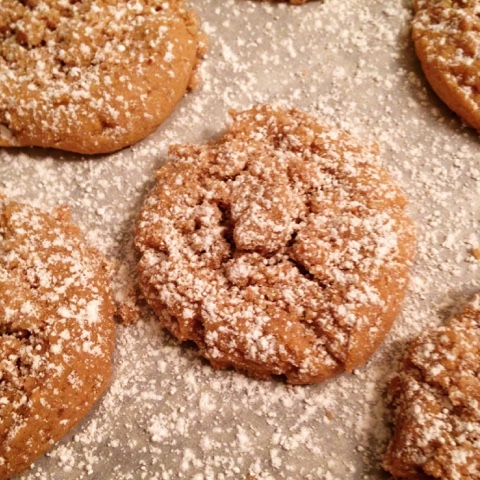
I saw this recipe for coffee cake cookies over 6 months ago and I emailed it to myself.  "I must make these," I thought to myself, but then I never did.  See, just about anything that is advertised as coffee cake gets my attention.  And if you say coffee crumb cake, well then I'm 1000% sold!  So imagine a coffee cake cookie topped with loads of crumb topping, in a portable snackable delicious cookie that's been dusted in a faint snowfall of powdered sugar?!  I can't believe it's taken me this long to make them!


Coffee Cake Cookies
From Cookies & Cups

Ingredients:

For the crumb topping:

1/2 cup butter, softened
1/3 cup brown sugar
1/3 cup granulated sugar
1 tsp cinnamon
1/2 tsp salt
1 2/3 cup flour

For the cookie:

10 Tbsp butter
1/2 cup shortening
1 cup light brown sugar
1/2 cup granulated sugar
1.5 tsp cinnamon
2 eggs
2 tsp vanilla
2 tsp baking powder
1 tsp salt
3 1/3 cup flour

Optional:

powdered sugar, for dusting

Directions:

Preheat the oven to 350F.
Line cookie sheets with parchment paper or silicon liner.
Set aside.

Make the crumb topping.
Mix all the crumb ingredients together in a medium bowl.
Cut together with a pastry cutter or a fork until evenly mixed.
Refrigerate while making the dough.

Make the cookies.
Mix together the butter, shortening, and both sugars for 1-2 minutes on medium speed, until combined and smooth.
Add in cinnamon, eggs, and vanilla.
Continue mixing until evenly combined.
Turn mixer to low and mix in baking powder, salt, and flour.
Mix until dough comes together evenly.

Scoop cookies out using a cookie scoop or spoon (about 3 Tbsp) and place on lined cookie sheets.  If using a spoon, roll dough into balls.
Make an indentation in the center of the cookie dough.
Scoop at least 1 Tbsp of the crumb topping into the center of the dough, pressing lightly to stick.  Don't be afraid to cram it in!
Bake cookies for 9-10 minutes, or until edges start to get golden.
Remove from oven and allow to cool for 3 minutes on cookie sheet.
Transfer cookies to a wire rack to finish cooling.

Dust cooled cookies with powdered sugar, if you'd like.

Sunday, September 20, 2015

Chewy oatmeal raisin cookies

Everyone says their mother makes the best brisket -- but mine really does!  Over three years ago, when B and I first met, we talked about my mom's brisket.  And although it took a while for him to actually get to try it, he happens to agree!

So it should come as no surprise that this year, when I asked my mom what I could bake for dessert for Rosh Hashana, she said "Just some cookies.  We don't really ever eat dessert because we always fill up on the brisket and the meal, and I don't want you to go overboard with dessert."  Well, I got half of it right....I made cookies, but not just cookies, lots of cookies.  A variety of cookies -- 4 types, to be exact!  I had set my goals a little loftier at first (I had about 8 kinds of cookies I wanted to make) but time was not on my side, and some had to fall by the wayside.  

Of the ones I actually got to make, the first up were these chewy oatmeal raisin cookies. 


Now I've made my fair share of oatmeal raisin cookies in the past, but one of my biggest complaints was that they weren't quite as soft and chewy as I'd like.  The flavor was always spot on, but sometimes they were perfect out of the oven, but once they cooled they were a little on the crispier side.  OK, not the worst thing in the world, but sometimes you could really just go for a soft chewy cookie.  This recipe was the answer!!

From Sally's Baking Addiction

Ingredients:  

1 cup unsalted butter, softened to room temperature
1 cup packed light or dark brown sugar (I used light because that's what I had on hand)
1/4 cup granulated sugar
2 large eggs
1 Tbsp vanilla extract
1 Tbsp molasses
1.5 cups all purpose flour
1 tsp baking soda
1.5 tsp ground cinnamon (I used a little more because I love cinnamon!)
1/2 tsp salt
3 cups old fashioned rolled oats
1 cup raisins (soaked in warm water for about 10 minutes to plump them up, then drained and blotted to dry them)
1/2 cup chopped toasted walnuts (optional.  I left these out because (a) I don't like nuts in my baked goods, and (b) we are having a nut-free holiday because my nut-allergic cousin is coming)

Directions: 

Using a hand mixer or stand mixer fitted with the paddle attachment, cream together the butter and both sugars on medium speed until smooth.
Add the eggs and mix on high until combined, about 1 minute.
Scrap down the sides and bottom of the bowl as needed.
Add the vanilla and molasses and mix on high until combined.
Set aside.

In a separate bowl, toss the flour, baking soda, cinnamon, and salt together.
Add to the wet ingredients and mix on low until combined.
Beat in the oats, raisins, and walnuts (if using) on low speed.
The dough will be thick yet very sticky.
Chill the dough for 30-60 minutes in the fridge.  
If chilling for longer (up to 2 days), allow the dough to sit at room temperature for at least 30 minutes before rolling and baking.

When ready to bake, preheat the oven to 350F.
Line two large baking sheets with parchment paper or silicone baking mats.
Set aside.

Roll balls of dough (about 1.5 Tbsp worth) and place 2 inches apart on the baking sheets.  Or use a cookie scoop for uniform cookies, which I prefer to do.
Bake for 10 minutes until very lightly browned on the sides.  The centers will look very soft and undone.
Remove from the oven and let cool on baking sheet for 5 minutes (the cookies will continue to "set" on the baking sheet) before transferring to a wire rack to cool completely.

Make ahead tip: Cookies stay fresh, covered and at room temperature, for up to 1 week.  Baked cookies freeze well, up to 3 months.  Unbaked cookie dough balls freeze well, up to 3 months, and do not need to be thawed but just be baked for an extra minute

Tuesday, May 5, 2015

Tres leches cupcakes

I don't do things half way.  It's just not in my nature.   So when I decided to make cupcakes for Cinco de Mayo, I didn't stop at the churro cupcakes.  No.  I made these trea leches cupcakes, too!


I have to admit that I was obsessed -- obsessed!  maybe unhealthily so -- with the tres leches mixture that you pour over the cupcakes that I debated saving the extra for my coffee the next morning.  In the end, I didn't, but you can bet I had sweet dreams of sweet, milky iced coffee last night!


Tres Leches Cupcakes
From Taste and Tell

Ingredients:

6 large eggs, separated
1/2 tsp baking soda
1/4 tsp salt
1 cup white sugar
1/2 cup butter, melted and cooled (it didn't specify, but I used unsalted)
1 cup all purpose flour
1 14-oz can sweetened condensed milk
1 12-oz can evaporated milk
1 3/4 cups heavy whipping cream, divided
6 Tbsp powdered sugar
Cinnamon, for dusting
Strawberries, cut into slices or quarters, for garnish (optional)

Directions:

Preheat the oven to 325F.
Line 24 muffin tins with foil-lined cupcake liners.

Combine egg whites, baking soda, and salt.
Whip until soft peaks form.'
Add in the yolks and the sugar, and mix until combined.
Gently fold in the melted butter.
Add in the flour in 4 batches, folding in after each addition.
Divide the batter between the prepared muffin tins.

Bake the cupcakes until lightly browned and a tester inserted in the middle comes out clean, about 25 minutes.

While the cupcakes are baking, combine the sweetened condensed milk, evaporated milk, and 3/4 cup cream.

Remove the cupcakes form the oven.
Using a skewer or fork, poke holes all over the top of the cupcakes.

While the cupcakes are still a little warm, spoon the milk mixture over the tops of the cucpakes (You can ladle/spoon one spoonful of the mixture over each cupcake, and then repeat, until all of the milk mixture has been absorbed).

Allow the cupcakes to fully absorb the milk mixture, at least 30 minutes, but preferably overnight.

Make the whipped cream.
Beat the remaining 2 cups of heavy cream, slowly adding the powdered sugar.
Beat until the whipped cream holds stiff peaks.

Pipe the frosting onto the cupcakes.
Sprinkle lightly with cinnamon.
Serve with a slice of strawberry on top.

Churro cupcakes

I've been a bit delinquent lately, given the move and the (somewhat lack of) unpacking and my dad's birthday party a week ago, but I decided to jump right back into baking and blogging with some festive cupcakes for Cinco de Mayo!


In the past, I've made a few treats for Cinco de Mayo, like these margarita cupcakes (with adorable sugar toppers!) and a daiquiri bunt cake, but this time I decided to veer away from the lime-and-alcohol flavored treats and go with something a little more "traditional."  Namely, churros.  There is something about that cinnamony deliciousness that called me to these cupcakes, and the mini churro on top?!  OMG, too cute!  (I actually considered frying them up like actual churros, but lets face it, with the decadence that is these cupcakes, why add to the insanity?  Plus, I've never made anything fried like a fritter, donut, or churro before, and figured that at this point it wasn't worth starting to try while I was baking cupcakes).


B seemed interested in these when I mentioned them, and since I worked an hour earlier than usual on Monday, I figured I'd bake them after work.  And when our evening plans got canceled, I figured it was a sign and I needed to make them!  Plus, he can bring them to work today (on Cinco de Mayo) and I could slowly start feeding my new doormen my yummy baked goods!

In the end, I ended up skipping the actual churro on top, simply because I had a napping roommate (I needed the food processor to make the dough) and I was baking another Cinco de Mayo treat (which you will hear about very shortly....).  It didn't really matter -- these cupcakes were delicious and B was a huge fan!

Churro Cupcakes
from the Baker Chick

Ingredients:

For the cupcakes

2.5 cups flour
2.5 tsp baking powder
1/4 tsp salt
1 stick butter, at room temperature
1 3/4 cups sugar
2 large eggs, at room temperature
2.5 tsp vanilla
1 1/4 cup whole milk, at room temperature
1 tsp ground cinnamon

For the icing

2 sticks unsalted butter, soft (I use room temperature)
4 oz cream cheese
3-5 cups powdered sugar
2 tsp vanilla extract

For the cinnamon sugar topping

1 cup sugar
3 Tbsp ground cinnamon

For the churros (if making)

4 Tbsp butter, cold
3/4 cup all purpose flour
pinch of salt
1 Tbsp sugar

Directions:

Preheat the oven to 350F.
Line two muffin tins with cupcake liners.
Set aside.

In a medium bowl, whisk together the flour, baking powder, salt, and cinnamon.

In the bowl of a stand mixer fitted with the paddle attachment, cream together the butter and sugar until pale and smooth.
Add in the eggs, one at a time, allowing each to be incorporated before adding the next.

Stir the vanilla into the milk.

With the mixer on low speed, alternate adding the dry ingredients and the milk/vanilla, starting and ending with the dry ingredients.
Mix until just combined.

Fill cupcake liners about 2/3 of the way.
Bake for 16-18 minutes or until a toothpick inserted into a cupcake comes out clean.
All the cupcakes to cool completely, on a wire rack.

While the cupcakes are baking, combine the "mini churro" ingredients in a food processor for 1-2 minutes or until a ball is formed.
Roll dough out on a floured surface to 1/8" thick.
Cut into strips, 1/2 inch wide, and cut 2 inch-long pieces on a diagonal.
Twist the dough pieces and place on a parchment-lined baking sheet.
Bake at 375F for about 10 minutes, or until golden brown.

In a medium bowl, stir together the sugar and cinnamon.
Set aside.

When the mini churros have cooled, gently toss them in the cinnamon sugar mixture until well-coated.
Return to the cookie sheet until ready to use.

Make the icing.
Cream together the butter and cream cheese.
Mix in the vanilla.
Add the powdered sugar, one cup at a time.
Start with 3 cups and add more depending on how stiff you want it to be.

When the cupcakes have cooled completely, dip the top of each one into the cinnamon/sugar mixture, giving each a light coating.  Mine didn't stick, so I steamed them a little in a hot oven and then dipped them to allow the cinnamon-sugar to stick.

Pipe the frosting onto the ucpcakes and dust with more cinnamon sugar.
Top each with a mini churro (if you aren't lazy like me and skipped the step).

Enjoy!  And Feliz Cinco de Mayo!

Wednesday, April 15, 2015

Oatmeal cake

I wrote this post about a two and a half months ago, in mid-April, when I actually baked this cake (as a procrastination tool for the packing I really needed to do), and as a result, I'm very belatedly posting this (since I learned the error of my ways, and actually packed instead of typing up the recipe and posting photos)... 


I saw this recipe while scrolling through Facebook the other night, and immediately forwarded it to myself.  I kinda knew I needed to make it ASAP.  See, I love anything with cinnamon. I also thought that adding cooked oats was an intriguing change from the norm.  And...I had an unopened nearly 3-pound container of oats that needed to be used up before my move in 10 days.  Sadly, this recipe only called for a scant cup of oats, and I therefore anticipate that I'll make making some sort of oatmeal-based cookie in the next week and a half.  Or I could just make a whole huge batch of this deliciousness!!


I love that this cake can be eaten for breakfast. I also love the fact that it could be served with or without the cream cheese icing. This time I opted for cream cheese icing, however next time I may be a little crazy, folks, and add some banana or fresh blueberries...I think this cake has possibilities, people!

Here's the one thing about this cake...I thought it would be a lot lighter.  It's actually a pretty dense cake which really shouldn't surprise me considering there's oatmeal in it.  Cooked oatmeal in it.


When it came to the icing, I made a few modifications. I happen to like my cream cheese icing with a little bit of vanilla (I used between half a teaspoon and a whole teaspoon).  I also find that some cream cheese icings can be a little too sweet, so I cut down the powdered sugar by about half a cup to make sure that it was my desired sweetness.  There is no shame if you taste the icing as you go along, to make sure you get it right.  No shame at all ;-).  In the end, this icing reminded me of the icing on a cake my mom used to serve decades ago to her bridge friends when they came over, which I absolutely adored.  This one is a keeper all on it's own!


Old Fashioned Oatmeal Cake
From Cookies and Cups

Ingredients: 

For the Cake

1 1/4 cups water
1 cup rolled oats
1/2 cup butter
1 cup granulated sugar
2 tsp vanilla
2 eggs
1/2 tsp kosher salt 
1 tsp baking soda
1 tsp cinnamon (I may have been a little heavy handed on that....)
1 1/2 cups all purpose flour

For the Frosting

4 oz cream cheese, room temperature
1/4 cup butter, room temperature
2 cups powdered sugar
1 Tbsp milk or cream
1/2 - 1 tsp vanilla extract

Directions:

Preheat the oven to 350F.
Spray a 9x9 inch pan with nonstick spray and set aside.

In a small pot, bring the water to a boil.
Add in the oats.
Stir and then remove the pot from the heat.
Allow the oats to soak for 20 minutes.

In the bowl of your stand mixer, fitted with the paddle attachment, mix the butter and sugar together on medium speed for 2 minutes until light and fluffy.
Add in the vanilla and the eggs and mix until combined, scraping the sides of the bowl as necessary.
With the mixer still on medium, add in the salt, baking soda, and cinnamon.
Mix until incorporated.

Turn the mixer to low and add in the oats and flour.
Mix until just combined.

Spread the cake batter into the prepared pan and bake for 35-40 minutes or until the cake is set in the center and a toothpick comes out clean.

Allow the cake to cool completely in the pan.

Make the frosting.

In the bowl of the mixer with the paddle attachment, mix the butter and cream cheese together on medium until smooth, about 2 minutes.
Turn the mixer to low and add in the powdered sugar, milk, and vanilla.
Mix for another minute until the frosting is creamy.

Spread the frosting on the cooled cake.

Serve immediately or keep in an airtight container for up to 3 days (if it even lasts that long....).