Facebook 1

Monday, October 29, 2012

Cinnamon buns and bacon-cinnamon buns

This past weekend, brunch with a friend consisted of a bacon-maple croissant and an as-big-as-my-face sticky bun.  A few weeks before that, a brunch appetizer at my friend's birthday brunch consisted of sticky buns - which the waitress informed us (after we had devoured them) contained some bacon (my friend the vegetarian was OK with that...just an affirmation of how good they were).  Now I am not a firm believer of "bacon makes everything better," but I would happily subscribe to the "bacon makes almost everything better" school of thought. 


I had been thinking of making something in the sweet-savory (bacon) realm since that first sticky bun weeks ago, but life has just been generally busy and I didn't have much time for baking.  Enter Hurricane Sandy.  The subways and buses in NYC and commuter trains outside of the city shut down on Sunday evening, evauations were ordered for certain areas of the city, and 2 tunnels closed in the middle of the day on Monday.  The school work is now done and submitted, and although my office is open today, I didn't go in. 


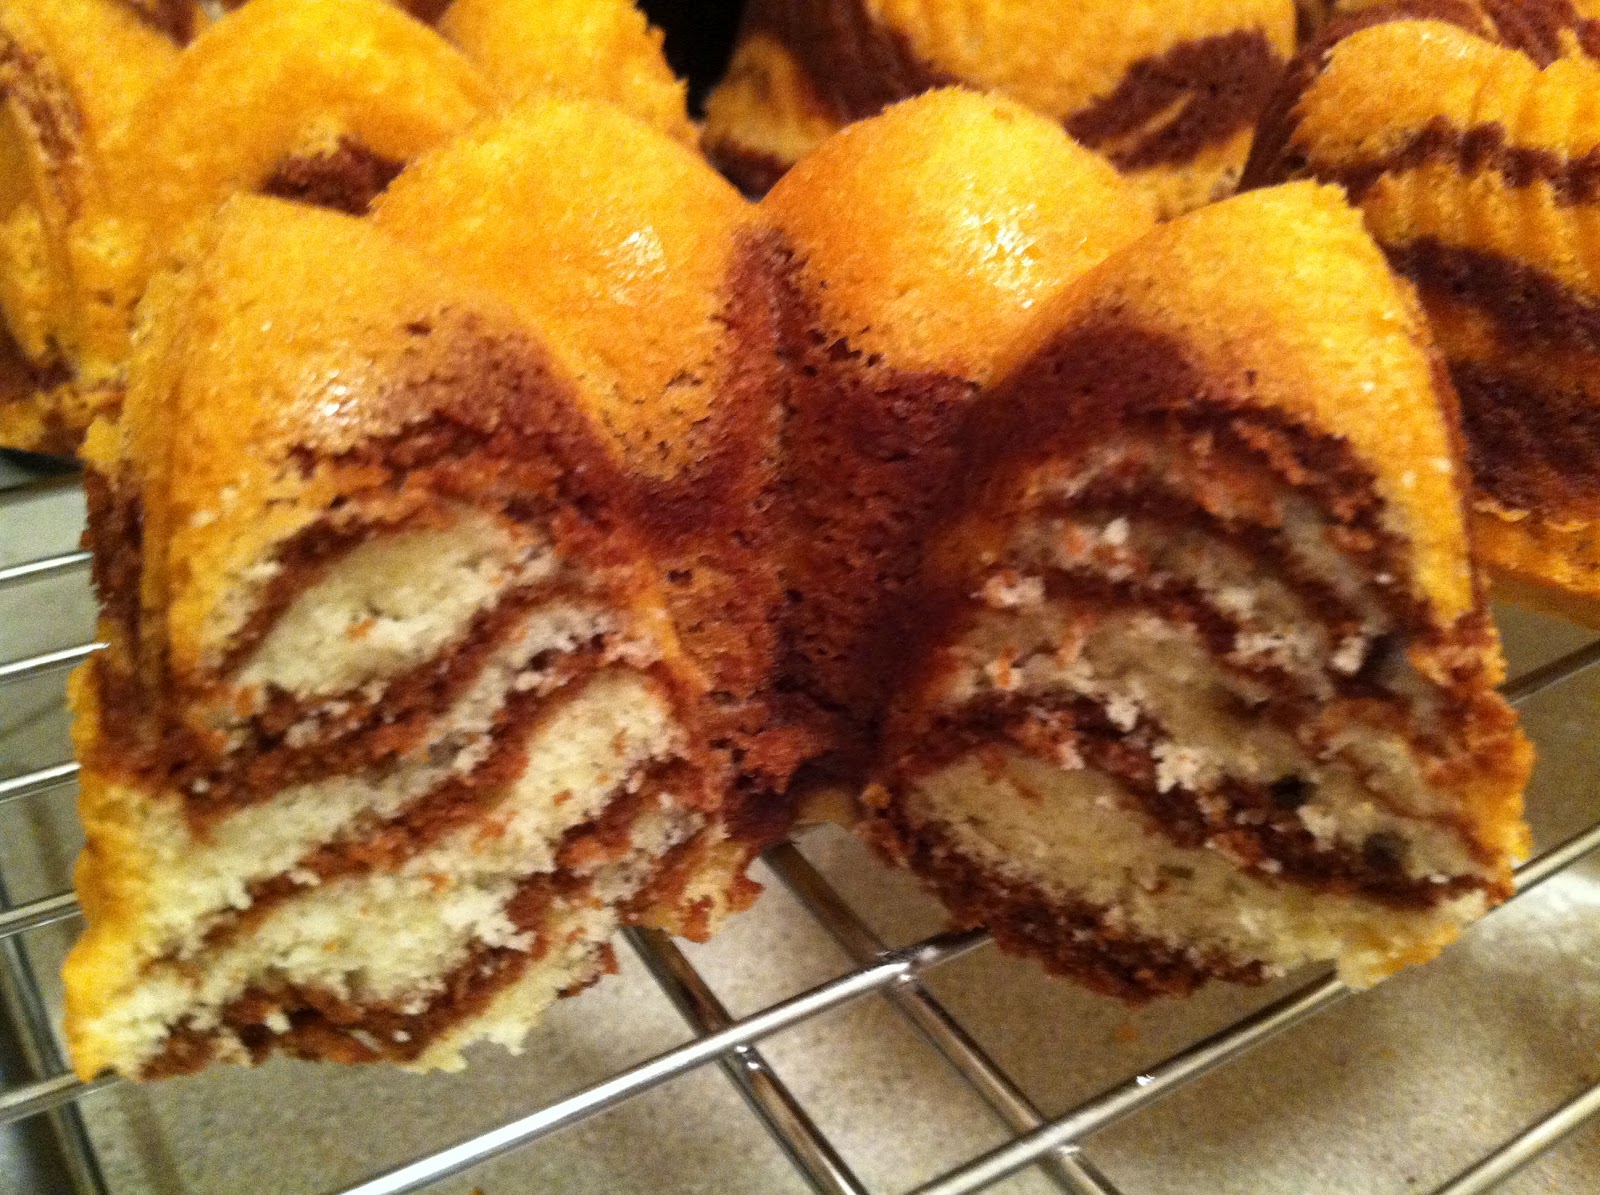
Pictures from top left: Rolled out bacon dough. Bacon-cinnamon-brown sugar mixture.  Log for slicing.  Sliced cinnamon rolls before second rising.  Sliced rolls after second rising.  Close-up of rolls after second rising.  Fresh out of the oven.

So when I went to the grocery store at 7 a.m. on Monday morning for some last minute supplies, I picked up some bacon.  It seemed only natural.  Because when the weather is inclement and there is the threat of power loss, buying pork products is always a smart idea.  Clearly.

Bacon-ified Cinnamon Rolls
Original recipe from epicurious.  Bacon-ifying by JulieBakes.
The recipe says it makes 18, but I got 14.  It's possible that I sliced them too big.  But in the past, when I've made the original recipe, I've gotten up to 21 out of the recipe.

Ingredients:

For the dough: 

1 cup whole milk (I had skim milk, so that's what I used)
3 tablespoons unsalted butter
3 1/2 cups (or more) unbleached all purpose flour, divided
1/2 cup sugar
1 large egg
2 1/4 teaspoons rapid-rise yeast (from 2 envelopes yeast)
1 teaspoon salt (I used less, just a pinch, since I was adding bacon to the dough)
 
Bacon, cooked and cooled, chopped, with fat removed, total was about a heaping handful.  Or turkey bacon, or bacon bits that have been soaked in water to soften them a bit.
Pinch of flour
 
Nonstick vegetable oil spray
For the filling:

3/4 cup (packed) golden brown sugar
2 tablespoons ground cinnamon
1/4 cup (1/2 stick) unsalted butter, room temperature - or cooled bacon grease, if you're totally into the bacon-ness....or a mixture of both
More chopped bacon

For the glaze (which I left off, since I don't love glaze on my cinnamon rolls, but I assume the sweetness would go well with the bacon)

4 ounces cream cheese, room temperature
1 cup powdered sugar
1/4 cup (1/2 stick) unsalted butter, room temperature
1/2 teaspoon vanilla extract

Directions:

Cook bacon however you prefer.  Remove from heat and place on platter lined with paper towels.  Allow to cool.  Or soak bits for a bit, and then strain them well.

Make the dough:

Combine milk and butter in glass measuring cup.
Microwave on high until butter melts and mixture is just warmed to 120°F to 130°F, start at 30 to 45 second intervals.  Mine took much longer. 
Pour into bowl of stand mixer fitted with paddle attachment.
Add 1 cup flour, sugar, egg, yeast, and salt.
Beat on low speed 3 minutes, stopping occasionally to scrape down sides of bowl.
 
Toss cooled, chopped bacon with a pinch of flour to coat.
 
Add 21/2 cups flour.
Beat on low until flour is absorbed and dough is sticky, scraping down sides of bowl.
Add chopped bacon.
If dough is very sticky, add more flour by tablespoonfuls until dough begins to form ball and pulls away from sides of bowl.
Turn dough out onto lightly floured work surface.
Knead until smooth and elastic, adding more flour if sticky.
Form into ball.

Lightly oil large bowl with nonstick spray.
Transfer dough to bowl, turning to coat.
Cover bowl with plastic wrap, then kitchen towel.
Let dough rise in warm draft-free area until doubled in volume, about 2 hours.

Make the folling:

Mix brown sugar and cinnamon in medium bowl.
Add chopped bacon. 

Punch down dough.
Transfer to floured work surface.
Roll out to 15x11-inch rectangle.
Spread butter or bacon grease, or mixture of them over dough, leaving 1/2-inch border.
Sprinkle cinnamon-sugar-bacon mixture evenly over butter (or bacon grease).
Starting at 1 long side, roll dough into log, pinching gently to keep it rolled up.
With seam side down, cut dough crosswise with thin sharp knife into 18 equal slices (each about 1/2 to 3/4 inch wide).

Spray two 9-inch square glass baking dishes with nonstick spray.  I used two 9" square metal baking dishes, but thats simply because that's what I have at home.
Divide rolls between baking dishes, arranging cut side up (there will be almost no space between rolls).
Cover baking dishes with plastic wrap, then kitchen towel.
Let dough rise in warm draft-free area until almost doubled in volume, 40 to 45 minutes.

Position rack in center of oven and preheat to 375°F.
Bake rolls until tops are golden, about 20 minutes.
Remove from oven and invert immediately onto rack. Cool 10 minutes.
Turn rolls right side up.

Make the glaze:

Combine cream cheese, powdered sugar, butter, and vanilla in medium bowl.
Using electric mixer, beat until smooth.
Spread glaze on rolls.
 
Serve warm or at room temperature.

Tuesday, October 16, 2012

Happy 1st Birthday, JulieBakes!

Today, October 16th, is the first birthday for this little blog!  While I've been baking for much longer, I started this blog exactly one year ago to this day.


I debated what to make the celebrate this momentous occasion for a very long time.  There were several cakes up for the honor, a few cupcakes, and even a pie.  Ultimately, I chose a cake - albeit an unconventional birthday cake - that was described as extremely rich.  A rich, dense, chocolate bundt cake.  The only problem?  When I removed it from the bundt pan, it didn't come out beautifully - so I kinda placed the piece that got stuck in the pan onto the cake, and then poured the ganache on top in hopes that it covered the not-so-pretty top of the cake.  It didn't matter - it's chocolatey richness shined RIGHT through!


Insanely Decadent Chocolatey Sour Cream Birthday Bundt Cake
Originally from Williams-Sonoma
*FYI this makes a TON of batter.....my bundt cake tin was too small, so I left out about 1/4-1/3 of it, and made cupcakes with it....about 9!*

Ingredients:

Cake:

1 cup cocoa powder, sifted, plus more for dusting pan
7 1/2 oz. semisweet chocolate, finely chopped
1 cup boiling water
2 1/4 cups all-purpose flour
1 1/2 tsp. baking soda
1 1/4 tsp. kosher salt
20 Tbsp. (2 1/2 sticks) unsalted butter
2 1/2 cups firmly packed light brown sugar
5 eggs, lightly beaten
4 tsp. vanilla extract
1 1/2 cups sour cream
1 1/2 cups semisweet chocolate chips (I ran out of full-sized chips, so I used a mixture of regular and minis)

Ganache (which is awesome!!):

6 oz. semisweet chocolate, finely chopped
2 Tbsp. unsalted butter
1/2 cup heavy cream

Directions:

Have all the ingredients at room temperature.

Preheat an oven to 325 degrees F. Grease pan and dust with cocoa powder; tap out the excess.

Combine the cocoa powder and the chocolate in a bowl. Add the boiling water and whisk until the chocolate melts and the mixture is smooth and blended. Set aside.

Sift together the flour, baking soda and salt. Set aside.

In the bowl of an electric mixer fitted with the flat paddle, beat the butter on medium speed until smooth and creamy.
Reduce the speed to low, add the brown sugar and beat until blended. Increase the speed to medium and continue beating until the mixture is light and fluffy, stopping occasionally to scrape down the sides of the bowl.
Add the eggs a little at a time, beating until incorporated before adding more and stopping the mixer occasionally to scrape down the sides of the bowl.
Beat in the vanilla until incorporated, about 1 minute.

Reduce the speed to low and add the flour mixture in three additions, alternating with the sour cream and beginning and ending with the flour, beating just until blended and no lumps of flour remain.
Slowly pour in the chocolate-cocoa mixture and beat until no white streaks are visible, stopping the mixer occasionally to scrape down the sides of the bowl.
Using a rubber spatula, gently fold in the chocolate chips.

Pour the batter into the prepared pan, spreading the batter so the sides are about 1 inch higher than the center.
Bake until a toothpick inserted into the center of the cake comes out with only a few moist crumbs attached to it, 60 to 65 minutes.
Transfer the pan to a wire rack and let the cake cool upright in the pan for 15 minutes. Invert the pan onto the rack and lift off the pan. Let the cake cool completely, at least 1 hour (I skipped this part and let it cool in the pan entirely, which may be why the top fell apart when I took it out of the pan later).

Return the cooled cake to the pan. Using a serrated knife, gently saw off any excess cake that extends over the edge of the pan. Set the wire rack on a parchment paper lines baking sheet. Invert the pan onto the rack and lift off the pan. (I skipped this step, too).

Meanwhile make the ganache:
In a heatproof bowl, combine the chocolate and butter.
In a small saucepan over medium-high heat, bring the cream just to a boil.
Immediately pour the cream over the chocolate and butter.
Whisk until the melt and the mixture is smooth.

Pour the ganache over the top of the cake, allowing the ganache to drip down the sides.
Let the cake stand until the ganache is set, at least 15 minutes.

Wednesday, October 10, 2012

The past year...

I can't believe it was almost a year ago that I was in Massachusetts visiting friends and the suggestion was made (yet again) that I start a blog for my baking.  This time was different, though, as the person suggesting that I start a blog actually knew HOW to start a blog....and helped me do it!  (And, coincidentally, I got back from visiting those same friends a few days ago.  Thanks R & J for a great weekend, as always!)

There have been ups, a few downs (remember the brownies-on-my-jeans episode?), a makeover, a Facebook page, and over 100 recipes posted!  But most importantly, I have enjoyed blogging and sharing my recipes with you.  I hope you've enjoyed reading JulieBakes as much as I've enjoyed creating it for you!

Here are a few of my favorite photos from the past year:


Thursday, September 27, 2012

Repeats

This was a week of repeats on JulieBakes.  Late last week I baked mini cupcakes for a friend's sister's 40th birthday party and she had requested red velvet and s'mores cupcakes.  Then I went home for dinner and my mom asked me to make some cookies - since she wanted to try those chewy dark chocolate cookies with white chocolate chips the last time I made them but didn't get the chance to, I made them this time.  So while it may appear that I haven't been busy here in the JulieBakes kitchen, I have been.....just baking up some repeats...

**of note, when I made the s'mores cupcakes this time, I made the icing using the cream of tartar as it called for.  The icing stayed soft for way longer and had a slightly better consistency.  I strongly recommend NOT leaving out the cream of tartar**


Monday, September 24, 2012

Baked Explorations cookbook

Last month I had stumbled into Williams Sonoma and spent some time in the cookbook section.  There were two that I wanted.  I bought one of them then and there, a Bundt Cake cookbook called Cake Simple, and left the other one to pick up on a rainy day.  Well, a few weeks later I went back and bought it (although it wasn't rainy that day).  See, when flipping through the cookbook in the store weeks before, I saw a Nutella scone recipe that, well, I just knew I was going to have to make.


I have to admit that I actually bought this cookbook a few weeks ago and it sat in the bag for a while.  Then I took it out and flipped through it.  There are so many amazing sounding recipes in there!  I can't wait to make them and share them with you!

Saturday, September 15, 2012

New camera

I've been talking about this for a while.  Maybe not here on the blog, but in "real life" I've been talking about it a lot.  I wanted a DSLR camera. 


It's something I've been saying that I wanted - and probably needed for the blog.  See, most of the pictures I've posted on JulieBakes have been taken on my <<gulp!!>> iPhone.  Yup, you read that correctly!  A few were taken on my regular digital camera but the large majority were taken on my phone.  There's really nothing wrong with that - and I think most of the pictures are fairly decent - but I wanted to elevate the pictures.  Make them a little artistic.  Show you that my talents extend far outside of the kitchen....or at least outside of the kitchen.

So a few weeks age my friend and camera guru WW met me at the camera store, and I finally bought my DSLR camera!  Of course I am too afraid to get it dirty or scratched in the kitchen, so I have yet to photograph any baked goods with my new camera, but that will change soon enough!

Stay tuned and check out some of my future pictures and let me know what you think.  Are the pictures better?

Apple Pizza

The Jewish new year, Rosh Hashanah, is upon us.  Apples and honey are common ingredients in Rosh Hashanah desserts.  Last year, I made an apple challah.  The year before, an apple crisp.  This year, I wanted to make something else.  The challah was actually delicious, but I wanted to make an apple dessert this year; the apple crisp literally weighed a ton, and lugging it from Manhattan to Brooklyn back to Manhattan then on the train to Westchester, and then walking through the train because my car wasn't going to open at my stop was almost as taxing as a workout at the gym.  So I went in search of an apple dessert that was not a cupcake, and came across an apple pizza by John Barricelli on Martha Stewart's page.  I was intrigued.


Of course I didn't have enough counter space to roll it out into the 16x11 rectangle, so I made a smaller but - in my humble opinion - just as cute one.  I think that some cinnamon might be nice on it, too, but since this was the first time I made it, I didn't want to change it too much.


Apple Pizza

Ingredients:

Pate Brisee (aka crust)
     2 1/4 cups all-purpose flour
     2 teaspoons sugar
     1 teaspoon coarse salt
     1 cup (2 sticks) cold unsalted butter, cut into small pieces
     1/4 cup ice water
1/2 cup applesauce (they made their own, I went with no sugar added store bought)
6 granny smith apples, peeled, cored, halved, and cut into 1/8" thick slices
5 Tbsp unsalted butter, melted
5 Tbsp confectioner's sugar, for dusting
1/2 cup apricot jam
(I bet some cinnamon on top would be fantastic, too).

Directions:

Make Pate Brisee: In the bowl of a food processor, combine flour, sugar, and salt.
Add butter and pulse until mixture resembles coarse crumbs, about 10 seconds.
With the machine running, add ice water in a slow, steady stream until dough just comes together.  Dough should not be wet or sticky. If dough is too dry and does not hold together, add a little more water.
Turn dough out onto a clean work surface and shape into a flattened disk; wrap with plastic wrap. Chill at least 1 hour before using.

On a lightly floured work surface, roll out pate brisee to a 16-by-11-inch rectangle, trimming if necessary, and transfer to a large baking sheet. Prick dough all over with a fork.
Transfer to refrigerator; chill for 30 minutes.

Preheat oven to 425 degrees with a rack set in the middle.

Pour applesauce onto center of dough; using an offset spatula, spread evenly over dough leaving a 1/2-inch border all around.
Arrange apples on top of applesauce in three tight rows down the length of the dough, using 2 apples per row.
Brush with melted butter and dust heavily with confectioners' sugar.

Bake, rotating the baking sheet two-thirds of the way through the baking time, until golden brown, about 50 minutes.
Transfer to a wire rack.

Meanwhile, heat jam in a small saucepan over low heat until warm; strain through a fine mesh strainer.
Brush jam over warm pizza.
Using a pizza wheel, cut into squares and serve.