So one of the things I debated doing for B's birthday party was a S'mores bar. See, we had unfettered access to a grill, but didn't actually plan on grilling for the party. We were going to be a big group and I didn't want B to be stuck grilling at his birthday party, I wanted him to be able to hang out with his friends. But when in NYC do you have access to a grill? I wanted to find a use for it...I was going to find a use for it!!
Enter the marshmallow! Able to be perfectly toasted over a flame when there is a flame nearby. And then why stop at plain marshmallows? Why not make a few flavors? Maybe some chocolate or berry flavored ones, or cinnamon, or coffee? The possibilities were endless!
So I started with some plain vanilla marshmallows. B loves all things vanilla, so that was a good place to start. Plus, they're almost identical to store-bought marshmallows, but way more delicious! Then I started thinking of some other flavors. I thought about some fruity flavored marshmallows, but didn't know how they'd taste toasted, or even with chocolate and sandwiched between graham crackers. Then I decided on some chocolate marshmallows. But I thought that maybe I could come up with another flavor. Coffee sounded great, so I decided on those. But then I thought back to a peanut butter and jelly marshmallow I has seen in the past, and - while I thought fruity marshmallows wouldn't work for this - I thought that peanut butter marshmallows with melted chocolate and graham crackers did sound pretty awesome. So I made a few varieties of marshmallows (1 more than I had planned to make), then bought a few flavors of graham crackers and chocolate bars, and set them up next to the grill for a s'mores making bar!
It was a huge hit! My favorite was a regular graham cracker-cookies n' cream chocolate bar-coffee marshmallow combination!!!
Facebook 1
Monday, July 21, 2014
S'mores bar
Labels:
Chocolate,
Coffee,
Graham,
Marshmallows,
Peanut Butter,
S'mores,
Vanilla
Tuesday, July 15, 2014
Assorted birthday cupcakes
I wanted to throw B a birthday party for a while. I originally mentioned it to him about three and a half months before his birthday. I wanted to make sure (a) he wanted a party and (b) that I had plenty of time to plan!
So I spent the past few months planning his birthday party -- first from whether it would be a group dinner out at a restaurant or a party on his roof deck (I let him make that decision), and once the decision was made, there was lots more planning: from the color scheme to the treats I'd bake to the food I'd order to the drinks we'd serve to the favors I'd give out to the should-there-be-a-photo-booth-at-the-party debate to the guest list to the centerpieces, and so on and so on and so on. Have I mentioned my OCD tendencies?!
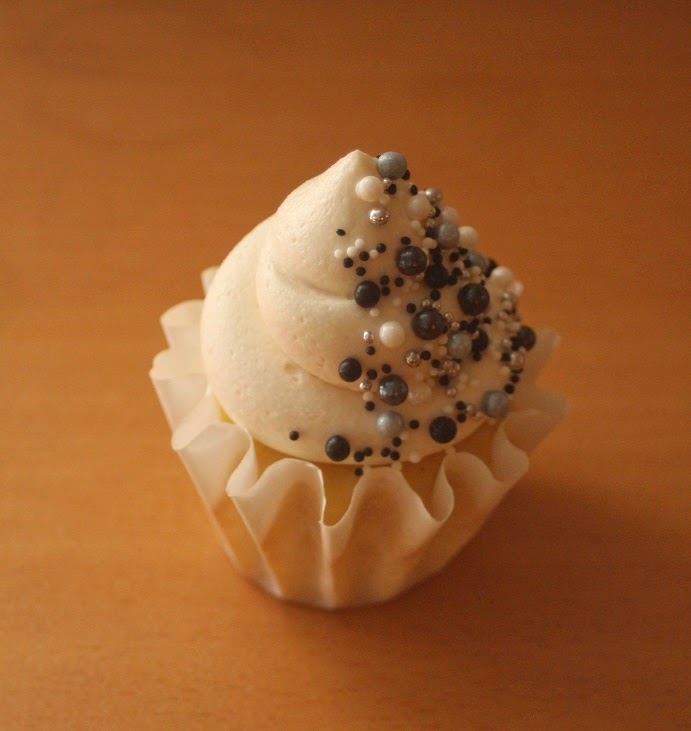
I wanted to make cupcakes. But I couldn't make just one kind of cupcake. Heck no! There needed to be a variety of cupcakes...and other treats, too. I am, after all, JulieBakes, and he has made it a habit of making me show people all of my baked goods when I meet them, so I couldn't embarass myself with just one kind of cupcake (even if it was his favorite cupcake). So I made lots of cupcakes. Lots and lots of them! Iced with a perfectly piped heap of icing and beautifully decorated. I mean, it is a PARTY, right?
So for the party, I made red velvet cupcakes with cream cheese frosting (I used dark cocoa powder since I loved the flavor it gave the red velvet bundt cake I made a few months ago). And dark chocolate cupcakes and vanilla/yellow cupcakes, and then I made vanilla buttercream and chocolate buttercream (this time I used 1/3 dark cocoa powder and 2/3 regular cocoa powder), and then I made a mixture of cupcake combinations - chocolate cupcakes with vanilla buttercream, yellow cupcakes with chocolate buttercream, chocolate cupcakes with chocolate buttercream, and yellow cupcakes with vanilla buttercream. On each cupcake, I piped the icing on in a swirling pile with a big round tip (Ateco 809). And then I went to town decorating them. I had seen these cupcakes on Pinterest and they were my inspiration for B's birthday cupcakes. I totally copied them, but it was so worth it....the cupcakes were gorgeous!!
I had a bunch of "pearls" -- white, black, graphite grey/silver, and silver. I used silver dragees as well. And then I used white and black nonpareils, and teeny tiny silver dragees that were basically the size of nonpareils. I started by strategically placing the pearls over half of the piped icing, and then after that was done to my liking, I started sprinkling a mixture of the silver, black, and white nonpareils (I mixed 2 Tbsp of each color together in a bowl and then used that mixture for the sprinkling) over the same half of the cupcake where I had placed the pearls.
I'm not going to lie, it's a bit time consuming, especially when it involved decorating 36+ cupcakes....but c'mon, look at the them....it was TOTALLY worth it. Even I - who never brags - think they're pretty freaking adorable!
I had a bunch of "pearls" -- white, black, graphite grey/silver, and silver. I used silver dragees as well. And then I used white and black nonpareils, and teeny tiny silver dragees that were basically the size of nonpareils. I started by strategically placing the pearls over half of the piped icing, and then after that was done to my liking, I started sprinkling a mixture of the silver, black, and white nonpareils (I mixed 2 Tbsp of each color together in a bowl and then used that mixture for the sprinkling) over the same half of the cupcake where I had placed the pearls.
I'm not going to lie, it's a bit time consuming, especially when it involved decorating 36+ cupcakes....but c'mon, look at the them....it was TOTALLY worth it. Even I - who never brags - think they're pretty freaking adorable!
Labels:
Birthday,
Buttercream,
Chocolate,
Cupcakes,
Red Velvet,
Sprinkles,
Vanilla
Monday, July 14, 2014
Peanut butter marshmallows
Peanut Butter Marshmallows. Fluffy, light, delicious, peanut butter-y marshmallows. Again, in case you didn't catch it the first or the second time: peanut butter marshmallows!!!
I saw this recipe a while ago, before I had become a marshmallow making machine. I adapted them from a peanut butter and jelly marshmallow recipe, and made it with my go-to marshmallow recipe. Let me tell you something. Sweet vanilla marshmallow mixed with slightly salty peanut butter makes for one delicious marshmallow. Now, I'm just wondering if I should try a chocolate-peanut butter marshmallow. OK, who am I kidding?! I'll be working on that in no time!
This was it -- the fourth marshmallow recipe for me in about as many days. Stay tuned for what I did with all these delicious marshmallows (besides eat them.....often.....by the handful).
Peanut Butter Marshmallows
Based loosely on these Peanut Butter and Jelly Marshmallows (which I will make soon, but didn't think went well enough with what I needed the marshmallows for this time around)
Ingredients:
1 cup water, at room temperature, divided
3 Tbsp plus 1.5 tsp unflavored gelatin (3 envelopes)
2 cups granulated sugar
1/2 cup light corn syrup
1/2 tsp fine salt
2 tsp vanilla
3 Tbsp creamy peanut butter
Marshmallow coating:
1.5 cups confectioners sugar
1 cup corn starch
Directions:
Spray a 9 x 9 inch pan with Pam, and line the bottom with parchment paper. Feel free to spray the parchment paper with some Pam, too, since when I made the vanilla ones it stuck a little.
In a stand mixer with the whisk attachment, pour in half a cup of the water and sprinkle the gelatin over it.
Let it stand.
In a medium saucepan over high hear, stir together the water, corn syrup, sugar, and salt.
Stir until the sugar dissolves and the mixture begins to boil.
Stop stirring and once the mixture comes to a rolling boil, continue boiling for one minute.
Remove from the heat (it helps to then pour the mixture into a 2-cup glass measuring up, to make it easier to pour the mixture.
Turn the mixer to low and mix the gelatin a bit to loosen it.
Very slowly and carefully pour the hot sugar mixture into the bowl by pouring it gently down the side of the bowl.
Continue to mix on low until all the sugar mixture is added.
Turn the mixture to high and whip for 10-12 minutes until the marshmallow batter almost triples in size and becomes very thick.
Add in the vanilla and mix to incorporate.
Place peanut butter into a small bowl and add about 1/4 of the vanilla marshmallow mixture.
Quickly stir until well blended.
Scrape the peanut butter mallow back in the mixer bowl with the vanilla batter.
Gently fold the two batters together until mostly blended, using a large spatula.
Transfer the mixture to the prepared baking pan and use a spatula or bench scraper to spread the marshmallow evenly in the pan, pushing it down into the corners.
Work quickly, as the marshmallow becomes more difficult to manipulate as it begins to set.
Spray a sheet of plastic wrap liberally with Pam and lay it across the top of the marshmallow, sprayed side down.
Using your fingers, smooth the plastic wrap on top of the marshmallows a bit to seal it smoothly and tightly against the marshmallows.
Leave the marshmallows to set at room temperature for at least 3 hours, or even better, overnight.
Mix together the confectioners sugar and corn starch.
When you're ready to cut the marshmallows, put a little bit of the corn starch mixture on a cutting board and flip the marshmallows onto the mixture.
Cut the marshmallows using a sharp knife or pizza cutter. Or, use cookie cutters to make shapes.
Toss the cut marshmallows into the coating to cover, and then shake off the excess coating mixture using a strainer.
Place the marshmallows in a single layer in a pan, and then place waxed paper on top, and then continue layering marshmallows.
Store in an air tight container, for up to a week....if they last that long!
| Check out those amazing peanut butter ribbons throughout the marshmallow!! |
Peanut Butter Marshmallows
Based loosely on these Peanut Butter and Jelly Marshmallows (which I will make soon, but didn't think went well enough with what I needed the marshmallows for this time around)
Ingredients:
1 cup water, at room temperature, divided
3 Tbsp plus 1.5 tsp unflavored gelatin (3 envelopes)
2 cups granulated sugar
1/2 cup light corn syrup
1/2 tsp fine salt
2 tsp vanilla
3 Tbsp creamy peanut butter
Marshmallow coating:
1.5 cups confectioners sugar
1 cup corn starch
Directions:
Spray a 9 x 9 inch pan with Pam, and line the bottom with parchment paper. Feel free to spray the parchment paper with some Pam, too, since when I made the vanilla ones it stuck a little.
In a stand mixer with the whisk attachment, pour in half a cup of the water and sprinkle the gelatin over it.
Let it stand.
In a medium saucepan over high hear, stir together the water, corn syrup, sugar, and salt.
Stir until the sugar dissolves and the mixture begins to boil.
Stop stirring and once the mixture comes to a rolling boil, continue boiling for one minute.
Remove from the heat (it helps to then pour the mixture into a 2-cup glass measuring up, to make it easier to pour the mixture.
Turn the mixer to low and mix the gelatin a bit to loosen it.
Very slowly and carefully pour the hot sugar mixture into the bowl by pouring it gently down the side of the bowl.
Continue to mix on low until all the sugar mixture is added.
Turn the mixture to high and whip for 10-12 minutes until the marshmallow batter almost triples in size and becomes very thick.
Add in the vanilla and mix to incorporate.
Place peanut butter into a small bowl and add about 1/4 of the vanilla marshmallow mixture.
Quickly stir until well blended.
Scrape the peanut butter mallow back in the mixer bowl with the vanilla batter.
Gently fold the two batters together until mostly blended, using a large spatula.
Transfer the mixture to the prepared baking pan and use a spatula or bench scraper to spread the marshmallow evenly in the pan, pushing it down into the corners.
Work quickly, as the marshmallow becomes more difficult to manipulate as it begins to set.
Spray a sheet of plastic wrap liberally with Pam and lay it across the top of the marshmallow, sprayed side down.
Using your fingers, smooth the plastic wrap on top of the marshmallows a bit to seal it smoothly and tightly against the marshmallows.
Leave the marshmallows to set at room temperature for at least 3 hours, or even better, overnight.
Mix together the confectioners sugar and corn starch.
When you're ready to cut the marshmallows, put a little bit of the corn starch mixture on a cutting board and flip the marshmallows onto the mixture.
Cut the marshmallows using a sharp knife or pizza cutter. Or, use cookie cutters to make shapes.
Toss the cut marshmallows into the coating to cover, and then shake off the excess coating mixture using a strainer.
Place the marshmallows in a single layer in a pan, and then place waxed paper on top, and then continue layering marshmallows.
Store in an air tight container, for up to a week....if they last that long!
Dark chocolate cupcakes
I did something very un-JulieBakes for B's birthday party. I actually baked the cupcakes a few days before and then froze them so that they were still fresh for the party. See, the week and a half before B's birthday party were going to be overly hectic for me, and there was no way I wasn't going to bake for the big birthday party. So I had to come up with a way to have homebaked goods but not pull a bunch of all-nighters before the party (because then what fun would I be at the actual party?). The answer was pretty clear: bake cupcakes, freeze cupcakes, thaw cupcakes, make icing, ice cupcakes, and then decorate cupcakes. I figured I could make the icing the day before, ice the cupcakes, and then decorate them, so that they'd be homemade, delicious, and fresh :) [more on the cupcake decorations and where I "borrowed" the super cute idea for sprinkles from here.]
But I wanted a new chocolate cupcake recipe. I don't really know why - I have a few chocolate cupcake recipes that I really like - but then I saw a recipe for dark chocolate cupcakes. DARK. CHOCOLATE. CUPCAKES!! With cocoa powder and chocolate! I figured they were worth a try, and trust me, they are! They're super delicious and rich and decadent -- even B, my self-proclaimed vanilla-vanilla cupcake guy, thought these chocolate cupcakes were amazing! The original recipe has them served with a peanut butter icing, which sounds fantastic, but I was planning on sticking with chocolate and vanilla icings for the party, so I just went with my go-to vanilla and chocolate buttercream recipes. Totally delish!
Dark Chocolate Cupcakes
From Brown Eyed Baker
Makes 12 cupcakes (I got 12 cupcakes plus 9 mini cupcakes)
Ingredients:
8 Tbsp unsalted butter, cut into 4 pieces
2 ounces bittersweet chocolate, chopped (I used semisweet since the store didn't have bittersweet. They're basically the same thing anyway).
1/2 cup Dutch-processed cocoa powder
3/4 cup all purpose flour
1/2 tsp baking soda
3/4 tsp baking powder
2 large eggs
3/4 cup granulated sugar
1 tsp vanilla extract
1/2 teaspoon table salt
1/2 cup sour cream
Directions:
Preheat the oven to 350F (325F if using a nonstick pan).
Line standard-sized muffin pan with cupcake liners.
Combine butter, chocolate, and cocoa in a medium heat proof bowl.
Set bowl over saucepan containing barely simmering water, and heat mixture until butter and chocolate are melted.
Whisk until smooth and combined.
(...or you could microwave the mixture at 50% powder, stirring every 30 seconds, until completely melted. Which is exactly what I did.)
Set aside to cool until just warm to touch.
Whisk flour, baking soda, and baking powder in a small bowl to combine.
Whisk eggs in another bowl to combine.
Add sugar, vanilla, and salt until fully incorporated.
Add cooled chocolate mixture and whisk until combined.
Sift about 1/3 of the flour mixture over the chocolate mixture and whisk until combined.
Whisk in sour cream until combined.
Sift the remaining flour mixture over and whisk until batter is thick and fully incorporated.
Divide the batter evenly among the cupcake liners.
Bake until a skewer inserted into the center of the cupcakes comes out clean, about 18-20 minutes.
Cool cupcakes in muffin pan on a wire rack until they are cool enough to handle, about 15 minutes.
Place cupcakes on a wire rack.
Cool to room temperature before icing, about 30 minutes (this is the point where I froze the cupcakes for later use).
Choose your icings:
Chocolate Buttercream
Vanilla Buttercream
Dark Chocolate Cupcakes
From Brown Eyed Baker
Makes 12 cupcakes (I got 12 cupcakes plus 9 mini cupcakes)
Ingredients:
8 Tbsp unsalted butter, cut into 4 pieces
2 ounces bittersweet chocolate, chopped (I used semisweet since the store didn't have bittersweet. They're basically the same thing anyway).
1/2 cup Dutch-processed cocoa powder
3/4 cup all purpose flour
1/2 tsp baking soda
3/4 tsp baking powder
2 large eggs
3/4 cup granulated sugar
1 tsp vanilla extract
1/2 teaspoon table salt
1/2 cup sour cream
Directions:
Preheat the oven to 350F (325F if using a nonstick pan).
Line standard-sized muffin pan with cupcake liners.
Combine butter, chocolate, and cocoa in a medium heat proof bowl.
Set bowl over saucepan containing barely simmering water, and heat mixture until butter and chocolate are melted.
Whisk until smooth and combined.
(...or you could microwave the mixture at 50% powder, stirring every 30 seconds, until completely melted. Which is exactly what I did.)
Set aside to cool until just warm to touch.
Whisk flour, baking soda, and baking powder in a small bowl to combine.
Whisk eggs in another bowl to combine.
Add sugar, vanilla, and salt until fully incorporated.
Add cooled chocolate mixture and whisk until combined.
Sift about 1/3 of the flour mixture over the chocolate mixture and whisk until combined.
Whisk in sour cream until combined.
Sift the remaining flour mixture over and whisk until batter is thick and fully incorporated.
Divide the batter evenly among the cupcake liners.
Bake until a skewer inserted into the center of the cupcakes comes out clean, about 18-20 minutes.
Cool cupcakes in muffin pan on a wire rack until they are cool enough to handle, about 15 minutes.
Place cupcakes on a wire rack.
Cool to room temperature before icing, about 30 minutes (this is the point where I froze the cupcakes for later use).
Choose your icings:
Chocolate Buttercream
Vanilla Buttercream
Tuesday, July 8, 2014
Chocolate marshmallows
To quote B, I've been a marshmallow making machine lately. First I made a batch of giant vanilla marshmallows. I followed that up with coffee (espresso) marshmallows, which were giant fluffy pillows of coffee deliciousness. Then I made these. Chocolate marshmallows. Yummy, fluffy, light chocolately marshmallows. I promise I'm not sitting at home stuffing my face with the dozens of marshmallows I've made so far....(and I also promise that I have at least one other flavored marshmallow up my sleeve for later this week). I'm making them for something. It's just a secret (for now). But there will be a big reveal soon, this I swear to you!
In the mean time, I leave you with all of these delicious marshmallows. These chocolate marshmallows would be delicious in just about anything (hot cocoa, coffee, chocolate milk). They're insanely good on their own, too. Hell, they'd be good on shoe leather!
Chocolate Marshmallows
Adapted from this recipe
Ingredients:
1 cup of room temperature water, divided
3 packets of unflavored gelatin
2 cups granulated sugar
1/2 cup light corn syrup
1/2 tsp fine salt
50 grams Dutch-processed cocoa -- then I added more to taste
Marshmallow coating:
1.5 cups of confectioners sugar
1 cup corn starch
2 Tbsp Dutch-processed cocoa, sifted
Directions:
Spray a 9 x 9 inch pan with Pam, and line the bottom with parchment paper. Feel free to spray the parchment paper with some Pam, too, since when I made the vanilla ones it stuck a little.
In a stand mixer with the whisk attachment, pour in half a cup of the water and sprinkle the gelatin over it.
Let it stand.
In a medium saucepan over high hear, stir together the water, corn syrup, sugar, and salt.
Stir until the sugar dissolves and the mixture begins to boil.
Stop stirring and once the mixture comes to a rolling boil, continue boiling for one minute.
Remove from the heat (it helps to then pour the mixture into a 2-cup glass measuring up, to make it easier to pour the mixture.
Turn the mixer to low and mix the gelatin a bit to loosen it.
Very slowly and carefully pour the hot sugar mixture into the bowl by pouring it gently down the side of the bowl.
Continue to mix on low until all the sugar mixture is added.
Turn the mixture to high and whip for 10-12 minutes until the marshmallow batter almost triples in size and becomes very thick.
Sift the cocoa powder over the marshmallow mixture.
Whip to incorporate.
Transfer the mixture to the prepared baking pan and use a spatula or bench scraper to spread the marshmallow evenly in the pan, pushing it down into the corners.
Work quickly, as the marshmallow becomes more difficult to manipulate as it begins to set.
Spray a sheet of plastic wrap liberally with Pam and lay it across the top of the marshmallow, sprayed side down.
Using your fingers, smooth the plastic wrap on top of the marshmallows a bit to seal it smoothly and tightly against the marshmallows.
Leave the marshmallows to set at room temperature for at least 3 hours, or even better, overnight.
Mix together the confectioners sugar, cocoa powder, and corn starch.
When you're ready to cut the marshmallows, put a little bit of the corn starch mixture on a cutting board and flip the marshmallows onto the mixture.
Cut the marshmallows using a sharp knife or pizza cutter. Or, use cookie cutters to make shapes.
Toss the cut marshmallows into the coating to cover, and then shake off the excess coating mixture using a strainer.
Place the marshmallows in a single layer in a pan, and then place waxed paper on top, and then continue layering marshmallows.
Store in an air tight container, for up to a week....if they last that long!
In the mean time, I leave you with all of these delicious marshmallows. These chocolate marshmallows would be delicious in just about anything (hot cocoa, coffee, chocolate milk). They're insanely good on their own, too. Hell, they'd be good on shoe leather!
Chocolate Marshmallows
Adapted from this recipe
Ingredients:
1 cup of room temperature water, divided
3 packets of unflavored gelatin
2 cups granulated sugar
1/2 cup light corn syrup
1/2 tsp fine salt
50 grams Dutch-processed cocoa -- then I added more to taste
Marshmallow coating:
1.5 cups of confectioners sugar
1 cup corn starch
2 Tbsp Dutch-processed cocoa, sifted
Directions:
Spray a 9 x 9 inch pan with Pam, and line the bottom with parchment paper. Feel free to spray the parchment paper with some Pam, too, since when I made the vanilla ones it stuck a little.
In a stand mixer with the whisk attachment, pour in half a cup of the water and sprinkle the gelatin over it.
Let it stand.
In a medium saucepan over high hear, stir together the water, corn syrup, sugar, and salt.
Stir until the sugar dissolves and the mixture begins to boil.
Stop stirring and once the mixture comes to a rolling boil, continue boiling for one minute.
Remove from the heat (it helps to then pour the mixture into a 2-cup glass measuring up, to make it easier to pour the mixture.
Turn the mixer to low and mix the gelatin a bit to loosen it.
Very slowly and carefully pour the hot sugar mixture into the bowl by pouring it gently down the side of the bowl.
Continue to mix on low until all the sugar mixture is added.
Turn the mixture to high and whip for 10-12 minutes until the marshmallow batter almost triples in size and becomes very thick.
Sift the cocoa powder over the marshmallow mixture.
Whip to incorporate.
Transfer the mixture to the prepared baking pan and use a spatula or bench scraper to spread the marshmallow evenly in the pan, pushing it down into the corners.
Work quickly, as the marshmallow becomes more difficult to manipulate as it begins to set.
Spray a sheet of plastic wrap liberally with Pam and lay it across the top of the marshmallow, sprayed side down.
Using your fingers, smooth the plastic wrap on top of the marshmallows a bit to seal it smoothly and tightly against the marshmallows.
Leave the marshmallows to set at room temperature for at least 3 hours, or even better, overnight.
Mix together the confectioners sugar, cocoa powder, and corn starch.
When you're ready to cut the marshmallows, put a little bit of the corn starch mixture on a cutting board and flip the marshmallows onto the mixture.
Cut the marshmallows using a sharp knife or pizza cutter. Or, use cookie cutters to make shapes.
Toss the cut marshmallows into the coating to cover, and then shake off the excess coating mixture using a strainer.
Place the marshmallows in a single layer in a pan, and then place waxed paper on top, and then continue layering marshmallows.
Store in an air tight container, for up to a week....if they last that long!
Monday, July 7, 2014
Coffee marshmallows
This winter, I had been on a marshmallow making spree. Toasted coconut, vanilla, even raspberry heart marshmallows! I tried Kahlua marshmallows (twice!) and thought they were OK, but I wanted to make some more flavored marshmallows. I have something coming up and I thought that some flavored marshmallows would be perfect for it, so I set out to find the perfect flavor of marshmallow to make. Enter the coffee marshmallow! Besides being delicious on it's own, imagine how good it would be in hot cocoa (say, in about 5 months when the heat has disappeared and hot cocoa actually sounds appetizing), making it a mocha....or even in a mug of coffee?!
I doctored up this recipe from the toasted coconut marshmallow recipe, leaving off the toasted coconut (obviously) and instead replacing the water in the recipe with really strong coffee (I used 8 oz of water and 3 heaping teaspoons of instant espresso powder for a really strong coffee flavor!....so I guess technically they are espresso marshmallows, but I digress. A cup of really strong coffee would work, too). I was going to add the vanilla, but when I tasted the marshmallow mixture before adding it, I thought it didn't need the added vanilla....they were perfectly coffee-y and delicious just as they were!
Stay tuned for a post on what I did with these delicious marshmallows!
(P.S. I also made a batch of the vanilla ones as they are, but used only 1 Tbsp of vanilla, I'm not going to post them again since I made them here, but just so you know -- they're totally fluffy, tasty, and simply out-of-this-world. Homemade marshmallows are worlds better than store bought ones!! I tossed them in a mixture of 3/4 cup confectioners sugar and 1/2 cup of corn starch)
Coffee Marshmallows (or, in this case, Espresso Marshmallows)
Recipe by me, based on this recipe
Ingredients:
1 cup strong coffee, room temperature, divided (I used 3 heaping teaspoons of instant espresso powder in 8 oz of water)
3 Tbsp plus 1.5 tsp unflavored gelatin (3 envelopes)
2 cups granulated sugar
1/2 cup light corn syrup
1/2 tsp fine salt
Marshmallow coating:
1.5 cups confectioners sugar
1 cup corn starch
(I debated adding a pinch of espresso powder, but last minute I decided against it)
Directions:
Spray a 9 x 9 inch pan with Pam, and line the bottom with parchment paper. Feel free to spray the parchment paper with some Pam, too, since when I made the vanilla ones it stuck a little.
In a stand mixer with the whisk attachment, pour in half a cup of the coffee and sprinkle the gelatin over it.
Let it stand.
In a medium saucepan over high hear, stir together the coffee, corn syrup, sugar, and salt.
Stir until the sugar dissolves and the mixture begins to boil.
Stop stirring and once the mixture comes to a rolling boil, continue boiling for one minute.
Remove from the heat (it helps to then pour the mixture into a 2-cup glass measuring up, to make it easier to pour the mixture.
Turn the mixer to low and mix the gelatin a bit to loosen it.
Very slowly and carefully pour the hot sugar mixture into the bowl by pouring it gently down the side of the bowl.
Continue to mix on low until all the sugar mixture is added.
Turn the mixture to high and whip for 10-12 minutes until the marshmallow batter almost triples in size and becomes very thick.
Transfer the mixture to the prepared baking pan and use a spatula or bench scraper to spread the marshmallow evenly in the pan, pushing it down into the corners.
Work quickly, as the marshmallow becomes more difficult to manipulate as it begins to set.
Spray a sheet of plastic wrap liberally with Pam and lay it across the top of the marshmallow, sprayed side down.
Using your fingers, smooth the plastic wrap on top of the marshmallows a bit to seal it smoothly and tightly against the marshmallows.
Leave the marshmallows to set at room temperature for at least 3 hours, or even better, overnight.
Mix together the confectioners sugar and corn starch.
When you're ready to cut the marshmallows, put a little bit of the corn starch mixture on a cutting board and flip the marshmallows onto the mixture.
Cut the marshmallows using a sharp knife or pizza cutter. Or, use cookie cutters to make shapes.
Toss the cut marshmallows into the coating to cover, and then shake off the excess coating mixture using a strainer.
Place the marshmallows in a single layer in a pan, and then place waxed paper on top, and then continue layering marshmallows.
Store in an air tight container, for up to a week....if they last that long!
![]() |
| *Pardon the poor photo quality - I took them with my iPhone* |
I doctored up this recipe from the toasted coconut marshmallow recipe, leaving off the toasted coconut (obviously) and instead replacing the water in the recipe with really strong coffee (I used 8 oz of water and 3 heaping teaspoons of instant espresso powder for a really strong coffee flavor!....so I guess technically they are espresso marshmallows, but I digress. A cup of really strong coffee would work, too). I was going to add the vanilla, but when I tasted the marshmallow mixture before adding it, I thought it didn't need the added vanilla....they were perfectly coffee-y and delicious just as they were!
Stay tuned for a post on what I did with these delicious marshmallows!
(P.S. I also made a batch of the vanilla ones as they are, but used only 1 Tbsp of vanilla, I'm not going to post them again since I made them here, but just so you know -- they're totally fluffy, tasty, and simply out-of-this-world. Homemade marshmallows are worlds better than store bought ones!! I tossed them in a mixture of 3/4 cup confectioners sugar and 1/2 cup of corn starch)
Coffee Marshmallows (or, in this case, Espresso Marshmallows)
Recipe by me, based on this recipe
Ingredients:
1 cup strong coffee, room temperature, divided (I used 3 heaping teaspoons of instant espresso powder in 8 oz of water)
3 Tbsp plus 1.5 tsp unflavored gelatin (3 envelopes)
2 cups granulated sugar
1/2 cup light corn syrup
1/2 tsp fine salt
Marshmallow coating:
1.5 cups confectioners sugar
1 cup corn starch
(I debated adding a pinch of espresso powder, but last minute I decided against it)
Directions:
Spray a 9 x 9 inch pan with Pam, and line the bottom with parchment paper. Feel free to spray the parchment paper with some Pam, too, since when I made the vanilla ones it stuck a little.
In a stand mixer with the whisk attachment, pour in half a cup of the coffee and sprinkle the gelatin over it.
Let it stand.
In a medium saucepan over high hear, stir together the coffee, corn syrup, sugar, and salt.
Stir until the sugar dissolves and the mixture begins to boil.
Stop stirring and once the mixture comes to a rolling boil, continue boiling for one minute.
Remove from the heat (it helps to then pour the mixture into a 2-cup glass measuring up, to make it easier to pour the mixture.
Turn the mixer to low and mix the gelatin a bit to loosen it.
Very slowly and carefully pour the hot sugar mixture into the bowl by pouring it gently down the side of the bowl.
Continue to mix on low until all the sugar mixture is added.
Turn the mixture to high and whip for 10-12 minutes until the marshmallow batter almost triples in size and becomes very thick.
Transfer the mixture to the prepared baking pan and use a spatula or bench scraper to spread the marshmallow evenly in the pan, pushing it down into the corners.
Work quickly, as the marshmallow becomes more difficult to manipulate as it begins to set.
Spray a sheet of plastic wrap liberally with Pam and lay it across the top of the marshmallow, sprayed side down.
Using your fingers, smooth the plastic wrap on top of the marshmallows a bit to seal it smoothly and tightly against the marshmallows.
Leave the marshmallows to set at room temperature for at least 3 hours, or even better, overnight.
Mix together the confectioners sugar and corn starch.
When you're ready to cut the marshmallows, put a little bit of the corn starch mixture on a cutting board and flip the marshmallows onto the mixture.
Cut the marshmallows using a sharp knife or pizza cutter. Or, use cookie cutters to make shapes.
Toss the cut marshmallows into the coating to cover, and then shake off the excess coating mixture using a strainer.
Place the marshmallows in a single layer in a pan, and then place waxed paper on top, and then continue layering marshmallows.
Store in an air tight container, for up to a week....if they last that long!
Sunday, July 6, 2014
"Strawberry shortcake" cupcakes
The first thing you might wonder in seeing this post is why is strawberry shortcake in quotes? Well because these aren't really strawberry shortcake cupcakes, but rather cupcakes based loosely on the idea of strawberry shortcake. See I started off with my Fluffernutter Cupcakes. Then I made the PB&J Cupcakes. I was kinda on a roll when it came to filling cupcakes, and creating them, if I do say so myself. So I had filled my PB&J cupcakes with strawberry jelly, and as I was looking at them I started thinking about what else might be good to top them with. Then I took out the cream to make the icing and it clicked: whipped cream! But then I thought that that's not really strawberry shortcake-like, with strawberry jam, and decided to fill the craters of my cupcakes with diced fresh strawberries and top them with some homemade slightly sweetened whipped cream and a few more pieces of fresh strawberry.
Then, I realized that it was July 4th this weekend, and figured that these would be perfectly patriotic! I even debated making a blueberry whipped cream to top them, but decided that the strawberry-whipped cream combo didn't need anything added to it, and stuck with the plain whipped cream topping. And I even dug up some July 4th cupcake liners for the occasion!
Confession: I love strawberry shortcake! I mean honestly, what's not to love about fresh sweet juicy strawberries and light fluffy mildly sweet whipped cream? I don't even eat the "shortcake" part, because the other two are so much better. So I decided to use my go-to yellow cake cupcake recipe, because it's light and mildly flavored and I thought it would go deliciously well with the strawberries and whipped cream!
Ingredients:
2 cups fresh cream
Powdered sugar, to taste.
Directions:
In a bowl, whip the cream on high with an electric hand mixer until soft peaks form.
Add in powdered sugar to taste and whip until stiff peaks form.
Add whipped cream to a piping bag fitted with the tip of your choice.
Then, I realized that it was July 4th this weekend, and figured that these would be perfectly patriotic! I even debated making a blueberry whipped cream to top them, but decided that the strawberry-whipped cream combo didn't need anything added to it, and stuck with the plain whipped cream topping. And I even dug up some July 4th cupcake liners for the occasion!
Confession: I love strawberry shortcake! I mean honestly, what's not to love about fresh sweet juicy strawberries and light fluffy mildly sweet whipped cream? I don't even eat the "shortcake" part, because the other two are so much better. So I decided to use my go-to yellow cake cupcake recipe, because it's light and mildly flavored and I thought it would go deliciously well with the strawberries and whipped cream!
"Strawberry Shortcake" Cupcakes
Cupcake idea by yours truly, each component listed with it's source
Yellow Cake Cupcakes
Ingredients:
4 cups plus 2 Tbsp cake flour (not self-rising)
2 teaspoons baking powder
1 1/2 teaspoons baking soda
1 teaspoon table salt
2 sticks (1 cup) unsalted butter, softened
2 cups sugar
2 teaspoons pure vanilla extract
4 large eggs, at room temperature
2 cups buttermilk, well-shaken
Fresh strawberries, diced small
Blueberries or sliced strawberries for decoration (I only suggest blueberries if you're planning to make these for July 4th. The blueberries with the white of the whipped cream and the red of the strawberries is very patriotic.)
Directions:
Preheat oven to 350F.
Line a cupcake tin with liners.
Sift flour, baking powder, baking soda, and salt together in a medium bowl.
In a large mixing bowl, beat butter and sugar with an electric mixer at medium speed until pale and fluffy.
Beat in vanilla.
Add eggs, 1 at a time, beating well and scraping down the bowl after each addition.
At low speed, beat in buttermilk until just combined (mixture will look curdled).
Add flour mixture in 3 batches, mixing until each addition is just incorporated.
Fill the baking cups about 2/3 of the way full.
Bang the pan against the counter a few time to let out air bubbles.
Bake until golden and a toothpick inserted in the center of the cake comes out clean, about 15 minutes.
Cool in pan on a rack for 10 minutes, then remove from the pan and allow to cool completely.
Whipped Cream Icing
Ingredients:
2 cups fresh cream
Powdered sugar, to taste.
Directions:
In a bowl, whip the cream on high with an electric hand mixer until soft peaks form.
Add in powdered sugar to taste and whip until stiff peaks form.
Add whipped cream to a piping bag fitted with the tip of your choice.
Assembly
Once completely cooled, cut a small crater in the center of each cupcake with a small paring knife or very carefully with a melon baller (these cupcakes are very fragile).
Gently spoon diced strawberries (about 1-1.5 teaspoons) into the newly cut hole in the center.
Using the piping tip of your choice (I used a star tip), pipe whipped cream onto filled cupcakes.
Top with a slice of strawberry (or cherries or blueberries for a patriotic twist).
Keep cupcakes in the fridge until just before serving.
Top with a slice of strawberry (or cherries or blueberries for a patriotic twist).
Keep cupcakes in the fridge until just before serving.
Subscribe to:
Posts (Atom)