Very infrequently do I eat what I bake. Extremely rare is when I eat a lot of something that I bake. One of those things are cinnamon buns. The other is this braided, stuffed lemon bread! I've been known to go through half a loaf the day I bake it. I've made it with the original recipe, and I've added raspberry jam, too. Once I even made a mini one with scraps and added some peach preserves. They're all good. I've chosen to stick with the original recipe today, because I think the lemony-ness (a totally real word, by the way) is fresh and tasty, and just what I would want on this summery day.
* These loaves are a little smaller than you would assume, given the amount of dough that this recipe yields. That's because I divided it into thirds and saved one third of the dough for an experiment (that you may or may not see up on the blog soon. *
Braided, stuffed lemon bread
Originally from King Arthur Flour, found by me on Smitten Kitchen
Ingredients:
For the sponge:
3/4 cup warm water
2 tsp sugar
2 Tbsp instant yeast (I use Rapid Rise)
1/2 cup flour
For the dough:
All the sponge (see above)
3/4 cup plain of vanilla yogurt (I found this recipe via Smitten Kitchen, and she recommended using sour cream, which is what I did)
1/2 cup (1 stick) unsalted butter, softened
2 large eggs, beaten
1/2 cup sugar
2 tsp salt
2 tsp Buttery Sweet Dough flavor (or vanilla)
5 cups flour
Egg wash (for brushing)
Pearl sugar or sparkling white sugar (for sprinkling on top. For the longest time, I couldn't find pearl sugar, so I used large crystal sugar, which worked perfectly fine.)
For the Cream Cheese Filling:
2/3 cup cream cheese, softened
1/4 cup sugar
1/4 cup sour cream
2 tsp fresh lemon juice (I used a little extra for an extra lemon-y flavor)
1/4 cup flour
1/2 cup lemon curd*
* For the lemon curd - you can use store bought or make your own....if you make your own, I highly recommend following Smitten Kitchen's recipe, which you can find here, but I recommend doubling if you are making the full dough recipe.
Directions:
In a small bowl, combine the sponge ingredients.
Stir well to combine, loosely cover with plastic wrap, and set aside to proof for 10-15 minutes.
In the bowl of a stand mixer, combine the sponge, yogurt (sour cream), butter, eggs, sugar, salt, and flavoring.
Add 4 and a 1/2 cups of flour and mix with the paddle attachment until the dough is a rough, shaggy mass.
Switch to dough hook and knead on speed 2 until a soft, smooth dough forms, about 5-6 minutes, adding more flour if needed.
Place the kneaded dough in a lightly greased bowl, cover with plastic wrap, and allow to rise for 60-90 minutes, until quite puffy and nearly doubled.
* If making your own lemon curd, now is a good time to make it *
While the dough is rising, prepare the cream cheese filling.
Combine all of the filling ingredients (except the lemon curd) in a small bowl, mixing until smooth and lump-free.
Set aside.
Gently deflate the dough and divide it in half.
Cover half with plastic wrap and set it aside as you roll out the first piece into a 10" x 15" rectangle.
Placed the rolled dough onto a piece of parchment paper.
Lightly press 2 lines down the dough lengthwise, to divide it into 3 equal sections.
Remove the corners of dough.
Spread half of the cream cheese filling down the middle section, and top with half of the lemon curd, leaving 1" free on all sides of the filling.
To form the mock braid, cut 1" crosswise strips down the length of the outside sections, making sure you have the same number of strips on both sides.
Flip the top piece over onto the filling.
Beginning with the left, lift the top dough strip and gently bring it across the filling diagonally.
Repeat on the other side with the top dough strip, so that the two strips crisscross each other.
Continue down the entire braid, alternating sides.
Repeat the process with the second loaf.
Set both loaves aside, lightly covered, to rise for 45-50 minutes, or until quite puffy.
Preheat the oven to 375F.
Brush the loaves with egg wash (1 slightly beaten egg, 2 tsp water, and a pinch of salt).
Sprinkle with sugar, if desired.
Bake for 25-30 minutes, or until the loaves are golden brown.
Remove from the oven and let cool for 15-20 minutes before serving.
And, just to give you an idea of what it looks like with the raspberry jam, I'm adding a picture from a while ago, just to show you:
Facebook 1
Sunday, August 11, 2013
Friday, August 2, 2013
Red velvet thumbprint cookies
A continuation of L's red velvet birthday treats are red velvet thumbprint cookies. The first installment, red velvet white chocolate chip cookies, can be found here.
The red velvet white chocolate chip cookie taste tester, my sister who was staying at my apartment for a few days, is not a huge fan of sweets. In retrospect, probably not the best option for a cookie taste tester, but regardless, she made a good point -- the white chocolate was very, very sweet.
So when it came to baking these red velvet thumbprint cookies, I was hesitant to fill them with white chocolate, as the original recipe called for. My first thought was to fill them with cream cheese icing, but the NYC heat, transport issues, and lack of refrigeration at work made me a little cautious. Ultimately, I decided on a white chocolate cream cheese filling (similar to - and adapted slightly from - the icing on these cranberry white chocolate bars). I think the cream cheese broke some of the sweetness of the white chocolate, while the white chocolate stopped it from becoming a soupy mess. Plus, this way I got to impart some of the cream cheese flavor that I think needs to go with the red velvet. And what a good decision it was!! It was actually the best part of the cookie.
** I ended up not bringing these to the movie on the pier as they wouldn't survive the stacking. But they ended up being pretty tasty. Let them cool before eating them -- that's when the taste the best. **
Red Velvet Thumbprint Cookies
Ingredients:
1 cup butter, softened
1 cup sugar
1 egg
4 tsp red food coloring (I used my gel food coloring, so I cut it down to 3 tsp and they're very RED)
1 teaspoon vanilla
2 1/2 cups all-purpose flour
3 Tbsp unsweetened baking cocoa
1/4 tsp salt
Directions:
Heat oven to 350°F. Line cookie sheet with cooking parchment paper.
In large bowl, beat butter and sugar with electric mixer on medium speed about 2 minutes or until creamy.
Stir in egg, food coloring and vanilla until well blended.
On low speed, beat in flour, cocoa and salt until blended.
Cream Cheese-White Chocolate Filling
Ingredients:
1 package (8 ounces) cream cheese, softened
1 cup powdered sugar, sifted
3 ounces white baking chocolate, melted
Directions:
In the microwave, melt white chocolate in a microwave safe bowl, in 30 second increments.
Be sure not to burn the chocolate.
In a large bowl, beat the cream cheese and powdered sugar with an electric mixer until well-blended.
Gradually add melted white chocolate.
Beat until blended.
The red velvet white chocolate chip cookie taste tester, my sister who was staying at my apartment for a few days, is not a huge fan of sweets. In retrospect, probably not the best option for a cookie taste tester, but regardless, she made a good point -- the white chocolate was very, very sweet.
So when it came to baking these red velvet thumbprint cookies, I was hesitant to fill them with white chocolate, as the original recipe called for. My first thought was to fill them with cream cheese icing, but the NYC heat, transport issues, and lack of refrigeration at work made me a little cautious. Ultimately, I decided on a white chocolate cream cheese filling (similar to - and adapted slightly from - the icing on these cranberry white chocolate bars). I think the cream cheese broke some of the sweetness of the white chocolate, while the white chocolate stopped it from becoming a soupy mess. Plus, this way I got to impart some of the cream cheese flavor that I think needs to go with the red velvet. And what a good decision it was!! It was actually the best part of the cookie.
** I ended up not bringing these to the movie on the pier as they wouldn't survive the stacking. But they ended up being pretty tasty. Let them cool before eating them -- that's when the taste the best. **
Red Velvet Thumbprint Cookies
Ingredients:
1 cup butter, softened
1 cup sugar
1 egg
4 tsp red food coloring (I used my gel food coloring, so I cut it down to 3 tsp and they're very RED)
1 teaspoon vanilla
2 1/2 cups all-purpose flour
3 Tbsp unsweetened baking cocoa
1/4 tsp salt
Directions:
Heat oven to 350°F. Line cookie sheet with cooking parchment paper.
In large bowl, beat butter and sugar with electric mixer on medium speed about 2 minutes or until creamy.
Stir in egg, food coloring and vanilla until well blended.
On low speed, beat in flour, cocoa and salt until blended.
Shape dough into 1-inch balls (I used my trusty cookie scoop).
On cookie sheets, place balls 2 inches apart.
Press thumb into center of each cookie to make indentation, but do not press all the way to the cookie sheet (I used the bottom of a 1/4 tsp measuring spoon to make the crater in the center; I sprayed it with Pam at the beginning).
Bake 12 minutes or until set.
Cool 2 minutes; quickly remake indentations with end of wooden spoon, if necessary.
Remove from cookie sheet to cooling rack.
Cool completely, about 10 minutes.
Fill the craters in the cookie with the cream cheese-white chocolate filling (see below). You can use a ziplock bag with the corner cut off, or a piping bag with a decorative tip.
Ingredients:
1 package (8 ounces) cream cheese, softened
1 cup powdered sugar, sifted
3 ounces white baking chocolate, melted
Directions:
In the microwave, melt white chocolate in a microwave safe bowl, in 30 second increments.
Be sure not to burn the chocolate.
In a large bowl, beat the cream cheese and powdered sugar with an electric mixer until well-blended.
Gradually add melted white chocolate.
Beat until blended.
Wednesday, July 31, 2013
Red velvet white chocolate chip cookies
My friend L's birthday is coming up and she has chosen a movie on the pier to celebrate. We're going to picnic with some treats and wine, and I figured that since we're celebrating L's birthday and that L loves red velvet, her birthday movie treats would be red velvet.
But again - as is pretty much customary in my life - I will be running to the movie straight from work, and that means whatever treats I make will have to first travel from my apartment to work (in Brooklyn) and the back to Manhattan for the movie. Therefore, ease of transport was a must. A cake was out. Cupcakes, too (partially because I didn't want to have to squeeze my way onto the subway with a giant tray of cupcakes, and partially because I made them in a mini for L's 30th birthday party last year). But cookies? Those seemed doable. And transportable. And, knowing me, why stop at one kind?! So I set out to make two different types of red velvet cookies.
First up are the red velvet white chocolate chip cookies. Not too far off from a hybrid of the chewy dark chocolate chip cookies I made last summer (and brought to a movie in the park...for L's birthday) and the dried cranberry white chocolate chip cookies I made earlier in the month (they both use corn starch).
Red velvet became hugely popular a few years ago. I'm unsure if its the novelty (at least at that time it was a novelty) or simply the fact that they're red (a conversation I had last week, in which B questioned whether an adult would ever admit that they like something simply because it's red). They're flavor is interesting, with a little -- but not too much -- cocoa, and typically some apple cider vinegar in the batter, too. But regardless of my opinion and questions regarding red velvet, some people absolutely adore it. L is one of those people.
So I started with the red velvet white chocolate chip cookies. A ruby-hued, mildly chocolately cookie speckled with white chocolate chips. Why white chocolate? Well anyone who knows knows that red velvet cake/cupcakes should be topped with cream cheese frosting, and I think aesthetically the white chips mimic the white icing. (That may be a little deep for a cookie blog post? Maybe?)
Red Velvet White Chocolate Chip Cookies
With some slight adaptations from the original by yours truly
First up are the red velvet white chocolate chip cookies. Not too far off from a hybrid of the chewy dark chocolate chip cookies I made last summer (and brought to a movie in the park...for L's birthday) and the dried cranberry white chocolate chip cookies I made earlier in the month (they both use corn starch).
Red velvet became hugely popular a few years ago. I'm unsure if its the novelty (at least at that time it was a novelty) or simply the fact that they're red (a conversation I had last week, in which B questioned whether an adult would ever admit that they like something simply because it's red). They're flavor is interesting, with a little -- but not too much -- cocoa, and typically some apple cider vinegar in the batter, too. But regardless of my opinion and questions regarding red velvet, some people absolutely adore it. L is one of those people.
So I started with the red velvet white chocolate chip cookies. A ruby-hued, mildly chocolately cookie speckled with white chocolate chips. Why white chocolate? Well anyone who knows knows that red velvet cake/cupcakes should be topped with cream cheese frosting, and I think aesthetically the white chips mimic the white icing. (That may be a little deep for a cookie blog post? Maybe?)
Red Velvet White Chocolate Chip Cookies
With some slight adaptations from the original by yours truly
Ingredients:
1 1/2 cups all-purpose flour
2 1/2 Tbsp cocoa powder
1 tsp cornstarch
3/4 tsp baking powder
1/4 tsp salt
1/2 cup butter, softened
1 cup granulated sugar
1 tsp distilled white vinegar - I used cider vinegar. Why? Because that's what I always use when I make red velvet cupcakes....and it's what I had on hand
1 large egg
1 1/2 tsp vanilla extract
1 1/2 tsp red food coloring (I had a little snafu - my twist off top on my gel food color wasn't on tightly, and it started oozing out of the bottle....I was aiming for 1 tsp of the gel color because it's so rich, but I think I ended up with closer to the 1 and a half teaspoons)
3/4 cup white chocolate chips, divided (for the first batch of cookies, I divided the chips as the original recipe called for, and then pushed a few into the tops of the cookies before baking. They turned brown and, in my opinion, not that pretty. So I mixed them all in and then baked them. Much easier. So I don't recommend dividing the chips)
Directions:
Preheat oven to 375 degrees.
In a mixing bowl whisk together flour, cocoa powder, cornstarch, baking powder and salt, set aside.
In the bowl of an electric stand mixer fitted with paddle attachment (mine was in the dishwasher, so I used a good old hand mixer), whip together butter, sugar and vinegar until pale and fluffy, about 3 - 4 minutes.
Mix in egg.
Add in vanilla and red food coloring and mix until blended.
With mixer set on low speed, slowly add in dry ingredients and mix just until combine.
Mix in white chocolate chips (the original author said: I mixed in half of the white chocolate chips then set aside the other half to press into the tops of the rolled dough balls so more of them show through when baking...but she noticed that another baker just pressed some extra white chocolate chips into the tops of cookies AFTER baking, genius!).
Scoop dough out by the heaping tablespoonfuls (or use your handy dandy small cookie scooper, which I did) and shape into balls. If using a scooper, flatten the tops a little before baking, otherwise some cookies may look a little domed.
Transfer to Silpat or parchment paper lined baking sheets and bake in preheated oven 9 - 11 minutes (mine were smaller and baked for 7-8 minutes).
Allow to cool on cookie sheet before transferring to a wire rack to cool.
Store cookies in an airtight container.
Thursday, July 25, 2013
Birthday week treat #4: Chocolate malt cupcakes
On my actual birthday, I thought it was only fitting to post a cupcake on the blog. A cake would've been acceptable, too, but I figured I could share cupcakes, and a cake would be difficult to lug around and give out to people. I had been debating between two cupcakes, but this one ultimately won out.
I had actually wanted to make these a while ago, but couldn't find malted milk powder in the stores. So I went online, found it at King Arthur Flour, and ordered it. Then, it sat in my cabinet until I got around to using it. In all honesty, whenever I wanted to make these cupcakes, I had the malted milk powder but didn't have any sour cream. I went back to Target for ingredients for the peanut butter monster cookies and remembered to pick up some sour cream, so I was finally able to make them!
I decided to make 1/3 of this recipe because I have been baking a ton this week and don't really have anywhere to bring it/anyone to give it to, and I can't be eating ALL of the Rice Krispie treats and giant peanut butter monster cookies AND the cupcakes that I've been baking. I would have halved the recipe, except I didn't feel like having to half an egg....easy solution was to use one egg and just make 1/3 of the recipe. The original recipe said that it made 30 cupcakes, but I got 13 from the third of the recipe. For the icing, I just halved it (there was plenty extra!).
** I have to admit -- I didn't love the cupcake part. But the icing, DELISH! Next time I think I'd just make a dark chocolate cupcake and top in with the malted buttercream. **
Chocolate Malt Cupcakes
Ingredients (those listed below are the original measurements, which make 30 cupcakes):
For the cupcakes:
2 1/4 cups all-purpose flour
3/4 cup unsweetened dutch-process cocoa powder
1/2 cup granulated sugar
3/4 cup packed brown sugar
1 1/2 teaspoons baking soda
1/2 teaspoon salt
1 cup whole milk
1 1/2 cups malted milk powder
1 cup vegetable oil
3 large eggs, at room temperature
1 cup sour cream, at room temperature
1 teaspoon vanilla extract
For the buttercream:
1 cup unsalted butter, at room temperature
1 cup vegetable shortening, at room temperature
1/2 cup malted milk powder
4 tablespoons unsweetened dutch-process cocoa powder
5 cups confectioner sugar, sifted
Chocolate Covered Malt Balls to garnish (the original blog showed them with mini straws, which are adorable, and I planned to skip them (I even had them at home from L's 30th birthday party last year and the Minnie Oreo pops), but then I couldn't resist them....they're too cute!)
Directions:
Preheat oven to 350 degrees.
Line standard muffin tins with paper liners.
Whisk together flour, cocoa, both sugars, baking soda and salt.
In another bowl, whisk together milk and malted milk powder until powder is dissolved.
With an electric mixer on medium-high speed, beat flour mixture, milk mixture and oil until combined (or just use a whisk and some upper arm strength - which I did).
Add eggs, one at a time, beating until each is incorporated, scraping down sides of bowl as needed.
Add sour cream and vanilla, and beat just until combined.
Divide batter evenly among lined cups, filling each halfway.
Bake, rotating tins halfway through, until a cake tester inserted in centers comes out clean, 18-20 minutes.
While cupcakes are cooling, prepare frosting.
In a large mixer bowl, whip the butter and shorting for several minutes until very light and fluffy.
Sprinkle in malted milk powder and cocoa powder.
Whip for 1 minute.
Slowly add the powdered sugar a few spoonful at a time, letting it incorporate until the frosting becomes thick and stiff.
Fill bag with the frosting and pipe large swirls on top of cupcakes. I liked the way mine looked piled high.
Top with candies and straws, if using.
Enjoy!
| The cute "Happy Birthday" plaque is from my birthday cake at work yesterday. |
I decided to make 1/3 of this recipe because I have been baking a ton this week and don't really have anywhere to bring it/anyone to give it to, and I can't be eating ALL of the Rice Krispie treats and giant peanut butter monster cookies AND the cupcakes that I've been baking. I would have halved the recipe, except I didn't feel like having to half an egg....easy solution was to use one egg and just make 1/3 of the recipe. The original recipe said that it made 30 cupcakes, but I got 13 from the third of the recipe. For the icing, I just halved it (there was plenty extra!).
** I have to admit -- I didn't love the cupcake part. But the icing, DELISH! Next time I think I'd just make a dark chocolate cupcake and top in with the malted buttercream. **
Chocolate Malt Cupcakes
Ingredients (those listed below are the original measurements, which make 30 cupcakes):
For the cupcakes:
2 1/4 cups all-purpose flour
3/4 cup unsweetened dutch-process cocoa powder
1/2 cup granulated sugar
3/4 cup packed brown sugar
1 1/2 teaspoons baking soda
1/2 teaspoon salt
1 cup whole milk
1 1/2 cups malted milk powder
1 cup vegetable oil
3 large eggs, at room temperature
1 cup sour cream, at room temperature
1 teaspoon vanilla extract
For the buttercream:
1 cup unsalted butter, at room temperature
1 cup vegetable shortening, at room temperature
1/2 cup malted milk powder
4 tablespoons unsweetened dutch-process cocoa powder
5 cups confectioner sugar, sifted
Chocolate Covered Malt Balls to garnish (the original blog showed them with mini straws, which are adorable, and I planned to skip them (I even had them at home from L's 30th birthday party last year and the Minnie Oreo pops), but then I couldn't resist them....they're too cute!)
Directions:
Preheat oven to 350 degrees.
Line standard muffin tins with paper liners.
Whisk together flour, cocoa, both sugars, baking soda and salt.
In another bowl, whisk together milk and malted milk powder until powder is dissolved.
With an electric mixer on medium-high speed, beat flour mixture, milk mixture and oil until combined (or just use a whisk and some upper arm strength - which I did).
Add eggs, one at a time, beating until each is incorporated, scraping down sides of bowl as needed.
Add sour cream and vanilla, and beat just until combined.
Divide batter evenly among lined cups, filling each halfway.
Bake, rotating tins halfway through, until a cake tester inserted in centers comes out clean, 18-20 minutes.
While cupcakes are cooling, prepare frosting.
In a large mixer bowl, whip the butter and shorting for several minutes until very light and fluffy.
Sprinkle in malted milk powder and cocoa powder.
Whip for 1 minute.
Slowly add the powdered sugar a few spoonful at a time, letting it incorporate until the frosting becomes thick and stiff.
Fill bag with the frosting and pipe large swirls on top of cupcakes. I liked the way mine looked piled high.
Top with candies and straws, if using.
Enjoy!
Wednesday, July 24, 2013
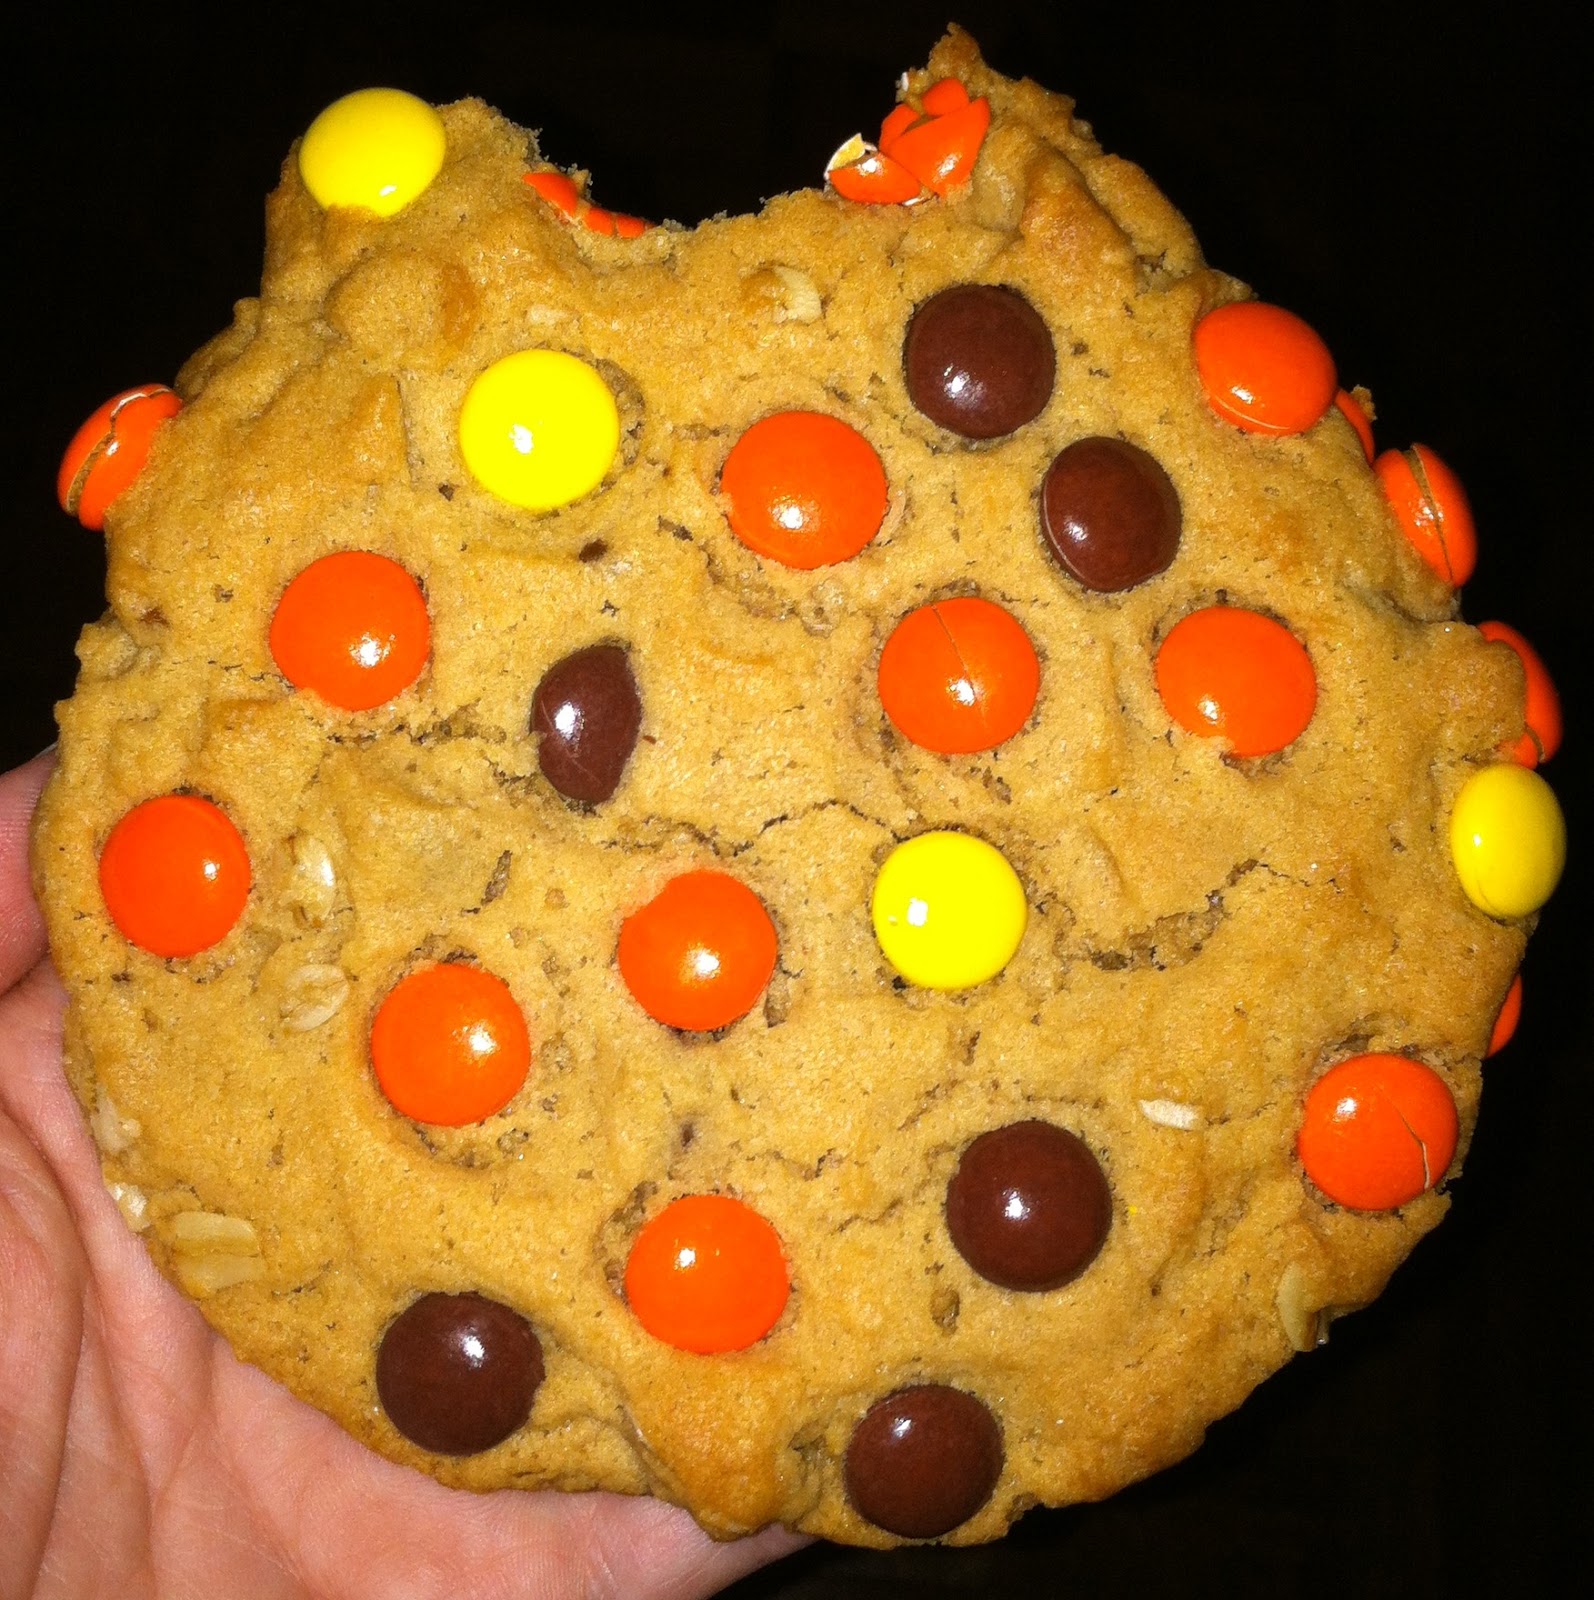
Birthday week treat #3: Peanut butter monster cookies
I have a confession: these weren't the cookies I set out to make for my birthday.
I had originally wanted to make these S'mores cookies that I had found on Pinterest ages ago. They even had these adorable mini marshmallows in them. But when I sat down and started scrolling though my "Things I Want to Bake" board, I couldn't find the recipe anywhere. It vanished off the page! See, the reason for wanting to make the s'mores cookies was that I made s'mores cupcakes for my birthday last year (as well as Kit Kat cupcakes, but this isn't about those). While not in love with s'mores any more than the next person, I decided that for some birthday week continuity, I would make some s'mores cookies this year. But lack of a recipe meant I had to scrap that idea.
So I started looking through my Pinterest board trying to find another cookie that I would want to make for my birthday week of treats. I came across these Peanut Butter Monster cookies. HUGE peanut butter cookies with peanut butter and chocolate chips, covered in Reese's Pieces. Cookies + candy + chocolate chips are definitely birthday treats! Happy Birthday to me! (These cookies would also be good for Halloween because, well, Reese's closely resemble Halloween colors.)
These are not for the faint of heart.....or peanut allergic!
Peanut Butter Monster Cookies
(I got 21 cookies.....BIG cookies)
Ingredients:
2 cups all-purpose flour
2 and 1/4 teaspoons baking soda
1/2 teaspoon salt
1 cup unsalted butter, softened
1 cup peanut butter
1 cup sugar
2/3 cup packed brown sugar
2 large eggs at room temperature
1 teaspoon vanilla extract
1/2 cup rolled oats
1/2 cup peanut butter chips
1/2 cup chocolate chips
Reese’s Pieces mini candies, 1 bag (They suggested two bags, since there weren't enough to coat all of the cookies with one bag - and I needed about 1/5 of an additional bag)
Directions:
Whisk together flour, baking soda and salt in a small bowl.
Set aside.
In a large bowl (or the bowl of a stand mixer) cream together butter, peanut butter, sugar and brown sugar (I used light brown sugar).
Beat until light and fluffy.
Add eggs one at a time, beating well after each addition.
Add vanilla, and beat to combine.
Slowly add dry ingredients, and beat just until combined.
Don’t over beat at this stage.
Stir in oats, peanut butter chips and chocolate chips.
Refrigerate dough for 15 minutes, meanwhile preheating oven to 350 degrees (F).
Prepare a cookie sheet with parchment paper.
Pour Reese’s Pieces candies onto a plate or into a flat bowl.
Using a large cookie scoop (about 3 Tablespoons - I actually used an ice cream scooper, which I purchased specifically for these cookies!) drop cookie dough into the bowl of candies.
Gently use your hand to press the dough down into the candies and flatten the dough into a disc, then transfer to cookie sheet.
Bake, six at a time, for 12-15 minutes or until the edges are just beginning to darken.
Allow to cool on cookie sheet for 5-10 minutes.
*If you skip this step, the cookies might break when you transfer them to a cooling rack.*
Allow to cool on a wire rack for 30 minutes before serving. Enjoy!
I had originally wanted to make these S'mores cookies that I had found on Pinterest ages ago. They even had these adorable mini marshmallows in them. But when I sat down and started scrolling though my "Things I Want to Bake" board, I couldn't find the recipe anywhere. It vanished off the page! See, the reason for wanting to make the s'mores cookies was that I made s'mores cupcakes for my birthday last year (as well as Kit Kat cupcakes, but this isn't about those). While not in love with s'mores any more than the next person, I decided that for some birthday week continuity, I would make some s'mores cookies this year. But lack of a recipe meant I had to scrap that idea.
So I started looking through my Pinterest board trying to find another cookie that I would want to make for my birthday week of treats. I came across these Peanut Butter Monster cookies. HUGE peanut butter cookies with peanut butter and chocolate chips, covered in Reese's Pieces. Cookies + candy + chocolate chips are definitely birthday treats! Happy Birthday to me! (These cookies would also be good for Halloween because, well, Reese's closely resemble Halloween colors.)
These are not for the faint of heart.....or peanut allergic!
Peanut Butter Monster Cookies
(I got 21 cookies.....BIG cookies)
Ingredients:
2 cups all-purpose flour
2 and 1/4 teaspoons baking soda
1/2 teaspoon salt
1 cup unsalted butter, softened
1 cup peanut butter
1 cup sugar
2/3 cup packed brown sugar
2 large eggs at room temperature
1 teaspoon vanilla extract
1/2 cup rolled oats
1/2 cup peanut butter chips
1/2 cup chocolate chips
Reese’s Pieces mini candies, 1 bag (They suggested two bags, since there weren't enough to coat all of the cookies with one bag - and I needed about 1/5 of an additional bag)
Directions:
Whisk together flour, baking soda and salt in a small bowl.
Set aside.
In a large bowl (or the bowl of a stand mixer) cream together butter, peanut butter, sugar and brown sugar (I used light brown sugar).
Beat until light and fluffy.
Add eggs one at a time, beating well after each addition.
Add vanilla, and beat to combine.
Slowly add dry ingredients, and beat just until combined.
Don’t over beat at this stage.
Stir in oats, peanut butter chips and chocolate chips.
Refrigerate dough for 15 minutes, meanwhile preheating oven to 350 degrees (F).
Prepare a cookie sheet with parchment paper.
Pour Reese’s Pieces candies onto a plate or into a flat bowl.
Using a large cookie scoop (about 3 Tablespoons - I actually used an ice cream scooper, which I purchased specifically for these cookies!) drop cookie dough into the bowl of candies.
Gently use your hand to press the dough down into the candies and flatten the dough into a disc, then transfer to cookie sheet.
Bake, six at a time, for 12-15 minutes or until the edges are just beginning to darken.
Allow to cool on cookie sheet for 5-10 minutes.
*If you skip this step, the cookies might break when you transfer them to a cooling rack.*
Allow to cool on a wire rack for 30 minutes before serving. Enjoy!
Tuesday, July 23, 2013
Birthday week treat #2: Neapolitan Rice Krispie treats
Birthday week treat #2 was supposed to be a cookie. But I worked late, ran an errand, and then went back to the office to finish a few charts and call two patients back, and then by the time I got home at 10 p.m. I had to make some meatballs before the ingredients went bad, and I was missing some of the cookie ingredients, and well, I made these instead. My apologies that its yet another Rice Krispie Treat.....for the second day in a row! At least these are "fancy" Rice Krispie treats (as one friend called them)...but I digress...
I have been wanting to make this recipe for a while, ever since I saw it on Pinterest. The only thing holding me back was the inability to find strawberry marshmallow fluff to make the strawberry layer. But when I was at Target yesterday buying the ingredients for the funfetti Rice Krispie treats, I found strawberry marshmallows! And figuring I could just exchange the strawberry marshmallows for the fluff, I bought two bags.
The other interesting thing is that the recipe called for Cocoa Krispies and regular marshmallows for the cocoa layer. Suffice it to say I was intrigued by this recipe. I've seen chocolate marshmallows, too, so I thought that that may have been how to make the chocolate layer, but I love the Cocoa Krispie idea. I'm already trying to think of other flavor combinations, but I don't think Cocoa Krispies with strawberry marshmallows would be tasty. But maybe I'm wrong?
Again, my apologies for making two Rice Krispie treats in the span of one week, but I felt that even though they don't involve baking, they were fun twists on Rice Krispie treats (kinda like the Oreo ones I made before).
Neapolitan Rice Krispie Treats
(adapted from erincooks.com)
FYI:
1. The original recipe calls for using a 9 x 13 inch pan. I halved the recipe and used a 9 X 9 inch baking pan. With the 3 layers in that pan, it came to the tippy top of the pan. So I recommend that you use a pan with high sides - regardless of if you half it or not.
2. The original recipe calls for using strawberry fluff for the strawberry layer. I looked long and hard for strawberry fluff but couldn't find it anywhere! I came across strawberry marshmallows (the large ones, same size as the regular ones) at Target and substituted those for the fluff, and followed the directions for regular rice krispie treats instead of the fluff directions (who knew there were different fluff directions?!).
3. The original recipe calls for making rice krispie treats the way I remember making them when I was a kid (the few times that we actually made them) - on the stove top in a pot. But the marshmallow bag that I have at home said to use the microwave, so I did.
4. The ingredients listed below are for the full 9 x 13 inch pan!
Ingredients:
For the Vanilla Layer
3 tablespoons butter or margarine
40 regular marshmallows (that's just under a full bag)
6 cups Rice Krispies cereal
For the Chocolate Layer
3 tablespoons butter or margarine
40 regular marshmallows
6 cups Cocoa Krispies cereal
For the Strawberry Layer
3 tablespoons butter or margarine
40 regular-sized strawberry marshmallows
6 cups Rice Krispies cereal
Directions:
Begin by lining a metal square edged 9” by 13” pan with aluminum foil (I skipped that part)
Use a pan that has high sides.
The original recipe notes that: Casserole dishes with rounded edges will not be able to hold all of the treat layers.
Generously spray your prepared pan with cooking spray (I sprayed the pan directly)
For the "Vanilla Layer" melt the butter in a microwave safe bowl.
Add the marshmallows and toss the marshmallows to coat them.
Put the bowl into the microwave for about 1 and a half minutes, stirring about halfway through, until all of the marshmallows are melted and mixed well.
Quickly stir in the rice krispies until they are completely coated.
Pour the mixture into the prepared pan.
Spray a rubber spatula with cooking spray and then firmly press the marshmallow covered cereal into the pan (I use a piece of wax paper sprayed with Pam).
Place the pan in the refrigerator.
Rinse the bowl and dry well.
Proceed to the Chocolate Layer.
For the "Chocolate Layer" melt the butter in a microwave safe bowl.
Add the marshmallows and toss the marshmallows to coat them.
Put the bowl into the microwave for about 1 and a half minutes, stirring about halfway through, until all of the marshmallows are melted and mixed well.
Quickly stir in the cocoa krispies until they are completely coated.
Pour the mixture into the prepared pan on top of the vanilla layer.
Spray a rubber spatula with cooking spray and then firmly press the marshmallow covered cereal into the pan (I use a piece of wax paper sprayed with Pam).
Place the pan in the refrigerator.
Rinse the bowl and dry well.
Proceed to the Strawberry Layer.
For the "Strawberry Layer" melt the butter in a microwave safe bowl.
Add the strawberry marshmallows and toss the marshmallows to coat them.
Put the bowl into the microwave for about 1 and a half minutes, stirring about halfway through, until all of the marshmallows are melted and mixed well.
Quickly stir in the rice krispies until it is completely coated.
Pour the mixture into the prepared pan on top of the chocolate layer.
Spray a rubber spatula with cooking spray and then firmly press the marshmallow covered cereal into the pan (I use a piece of wax paper sprayed with Pam).
Place the pan in the refrigerator.
When the treats have cooled completely, remove them from the pan.
Place them on a cutting board.
Discard the aluminum foil (If you used it) and cut the large rectangle into slices.
Then cut each large slice into smaller squares.
Enjoy!
I have been wanting to make this recipe for a while, ever since I saw it on Pinterest. The only thing holding me back was the inability to find strawberry marshmallow fluff to make the strawberry layer. But when I was at Target yesterday buying the ingredients for the funfetti Rice Krispie treats, I found strawberry marshmallows! And figuring I could just exchange the strawberry marshmallows for the fluff, I bought two bags.
The other interesting thing is that the recipe called for Cocoa Krispies and regular marshmallows for the cocoa layer. Suffice it to say I was intrigued by this recipe. I've seen chocolate marshmallows, too, so I thought that that may have been how to make the chocolate layer, but I love the Cocoa Krispie idea. I'm already trying to think of other flavor combinations, but I don't think Cocoa Krispies with strawberry marshmallows would be tasty. But maybe I'm wrong?
Again, my apologies for making two Rice Krispie treats in the span of one week, but I felt that even though they don't involve baking, they were fun twists on Rice Krispie treats (kinda like the Oreo ones I made before).
Neapolitan Rice Krispie Treats
(adapted from erincooks.com)
FYI:
1. The original recipe calls for using a 9 x 13 inch pan. I halved the recipe and used a 9 X 9 inch baking pan. With the 3 layers in that pan, it came to the tippy top of the pan. So I recommend that you use a pan with high sides - regardless of if you half it or not.
2. The original recipe calls for using strawberry fluff for the strawberry layer. I looked long and hard for strawberry fluff but couldn't find it anywhere! I came across strawberry marshmallows (the large ones, same size as the regular ones) at Target and substituted those for the fluff, and followed the directions for regular rice krispie treats instead of the fluff directions (who knew there were different fluff directions?!).
3. The original recipe calls for making rice krispie treats the way I remember making them when I was a kid (the few times that we actually made them) - on the stove top in a pot. But the marshmallow bag that I have at home said to use the microwave, so I did.
4. The ingredients listed below are for the full 9 x 13 inch pan!
Ingredients:
For the Vanilla Layer
3 tablespoons butter or margarine
40 regular marshmallows (that's just under a full bag)
6 cups Rice Krispies cereal
For the Chocolate Layer
3 tablespoons butter or margarine
40 regular marshmallows
6 cups Cocoa Krispies cereal
For the Strawberry Layer
3 tablespoons butter or margarine
40 regular-sized strawberry marshmallows
6 cups Rice Krispies cereal
Directions:
Begin by lining a metal square edged 9” by 13” pan with aluminum foil (I skipped that part)
Use a pan that has high sides.
The original recipe notes that: Casserole dishes with rounded edges will not be able to hold all of the treat layers.
Generously spray your prepared pan with cooking spray (I sprayed the pan directly)
For the "Vanilla Layer" melt the butter in a microwave safe bowl.
Add the marshmallows and toss the marshmallows to coat them.
Put the bowl into the microwave for about 1 and a half minutes, stirring about halfway through, until all of the marshmallows are melted and mixed well.
Quickly stir in the rice krispies until they are completely coated.
Pour the mixture into the prepared pan.
Spray a rubber spatula with cooking spray and then firmly press the marshmallow covered cereal into the pan (I use a piece of wax paper sprayed with Pam).
Place the pan in the refrigerator.
Rinse the bowl and dry well.
Proceed to the Chocolate Layer.
For the "Chocolate Layer" melt the butter in a microwave safe bowl.
Add the marshmallows and toss the marshmallows to coat them.
Put the bowl into the microwave for about 1 and a half minutes, stirring about halfway through, until all of the marshmallows are melted and mixed well.
Quickly stir in the cocoa krispies until they are completely coated.
Pour the mixture into the prepared pan on top of the vanilla layer.
Spray a rubber spatula with cooking spray and then firmly press the marshmallow covered cereal into the pan (I use a piece of wax paper sprayed with Pam).
Place the pan in the refrigerator.
Rinse the bowl and dry well.
Proceed to the Strawberry Layer.
For the "Strawberry Layer" melt the butter in a microwave safe bowl.
Add the strawberry marshmallows and toss the marshmallows to coat them.
Put the bowl into the microwave for about 1 and a half minutes, stirring about halfway through, until all of the marshmallows are melted and mixed well.
Quickly stir in the rice krispies until it is completely coated.
Pour the mixture into the prepared pan on top of the chocolate layer.
Spray a rubber spatula with cooking spray and then firmly press the marshmallow covered cereal into the pan (I use a piece of wax paper sprayed with Pam).
Place the pan in the refrigerator.
When the treats have cooled completely, remove them from the pan.
Place them on a cutting board.
Discard the aluminum foil (If you used it) and cut the large rectangle into slices.
Then cut each large slice into smaller squares.
Enjoy!
Labels:
Birthday,
Ice Cream,
Marshmallows,
Neapolitan,
Rice Krispies
Monday, July 22, 2013
Birthday week treat #1: Funfetti Rice Krispie treats
I never need an excuse to bake, but sometimes it's nice to have one. It started with a simple question on the juliebakes Facebook page, "My birthday is less than a week away and I'm trying to decide if I should bake something for my birthday, and if so, what I should bake. All suggestions welcome :)"
One person suggested funfetti. Funfetti is definitely celebratory and birthday-esque, but I had just made a funfetti cake for my sister when she went to Thailand. I tried to think of a new funfetti recipe and then it came to me. Funfetti Rice Krispie Treats!
So I made regular old Rice Krispie treats (which are totally awesome on their own), but added loads and loads of colored sprinkles. Because, honestly lets face it, the only thing that really makes anything funfetti is rainbow sprinkles!
And at work today, I decided that since I'm being overworked at work, the only thing I could do was to attempt to make a birthday treat every weekday of my birthday week. Because I still find baking relaxing. So this is the first installment of my "birthday week treats." Hopefully I'll be able to keep it up all week! Stay tuned for more fun treats!
Funfetti Rice Krispie Treats
(adapted from the Jet Puffed bag)
Ingredients:
3 Tbsp butter or margarine
40 Large marshmallows (I used Jet Puffed, since that's what they had at the store)
6 cups of Rice Krispies
"Loads and loads" of rainbow sprinkles (actually, 2/3 cup to be exact)
Directions:
Grease a 9 x 13 inch baking pan. My preference is Pam, but you could also brush it with some melted butter.
Measure out the cereal.
Add the sprinkles and toss to mix.
Microwave the butter in a microwavable bowl on high until melted (about 45 seconds).
Add marshmallows and toss to coat.
Microwave for 1 minute 30 seconds or until marshmallows are completely melted and mixture is well blended, stirring after 45 seconds. I recommend using a nonstick spatula or a spatula sprayed with Pam.
Add the cereal and sprinkle mixture immediately, and mix well.
Press into the greased pan.
Allow to cool completely.
Cut into 12 squares. Honestly, 12 squares will be HUGE Rice Krispie treats. I recommend cutting them into about 24 squares (4 by 6). But that's just me.
One person suggested funfetti. Funfetti is definitely celebratory and birthday-esque, but I had just made a funfetti cake for my sister when she went to Thailand. I tried to think of a new funfetti recipe and then it came to me. Funfetti Rice Krispie Treats!
So I made regular old Rice Krispie treats (which are totally awesome on their own), but added loads and loads of colored sprinkles. Because, honestly lets face it, the only thing that really makes anything funfetti is rainbow sprinkles!
And at work today, I decided that since I'm being overworked at work, the only thing I could do was to attempt to make a birthday treat every weekday of my birthday week. Because I still find baking relaxing. So this is the first installment of my "birthday week treats." Hopefully I'll be able to keep it up all week! Stay tuned for more fun treats!
Funfetti Rice Krispie Treats
(adapted from the Jet Puffed bag)
Ingredients:
3 Tbsp butter or margarine
40 Large marshmallows (I used Jet Puffed, since that's what they had at the store)
6 cups of Rice Krispies
"Loads and loads" of rainbow sprinkles (actually, 2/3 cup to be exact)
Directions:
Grease a 9 x 13 inch baking pan. My preference is Pam, but you could also brush it with some melted butter.
Measure out the cereal.
Add the sprinkles and toss to mix.
Microwave the butter in a microwavable bowl on high until melted (about 45 seconds).
Add marshmallows and toss to coat.
Microwave for 1 minute 30 seconds or until marshmallows are completely melted and mixture is well blended, stirring after 45 seconds. I recommend using a nonstick spatula or a spatula sprayed with Pam.
Add the cereal and sprinkle mixture immediately, and mix well.
Press into the greased pan.
Allow to cool completely.
Cut into 12 squares. Honestly, 12 squares will be HUGE Rice Krispie treats. I recommend cutting them into about 24 squares (4 by 6). But that's just me.
Subscribe to:
Posts (Atom)