Sunday, October 25, 2015

Salted vanilla caramels

A few weeks ago, while cleaning the apartment, I came across (translate: had misplaced earlier, but found) an Amazon gift card that I received as a gift.  I knew I had to spend it or risk misplacing it again, so I ended up shopping and spending more than the amount on the gift card...But I gained four candy and baking cookbooks.  Four!


The first night I got them I read one from cover to cover, and placed little ripped up pieces of paper to mark the recipes I wanted to try (spoiler: there were a lot!).  One book was late to arrive, and came the other day.  This one was called "Artisan Caramels" (I'll write a different post about this book another time), and it had tons of different caramels in it.  Ones with crusts, ones with toppings, and some interesting flavored ones, too.

With Halloween right around the corner, I had a bunch of candies and candy-related things I wanted to make now.  Some caramels, I figured, would be perfect for a Halloween get together that B and I might attend.  So I started with the salted vanilla caramels, the most basic of flavors in the cookbook.

These caramels were so tasty that I ended up eating the caramel off of the spoon while I was sitting at the computer doing work.  I would've gone back for more but I had already start soaking the pot (damn!).  Clearly, I have no shame.

And with B out of town this week, and Halloween right around the corner, my goal is to make one new flavor of caramels each day this week...wish me luck, since I'm on the schedule at work for 44.5 hours this week and making caramels is quite time intensive... 

Salted Vanilla Caramels
From "Artisan Caramels"

Ingredients:

4 cups heavy cream
4 cups sugar
3/4 cup unsalted butter
2 cups light corn syrup
1 Tbsp vanilla
1 Tbsp coarse sea salt 

Directions:

Spray a jelly roll pan (17.5" x 12.5") pan with a thin layer of cooking spray, making sure you get the sides as well as the bottom of the pan. 
Using a clean, dry paper towel, wipe off the excess. 
Trim a piece of parchment paper so that it covers the bottom of the pan, leaving a 2" overhand over either the handles or the sides.  
Spray the parchment paper again with a light layer of cooking spray and wipe the excess off. 
Set aside. 

Combine the cream, sugar, butter, and corn syrup in a 8-quart stock pot. 
Bring the mixture to a boil, stirring constantly. Be careful -- it can bubble over very quickly if you aren't paying attention. 

Cook over medium-high heat, and continue to stir until a candy thermometer reaches 248 degrees.  This takes about 45 minutes.  

Remove from the heat and very quickly stir in the vanilla and sea salt. 

Pour the caramel into the prepared pan. 
Let it cool completely before cutting.  This takes about 8 hours. 

Remove caramel from the pan. 
Remove parchment paper.  
Cut into squares. 
Top with sea salt.

Wrap caramels in either cello wrappers or parchment squares.  Wrapped caramels have a shelf life of about 3 weeks; those wrapped in parchment tend to get stale faster.

Wednesday, October 14, 2015

Bucatini pie

I've had a long past 2 weeks, and so has B.  We're both working a ton, which is great, but with me leaving really early for work and him getting home from work as late as 11:15 p.m. (!!), I sometimes don't get to see him as often as I'd like (at least during wakeful hours).  Last night we both managed to be home by 9 p.m. and we even ate dinner together.  Turns out that today is my early day at work and he doesn't expect to work late, and I felt like that was cause for a (mini) celebration...or at least a home cooked dinner that was more than a protein and salad (our mainstay).  Honestly, I was probably only looking for an excuse to make this recipe, but heck, maybe I'll throw in a glass of wine and we can have a little party.


This recipe, much like the hummus I made before, is a savory one.  But unlike the hummus, it is baked and it does have the word "pie" in the title.  I've done a few savory things in the past (there was this garlic parmesan pull-apart bread and this killer mac and cheese) that also required baking, so I felt that this was an OK thing to post on this baking blog (which, by the way, turns 4 years old in 2 days!).


We usually make our own pasta sauce, which we call marinara sauce, for our meatballs and pasta.  I decided that, since I was going all out with this homemade bucatini pie, I might as well make some homemade sauce as well.  So I did just that!  We don't have a recipe, per se, but since I'm on this "savory kick," I've added a link to it here and below. 

Just one note about the pasta shape: I love bucatini but have found it difficult to find in the past.  Not all stores carry it.  Much to my dismay, there was no bucatini at either of the two grocery stores or two other bodegas that I checked out.  I used spaghetti instead and it came out really well!

Bucatini Pie
From Food and Wine

Ingredients:

4 Tbsp unsalted butter, melted and cooled
6 large eggs, beaten
1 pound bucatini, broken in half (Bucatini is a long pasta with a hole in the center so that it is actually a tube, also known as Perciatelli)
1.5 cups freshly grated Parmigiano-Reggiano cheese (4 oz)
3/4 cup heavy cream
1/3 cup chopped parsley
1/4 cup extra virgin olive oil
1 Tbsp minced garlic
1 Tbsp freshly ground pepper (no, that is not a typo!)
2 tsp kosher salt

Warm marinara sauce, for serving

Directions:

Preheat the oven to 375F.
Lightly grease a 10-inch cast iron skillet (our cast iron skillet is technically a grill pan, with grooves on the bottom, so I baked this in a regular 9" round metal cake pain, adjusting a little for time since it was a bit thicker).

In a large pot, bring salted water to a boil.
Add the bucatini and cook until al dente (the pasta will continue to cook a little while baking)
Drain the pasta.
Run under cold water to stop the cooking.
Drain well.

In a large bowl, whisk together the butter, eggs, cheese, cream, parsley, olive oil, garlic, pepper, and salt.
Add the pasta and toss to coat.
Scrape into the prepared skillet.
Bake for about 30 minutes, until just set..
Remove from the oven.

Preheat the broiler.
Broil the bucatini pie 6 inches from the heat until golden, about 5 minutes.

Transfer to a rack and let cool for 10 minutes before cutting into wedges.

Serve with warm marinara sauce.

The pie can be kept at room temperature for 4-6 hours before serving.

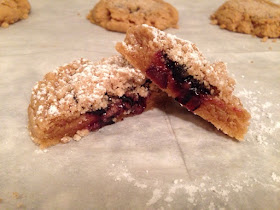
Blueberry coffee crumb cake cookies

Over two years ago, I baked a New York Style Crumb Cake with blueberry jam that my youngest sister absolutely fell in love with!  My self-proclaimed lover-of-savory-foods and hater-of-almost-all-sweet-things sister.  The one that shocked me when she asked me when I was going to bake this for her again.


Once I picked my jaw up off the floor, and after we polished off the cake, I told myself I'd make it for her again.  But then, well, that just never happened.  She's been asking for it a lot again lately, namely for our non-traditional Thanksgiving dinner this year (can anyone say lamb?  That's the proposed protein for the meal....but I digress).


So when I made these Coffee Crumb Cake Cookies for break fast this year, I had the brilliant idea to add blueberry jam to them for my sister.  Because cookies are so much easier to transport than a cake, and plus, the cookies were met with such rave reviews, that I just had to try them with the addition of blueberry jam.  They came out deliciously!

P.S. Don't fret....my sister will still get her coffee cake soon!

Blueberry Coffee Crumb Cake Cookies
Adapted from Cookies & Cups

Ingredients:

For the crumb topping:

1/2 cup butter, softened
1/3 cup brown sugar
1/3 cup granulated sugar
1 tsp cinnamon
1/2 tsp salt
1 2/3 cup flour

For the cookie:

10 Tbsp butter
1/2 cup shortening
1 cup light brown sugar
1/2 cup granulated sugar
1.5 tsp cinnamon
2 eggs
2 tsp vanilla
2 tsp baking powder
1 tsp salt
3 1/3 cup flour

Blueberry jam, about 1/2 cup

Optional:

powdered sugar, for dusting

Directions:

Preheat the oven to 350F.
Line cookie sheets with parchment paper or silicon liner.
Set aside.

Make the crumb topping.
Mix all the crumb ingredients together in a medium bowl.
Cut together with a pastry cutter or a fork until evenly mixed.
Refrigerate while making the dough.

Make the cookies.
Mix together the butter, shortening, and both sugars for 1-2 minutes on medium speed, until combined and smooth.
Add in cinnamon, eggs, and vanilla.
Continue mixing until evenly combined.
Turn mixer to low and mix in baking powder, salt, and flour.
Mix until dough comes together evenly.

Scoop cookies out using a cookie scoop or spoon (about 3 Tbsp) and place on lined cookie sheets.  If using a spoon, roll dough into balls.
Make an indentation in the center of the cookie dough.
Place about 1/4 to 1/2 tsp of jam into the indentation.
Scoop at least 1 Tbsp of the crumb topping into the center of the dough, pressing lightly to stick.  Don't be afraid to cram it in!
Bake cookies for 9-10 minutes, or until edges start to get golden.
Remove from oven and allow to cool for 3 minutes on cookie sheet.
Transfer cookies to a wire rack to finish cooling.

Dust cooled cookies with powdered sugar, if you'd like.

S'mores Rice Krispie treat pops

Remember when I made those heavenly toasted marshmallow Rice Krispie Treats?  The ones with the perfectly toasted marshmallows and browned butter that I intentionally made a double batch of the first time that I made them simply because I knew they just had to be that good, and they were?  Well I turned those into s'mores pops.  Because that's what I do.  (My original intention had been to coat them in melted semisweet chocolate and cover them with graham cracker crumbs, but found this way to be more whimsical).


These are super cute and would be so adorable at a BBQ or bonfire.  Or on your couch in front of the TV.....just sayin'!  Had I been created -- or brave -- enough, I would've used twigs instead of skewers for a more authentic s'mores experiences, but twigs from the ground of NYC shouldn't be anywhere near my food....or at least I believe that!


I thought this shot below was cute but I don't recommend eating them this way!


Smore's Pops

Ingredients:

One batch of Toasted Marshmallow Rice Krispie Treats
2 cups semisweet chocolate chips (you could use Hershey's bars instead, for a more authentic s'mores taste)
12 graham crackers, made into crumbs
Cooking spray

Tools:

Round cookie cutter (mine is about 2.5 inches high, to make sure it was taller than the Rice Krispie treats, a small biscuit cutter would also work)
20-30 wooden skewers

Directions:

Spray round cookie cutter with some cooking spray.
Using a cookie cutter, cut out cylindrical Rice Krispie treats to make them look like marshmallows.
Cut them as close together to ensure that you can get the most cylinders.
Eat the scraps -- this is the best part!

Pulse graham crackers in food processor until they're turned into fine crumbs.
Put in a bowl and set aside.

Melt chocolate in a microwave safe bowl, at 30 second intervals, making sure not to burn it.

Place a skewer in the center of each Rice Krispie treat.
Dip each treat in melted chocolate, the immediately into graham cracker crumbs.
Place them, flat side down on a wax paper coated tray.
Continue until all treats are coated.

Allow chocolate to dry before serving.

Homemade pasta sauce

B and I love to cook together!  I've even been known to type #thecouplethatcookstogethereatstogether with photos of the meals that we make (and eat) together.  And while he does leave the baking to me, he is a great cook!  One of our favorites to make is meatballs (one day I'll post those for you) and homemade sauce.  Today, I'm writing to you about this sauce.


The thing about homemade sauce is that it is really easy to make.  It just involves some chopping, and time and patience, but not much else.  (Confession: I am not Italian, and if you have an Italian grandma, she'll probably tell you that this isn't real sauce, but B and I love it and I can't get enough!)  Again, I know this isn't really baked, but it goes so nicely with a savory dish that I'm having for dinner tonight, so I thought that instead of telling you to serve that with store-bought sauce, I'd let you in our little secret :-)  Sorry, I know I'm jumping around, but it'll all make sense soon.


Anyway, back to this sauce.  There is no actual recipe, no actual amounts of measurements, but I will do the best to approximate everything for you.  Feel free to adjust it to your taste: less garlic, more hot pepper, different kinds of tomatoes, etc.

Homemade Pasta Sauce
B's and my recipe

Ingredients:

1/3 cup olive oil
4-6 cloves of garlic, sliced
1 medium-to-large yellow onion, diced about 1/3"
1 box (750 mL) San Marzano crushed tomatoes
1 box (750 mL) San Marzono diced tomatoes
Salt, to taste
Pepper, to taste
Crushed red chili peppers, dried
Pinch of sugar
8-10 large fresh basil leaves (or more, if leaves are small), chiffonaded

Directions:

Put olive oil in large sauce pan or dutch oven, making sure that it covers the bottom of your pan.
Warm over medium flame until oil is hot.
Add diced onions.
Sautee until almost translucent.
Add in garlic slices.
Continue cooking until garlic is soft and pale.
Add both boxes of tomatoes, being careful because they can splatter.
Add a sugar, salt, pepper, and crushed red pepper flakes.
Mix well.

Keep the sauce on a medium flame and stir occasionally so that it doesn't stick to the bottom of the pan.
Taste, and add more salt, pepper, and chili flakes to your liking.
At this point, you can lower the heat to medium-low.
Continue cooking until sauce is reduced and thickened, about 1 hour.
Stir in fresh basil, and allow to cook for 5-10 more minutes.

Serve with anything -- pasta, meatballs, or this bucatini pie!

Monday, October 12, 2015

Salted caramel popcorn

I can't be the only one who has had one of these moments in the kitchen.  You're following a recipe to a T and then all of a sudden you have an 'oh crap' (I usually use a different four-letter word) moment.  Where you fear something has gone terribly wrong (and it usually has)?  Like the burning caramel in the bottom of the pot.  Well in this case, it was what I thought was burnt caramel and actually wasn't (or maybe it was?  As compared to the popcorn in the original post, my caramel is way darker).  But I ended up pouring some of what I thought was burnt caramel out, and my popcorn didn't get totally and completely covered in delicious salted caramel. Which is actually ok.  But I was more impressed with my disaster-averted.


But let me get back to this salted caramel popcorn.  Because first, it's the best combination of salty and sweet.  And secondly, it's really easy (as long as you don't burn the caramel)!


I ended up seeing mimi popcorn kernels on the shelf at the supermarket and I decided that they would probably be the best for caramel popcorn since their surface area to popcorn ratio was high -- meaning more caramel per kernel for a better bite. B thought that I had overthought the popcorn size, but I guess that's the science nerd in me coming out.  Plus, he got a tastier popcorn so I really don't think anyone lost out on this deal!


Salted Caramel Popcorn
From Cookies & Cups

Ingredients:

1/2 cup unpopped popcorn kernels (about 16 cups popped corn)
1 cup salted butter
1 cup light brown sugar
1/3 cup light corn syrup
1.5-2 tsp kosher or sea salt, divided
2 cups of nuts, optional

Directions:

Preheat oven to 300F.

Line a large baking sheet with parchment paper or a silicone mat.
Set aside.

Pop popcorn kernels using air popper into a large bowl (I don't have an air popper, and popping it the old fashioned way in a pan with a little bit of oil worked nicely...just move it to a bowl before proceeding).
If using nuts, add them here.

In a small sauce pan, melt the butter, brown sugar, corn syrup, and 1 tsp of salt together of medium heat.
Bring to a boil.
Boil for 4 minutes without stirring.

Pour caramel mixture over popcorn.
Stir to coat evenly.

Pour popcorn onto lined pan.
Sprinkle remaining salt on top (I skipped this part).
Place pan in the oven.
Bake for 30 minutes, stirring every 10 minutes.

Allow popcorn to cool on a parchment lined counter.

Scotcheroo bites

As someone who has been blogging about my baking for nearly four years (JulieBakes' birthday is 10/16!!), I've read a lot of other food blogs to find the best recipes to make for you guys. Lately, there have been lots of Scotcheroo recipes. Which is funny because I had never really heard of tem before, but once I started reading them, I realized they were the same as the 'peanut chews' we get as gifts at work sometimes (and which I cannot, for the life of me, stop eating, no matter how diet unfriendly they are).  So I knew I kinda had to make them.  It was only a matter of time...


Scotcheroos are usually made into bars, like Rice Krispie treats, and are topped with a milk chocolate or a milk chocolate-butterscotch topping.  Then I saw this recipe for what they called Scotcheroo Millionaire Nuggets. Or basically a Scotcheroo truffle - the peanut butter-Rice Krispie mixture is shaped into balls and allowed to harden before being dipped in the same chocolately topping as is used on the bars.  And I even made some like that.  But because I don't love butterscotch and because I found a caramel flavored milk chocolate, I used a mixture of regular and caramel milk chocolate, but it ended up being too soft and started melting the minute B held one to take a bite.  So instead I drizzled some of the bites with the chocolate mixture to add some delicious flavor but to also make them less messy to eat!  But honestly, it's because I personally prefer them sans chocolate (which is weird for me, a self-proclaimed chocoholic!).


I have to say that these are so tasty that I was snacking on them all day while I baked some other treats for you!


Scotcheroo Millionaire Nuggets
From Oh, Sweet Basil

Ingredients:

1 cup light corn syrup
1 cup sugar
1 cup peanut butter
4 cups Rice Krispies cereal (Mine were a bit runny, so I added an extra 1/2 cup of cereal)
6 oz milk chocolate (or 12 oz if not using butterscotch, see below)
6 oz butterscotch chips

Directions:

In a sauce pan over medium heat, pour in the corn syrup and sugar.
Allow to cool, stirring occasionally, until clear and the sugar is totally dissolved.
Add the peanut butter and stir until smooth.

In a large bowl, add the cereal and pour the peanut butter mixture in.
Gently fold to combine.
Set aside for 5-10 minutes to cool (or a bit longer, hot sticky peanut butter syrup stuck on your hands is not pleasant....trust me!).

Lay wax paper or parchment paper on a cookie sheet.
Begin rolling the cereal-peanut butter mixture into balls.
Set aside on cookie sheet to cool entirely.

Meanwhile, in a glass measuring up or bowl, melt the chocolate and butterscotch (if using) until smooth.

One at a time, drop the balls into the chocolate mixture.
Using a fork, roll it around to coat it and then lift it out, tapping the sides gently to allow excess chocolate to drip off.
Place on cookie sheet.
Repeat until all are coated in chocolate.
Store in a cool place to allow the chocolate to harden.

Store in airtight containers (if they last that long!!!). 

Saturday, October 10, 2015

Spiced apple cider marshmallows

Last fall I made pumpkin spice marshmallows.  They were actually tasty, despite my dislike of pumpkin and pumpkin pie spices.  I gave them out to friends and family and they were met with such rave reviews!  So this fall, I figured why not try something new?  Another fall themed marshmallow?


So I went with my favorite fall beverage, apple cider.  I simply loooooove it!  It's the only drink with calories I'll have (besides coffee with milk and booze).  I'm not a juice drinker (I actually hate apple juice), but I love apple cider.  So when I saw it on the shelves in the grocery store last week, I bought myself a quart.  


Which brings me back to these marshmallows.  At first I thought about how to get the apple flavor into them (they started out in my head as apple pie marshmallows).  At first I thought I'd use some apple sauce.  Then I realized that I had the apple cider in the fridge.  So I went with all apple cider to make sure that I got that appl-y good flavor just right!  (But I'm sure I'll get back to those apple pie marshmallows soon enough!)  


Spiced Apple Cider Marshmallows

Ingredients:

For the marshmallows

1 cup of your favorite apple cider, divided
3 Tbsp. + 1 1/2 tsp. unflavored powdered gelatin (3 envelopes – envelope is 1/4 oz. each, for 3/4 oz. total)
2 cups granulated white sugar
1/2 cup light corn syrup
1/2 tsp. fine salt
1/2 tsp cinnamon
1/4 tsp ground ginger
1/8 tsp nutmeg
pinch of ground cloves (more to your taste, I'm personally not a huge fan)

For the coating

3/4 cup powdered sugar
1/2 cup corn starch
1 tsp ground cinnamon

Directions:

Spray a 9x9 or 7x11 inch baking pan and line with parchment paper (Recommendation: cut to fit flat on the bottom, with the edges of the paper over-hanging the sides. The ends are fine just sprayed.)

In a stand mixer fitted with a whisk attachment, pour 1/2 cup of apple cider
Mix a few times to allow them to mix.
Sprinkle the gelatin over the cider.
Let stand.

In a medium saucepan over high heat, stir together the sugar, corn syrup, salt and the remaining 1/2 cup of cider.
Stir until sugar dissolves and mixture begins to boil.
Stop stirring and once mixture comes to a rolling boil, continue boiling for 1 minute.
Remove from the heat.
Pour the mixture into a 2-cup glass measuring cup, to make it easier to pour into the mixer.  *The mixture is very, very, very hot.  Be extremely careful!*

Turn the mixer to low and mix the gelatin a bit to loosen.
Very slowly and carefully add the hot sugar mixture by pouring it gently down the side of the bowl.
Continue to mix on low until all the sugar mixture is added.

Turn the mixer to high and whip the mixture for 10 to 12 minutes until the marshmallow batter almost triples in size and becomes very thick and opaque.

While the mixer is going, mix the spices in a small bowl.
Stop the mixer, add the spice mixture, and then whip briefly to combine.

Transfer the mixture to the prepared baking pan and use a spatula or bench scraper to spread the marshmallow evenly in the pan, pushing it down into the corners.
Work quickly, as the marshmallow becomes more difficult to work with as it begins to set.

Spray a sheet of plastic wrap really well with cooking spray and lay it across the top of the marshmallow, sprayed side down.
Smooth the plastic wrap on top of the marshmallows a bit to seal it smoothly and tightly against the mixture.

Leave the marshmallow to set at room temperature for at least 3 hours or, even better, overnight.
The marshmallow will be too sticky and soft to cut if you try too soon.

Meanwhile, mix the coating ingredients in a bowl.

When marshmallows are ready, grab the edges of the parchment and lift the marshmallows from the pan.
Remove the plastic wrap from the top and fold down the parchment on the sides.
Using a pizza cutter or a large knife, cut the slab into 1x1 inch squares.
Roll each of the freshly cut marshmallow squares in the coating mixture.
Put them on a baking sheet to dry slightly before packaging them up (about 30 – 45 minutes).

Saturday, October 3, 2015

Pumpkin spice latte cupcakes

It's early October in New York City, and despite last week being sunny and in the 70s, this weekend is utterly cold (last night it was below 50 degrees!) and rainy.  Doesn't help that there's a hurricane threatening to dump more rain and wind on us in the next few days.  So I figured a homemade cupcake version of the Starbucks pumpkin spice latte (which aficionados of the drink affectionately refer to as a PSL, I hear) -- which is synonymous to most people with fall -- was the perfect treat to bake today!


I'm not a huge pumpkin spice fan, but I decided to give these a go anyway.  Part of it was that they were perfect for this weather, and part of it is because I was less likely to eat them all.  Plus, I really really really wanted to try this cream cheese whipped cream frosting.  Because how awesome does that sound?!


Pumpkin Spice Latte Cupcakes
From Brown Eyed Baker

Ingredients:
Makes 12 cupcakes (I got 18) with extra icing

For the Cupcakes:

1 1/3 cups flour
4 1/5 tsp espresso powder
1 tsp baking powder
1 tsp baking soda
1/2 tsp salt
1/2 tsp ground cinnamon
pinch of nutmeg
pinch of cloves
3/4 cup canned pumpkin
1/2 cup granulated sugar
1/2 cup dark brown sugar (packed)
1/2 cup vegetable oil (I used canola, since that's what I had)
2 eggs
1/4 cup brewed coffee, for brushing

For the Frosting:

8 oz cream cheese, at room temperature
1/2 cup granulated sugar
1 1/2 tsp vanilla extract
2 cups heavy cream

For the Garnish:

Ground cinnamon
Salted caramel sauce
Coffee syrup (optional)

Directions:

Make the cupcakes.
Preheat the oven to 350F.
Line a 12-cup muffin pan with paper liners.
Set aide.

In a medium bowl, whisk together the flour, espresso powder, baking powder, baking soda, salt, cinnamon, nutmeg, and cloves.
Set aside.

In a large bowl, whisk together the pumpkin, both sugars, and the oil until completely combined.  Make sure to break up any clumps of brown sugar.
Whisk in the eggs, 1 at a time.
Add the flour mixture in 2 additions, folding with a rubber spatula (I continued to use my whisk) until no flour pockets remain.

Divide the batter between the baking cups, filling each about 2/3 full.  I opted to fill mine until they were 2/3 full and ended up with 6 extra cupcakes, although one was a bit small).
Bake until a toothpick inserted into the center comes out clean, about 18-22 minutes (mine were done at 18 minutes).
Allow to cool in the pan for 5-10 minutes.
Remove cupcakes and leave to cool on a wire rack.
While the cupcakes are still warm, brush the tops with the brewed coffee (next time I might try some coffee syrup instead).
Let each coat soak in before applying the next one.  I only did 2 coats each since I didn't want them to get soggy.
Allow the cupcakes to cool completely before frosting.

Make the frosting.
On medium speed, beat the cream cheese, sugar, and vanilla extract in a mixer with the whisk attachment until smooth and completely combined, about 2 minutes.
Slowly add the cream and scrape the side of the bowl.
Increase speed to medium high and whip until stiff peaks form.

Assemble the cupcakes:
Pipe the frosting onto the cupcakes.
Sprinkle with cinnamon.
Drizzle with caramel sauce, coffee syrup, or both, if desired.

Serve immediately, or store in an airtight container in the fridge for up to 3 days.

Salted caramel sauce

I just made the most delicious salted caramel sauce.  Granted it was part of another recipe that I'm working on now, but it's just so tasty, and has so many uses, that I decided it needed it's own post (truth be told, so did the original blogger, so I'm not that far off).


Hell, this would probably go really well on ice cream, maybe even with some of that coffee syrup I made earlier today.  Oh man, I might be onto something!  A caramel macchiato ice cream sundae?  How awesome would that be?!


I didn't have fancy salt at home, so I used regular salt, but cut down on the amount.  It came out perfectly salty and sweet and gooey and awesome!  I keep going back into the kitchen to taste a spoonful, and I'm not a huge caramel fan.  Although B is, and when he gets home from work today, I think he might just love me a little bit more ;-)

I actually cut the recipe in half because I only needed it for a cupcake recipe, but I'm really regretting that now...

Homemade Salted Caramel Sauce
From Brown Eyed Baker

Ingredients:

2 cups granulated sugar
12 Tbsp unsalted butter, at room temperature, cut into pieces
1 cup heavy cream, at room temperature (oops....mine was cold)
1 Tbsp fleur de sel (or any other flaky sea salt) -- I didn't have, so I used regular salt, but went down to 2 tsp

Directions:

Get all of your ingredients ready and set aside -- this who recipe comes together quickly and a few seconds can be the difference between heavenly salted caramel sauce and a burnt mess!!

Add the sugar in an even layer over the bottom of a heavy sauce pan (make sure it can hold at least 2-3 quarts).
Heat the sugar over medium-high heat, whisking it as it begins to melt.  You'll see that the sugar will begin to form clumps, but that's OK.  Keep whisking, and as it continues to cook, they will melt back down.
Stop whisking once all of the sugar has melted.
Swirl the pan occasionally while the sugar cooks.

Continue cooking until the sugar has reached a deep amber color -- this happened WAY quicker than I thought it would.  So watch.  it.  CLOSELY.  It should look almost reddish-brown, and have a slight toasted aroma.  This is the point where it can co from perfect caramel to burnt in a matter of seconds, so keep a close eye.  If you're using a instant-red thermometer, cook until the sugar reaches 350F (a good tip for beginners).

As soon as the caramel reaches 350F, add the butter all at once.  Be careful as the caramel will bubble up when the butter is added.
Whisk in the butter until it is completely melted.

Remove the pan from the heat and slowly pour in the cream.  Again, be careful because the mixture will once again bubble up ferociously.
Whisk until all of the cream has been incorporated and you have a smooth sauce.
Add the salt and whisk to incorporate.

Set the sauce aside and let cool for 10-15 minutes.
Pour into your favorite glass jar and let cool to room temperature.
You can refrigerate the sauce for up to 2 weeks.  You'll want to warm the sauce before using.

Coffee syrup

I missed National Coffee Day.  I'm not proud to admit it, but I feel the need to come clean.  In an attempt to make up for it, I made some espresso brownies two days later.  I had intended to make them for national coffee day, but time got away from me.  I also planned to make this coffee syrup.  Seems simple enough -- coffee syrup.  I thought it would be good on ice cream (which I've never made, but would love to try)...or anything for that matter!


The recipe is easy: two ingredients, in equal parts.  So you can modify it as you want.  The original calls for 4 cups, but I went down to 3.  Easy peasy!  And the best part?  It's super tasty!  Plus, it stays for days, in case you're wondering "what on earth am I going to do with four cups of coffee syrup?!" (Don't worry, it does cook down.) The possibilities really are endless!

Coffee Syrup
Found on the KitchenAid Blog

Ingredients:

4 cups brewed coffee
4 cups sugar

(Just remember, it's a 1:1 ratio, so you can adjust easily.  I went with 3 cups coffee to 3 cups sugar, since I had under 4 cups of coffee when I brewed it.  It yielded about 2 3/4 cups of syrup.)

Directions:

Combine the coffee and sugar in a sauce pan.
Bring to a boil.
Once boiling, reduce heat to medium and moderately boil for about 1 hour, or until your preferred thickness.  (Syrup will thicken as it cools.  You can test the final thickness of the syrup while it is still hot by placing some on a metal spoon and chilling in the freezer for a minute or two, until the underside of the spoon is no longer warm.  Test the consistency and if needed continue boiling and testing every 5-10 minutes.)

When the syrup is at your desired consistency, allow the syrup to cool completely and then store in the fridge.
The colder the syrup, the thicker the consistency, so if you want to use it the same day, chill it for as long as possible.

Espresso brownies

Tuesday was National Coffee Day.  I don't know who comes up with these national food holidays, but I would like to thank the person who came up with this one.  I am obsessed with coffee!  I used to spend many of my waking non-work moments studying in Starbucks when I was a grad student (both times, all three of you count that second bachelors...), and I still frequent the chain, but lately I've been seriously crushing on the iced americanos from this little coffee shop in my neighborhood, Laughing Man (and in case you don't live in my neighborhood -- if you do, stop by and say hi! -- and want to sample it, I just read the coffee is available for Keurig!!).


But I digress.  Enough about my favorite coffee (I could go on and on).  Back to what I had been saying: It was national coffee day, and I didn't have a coffee treat for you guys.  I could've let it go by unnoticed. I could've made the coffee syrup that I saw online that day (that'll be coming soon), but with nothing to put it on it would've been sad.  So I decided to wait and make something good.  Like these espresso brownies.  Which are really just a modification of these yummy brownies I made for Yom Kippur break fast (and on Valentine's Day last year).  Because they're so freaking good, and because when pumped up with espresso flavor, they can take the place of a brownie and a cup of coffee -- a two-for-one deal.


Wait!  Am I rambling?  I think I may be rambling.  I don't know why I'm so hopped up.  Oh, right, maybe it's because I licked the batter?  The batter with 3 tablespoons of espresso powder? Yeah, maybe that's it.  Why am I still rambling??


OK, meltdown aside, these brownies are awesome.  The espresso goes so nicely with the chocolate in the brownie, you might even be able to call them mocha, but I like the ring of espresso brownies better.  And they'll give you a little buzz, but in a good mellow I-just-had-a-shot-of-espresso way. Lip smacking good!  

P.S. I don't think anyone would fault you if you enjoyed one of these with a cup of coffee!

Espresso Brownies 
Adapted from these heavenly Fudge Brownies from Yammie's Noshery

Ingredients:

2 sticks of butter
2 1/4 cups of sugar
4 large eggs
1 Tbsp vanilla
1 1/4 cups of cocoa powder (I used Dutch press)
1/2 teaspoon salt
1 teaspoon baking powder
1 1/2 cups of flour
2 cups chocolate chips
3 Tbsp espresso powder

Directions:

Grease a 9 x 13 inch pan.
Preheat the oven to 350 degrees.

Mix together the butter and sugar in a microwave safe bowl.
Heat in the microwave, stirring about every 30 seconds, until the mixture is bubbly and smooth (mine was smooth, but not so bubbly).  You can also do this on the stove.

Add in the eggs and vanilla and beat until smooth.
Add the espresso powder and mix well to incorporate.
Mix together the cocoa powder, salt, baking powder, and flour.  I just sifted it into the butter mixture, in about 3 additions.
Add to the butter mixture, mixing until smooth.
Stir in the chocolate chips.

Pour the batter into the prepared pan.
Bake for about 28 minutes.  I baked mine for 25 minutes.  They were delicious, but very gooey when they came out of the oven.  They did set up nicely when the cooled.

Thursday, October 1, 2015

Salted browned butter Rice Krispie treat white chocolate cones

Remember when I made those poppable Rice Krispie Treats?  Well as soon as I made them, I had two simultaneous ideas.  One was that I should make them with browned butter, because it just makes everything better, and then other idea was "why not put them on mini ice cream cones?" because I thought they'd make super cute treats!


I'd say I was right, no?  I made these fall themed because it's pretty darn coool out today, and also because I had picked up these adorable mini leave sprinkles that I just had to use.  I chose white chocolate because I thought it would contrast with the fall colors of the leaves, but dark or milk chocolate would work just as well.


Rice Krispie Treat Ice Cream Cones
Loosely adapted from the poppable Rice Krispie Treat recipe from Cookies & Cups

Ingredients:

1/3 cup nonpareil sprinkles, in your choice of color or combination
1/3 cup sprinkles of your choosing (I chose mini leaves for fall)
2 Tbsp butter
2 cups mini marshmallows
Pinch of salt
2 cups Rice Krispies Cereal
1-1.5 cups chocolate or white chocolate chips
18-24 mini ice cream cones, depending on the size of your Rice Krispie Treat balls

Decorations for the top could include:
Melted dark or white chocolate
More sprinkles
Red M&Ms (to look like cherries!)

Directions:

Line a baking sheet with parchment paper.
Set aside.

Place nonpareil sprinkles in a bowl.
Place other sprinkles on a small shallow plate
Set both aside.

Melt the butter in a medium sauce pan over low heat.
Allow butter to brown, watching closely so it does not burn.
Add the mini marshmallows into the melted butter.
Stir frequently until the marshmallows are melted and smooth.
Immediately remove from the heat.

Stir in the cereal.
Allow to cool for 5 minutes.

Lightly grease your hands and form the Krispie Treat mixture into 1 Tablespoon-sized balls.

If using nonpareils, immediately roll each ball into the sprinkles, coating evenly (I skipped this part this time).
Place each ball onto the lined baking sheet.
Repeat the process with the remainder of the Rice Krispie Treat mixture.
Allow balls to set before proceeding.

Set up a rack so that mini ice cream cones can stand upright.  I find the best way to do this is to cut little "x"s in the ice cream cone box.
Melt the chocolate chips in a microwave safe bowl until smooth, mixing every 30 seconds to make sure it doesn't burn.
Fill the cone with melted chocolate (you can skip this step if you'd like).
Dip the top 1/4 to 1/2" of the ice cream cone in the chocolate (it's OK if some of the chocolate from the cone drips out) and then immediately into the sprinkles and then immediately stick the cooled Rice Krispie Treat ball on top (it should stick because the chocolate is still wet....if not, just dip the bottom of the Rice Krispie Treat Ball in the chocolate and then affix it to the cone).
Leave upright and allow chocolate to harden.

Decorate with melted chocolate and more sprinkles and/or an M&M "cherry."