Delaying gratification is not a strong suit of mine. So that new cake pop baking pan that I bought earlier today? Well yeah, I couldn't wait to use it. Nope, couldn't wait till next weekend, or even tomorrow. Passover ended at sundown on Saturday, and I could bake "real" baked goods again. So new pan + being allowed to bake things that actually rise = must use new pan that night. It's a character flaw, but one that I have embraced.
This new cake pop pan also has an additional advantage. I can make funfetti cake pops! Funfetti cake has been all the rage lately, and I wasn't sure that my original cake pop recipe would work with funfetti cake (I thought with all the mixing that the colored speckles would disappear and I'd just end up with a slightly off white cake pop center). But this way, it should work well. And I can adorn them with sprinkles to mimic the funfetti sprinkles inside. Genious! At least I think so ;-)
And....just to mix things up a bit, I decided to make these into Ice Cream Cone Cake Pops. Yup, you read that correctly! I mean seriously, are these not THE cutest thing in the whole wide world....ever?!
There's only one problem. Remember that inability to wait for just about anything baking-related? Well I tried removing the cake balls before they were completely cooled and I ended up breaking 17 of the 18 cake balls in the first tin right in half. So I reverted back to my crumbled-cake-plus-icing cake balls, and made the first batch with those while I baked the second batch of cake balls up.
My Directions:
All you'll need are the regular ingredients for cake balls or cake pops (a box of your favorite store bought cake mix, the ingredients on the back of the box, and about 1/2 can of an icing flavor that goes with the cake flavor), 2 boxes of ice cream cones (with about 1-2 inches cut off the top), and candy coating or chocolate....lots of it!
Start by baking the cake according to the directions on the box, allowing it to cool, and crumbling it into a bowl.
Mix in about 1/2 container of regular icing.
Shape into balls (I like to leave mine in the fridge overnight as I find them easier to handle that way).
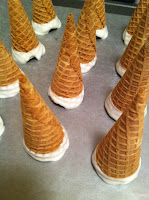
Cut 1-2" off of the top of the ice cream cones
I chose to dip the top 1/2" of the cones into the candy/chocolate coating, but you don't have to.
Dip cake balls into coating and then place on wax paper or parchement paper-lined sheets. If using sprinkles, make sure to put them on when the coating is still wet.
Let the coated (and decorated) cake balls harden so that you can handle them.
Dip the top of the cone into the coating and apply the cake ball.
Place upright in a styrofoam block, then chill.
(The directions from the CandiQuik blog are a little different, and probably a little more logical than the way I made them. Those can be found by clicking on the link above, Ice Cream Cone Cake Pops.)


I can adorn them with sprinkles to mimic the funfetti sprinkles inside. Genious! At least I think so ;-) gluten free ice pops
ReplyDelete